 English
 Français
 Deutsch
 Español
Getting Started
Campaign Wizard: complete guide to every setting
A step-by-step guide to every section of the YieldBI Campaign Wizard, from templates and naming to targeting, tracking, ad set settings, and review.
YieldBI TeamGrowth ResearchUpdated Sep 2026
The Campaign Wizard builds a complete Meta campaign in three stages: Campaign, Ad Set (Targeting, Tracking, and Settings), and Review. Each section below starts with an annotated screenshot. The numbered notes under each image match the numbers in the screenshot, and numbering starts again at 1 in every section.
To open the wizard, go to Campaigns and select New Campaign. Choose an active Meta ad account first; the campaign form will not open without one. This wizard creates the campaign and its ad sets. You create the ads separately afterward.
Stage 1: Campaign
1. Start from a template
Templates save a whole campaign setup so you can launch the same structure again without rebuilding it.
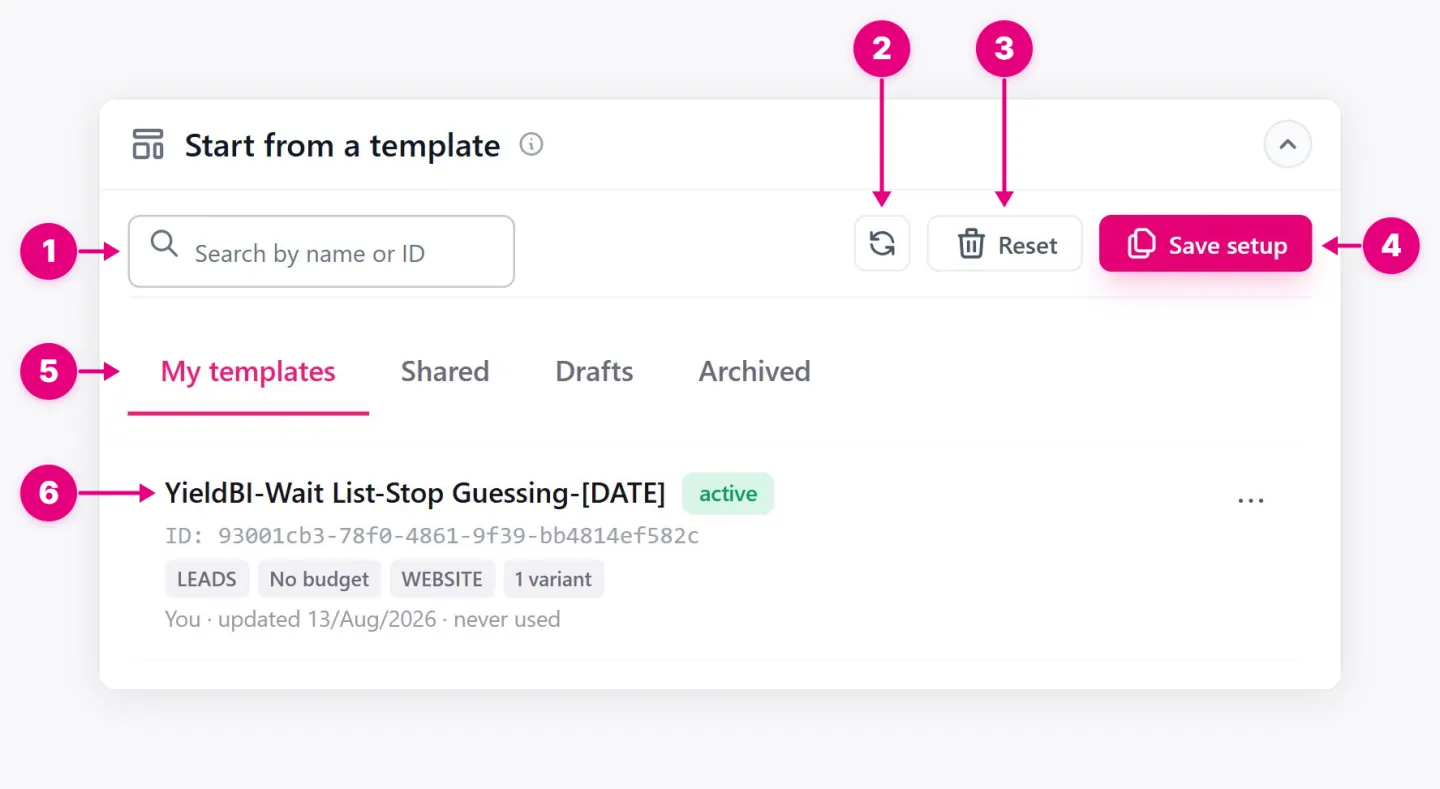
- Search. Finds a saved template by its name or ID.
- Refresh. Loads templates your teammates saved since you opened the wizard.
- Reset. Clears the wizard back to its default settings.
- Save setup. Saves everything currently in the wizard as a reusable template.
- Tabs. Separate your own templates, templates shared with your team, unfinished drafts, and archived templates.
- Template card. Summarizes a template’s objective, budget, destination, and number of variants so you can pick the right one before loading it.
2. Campaign Name
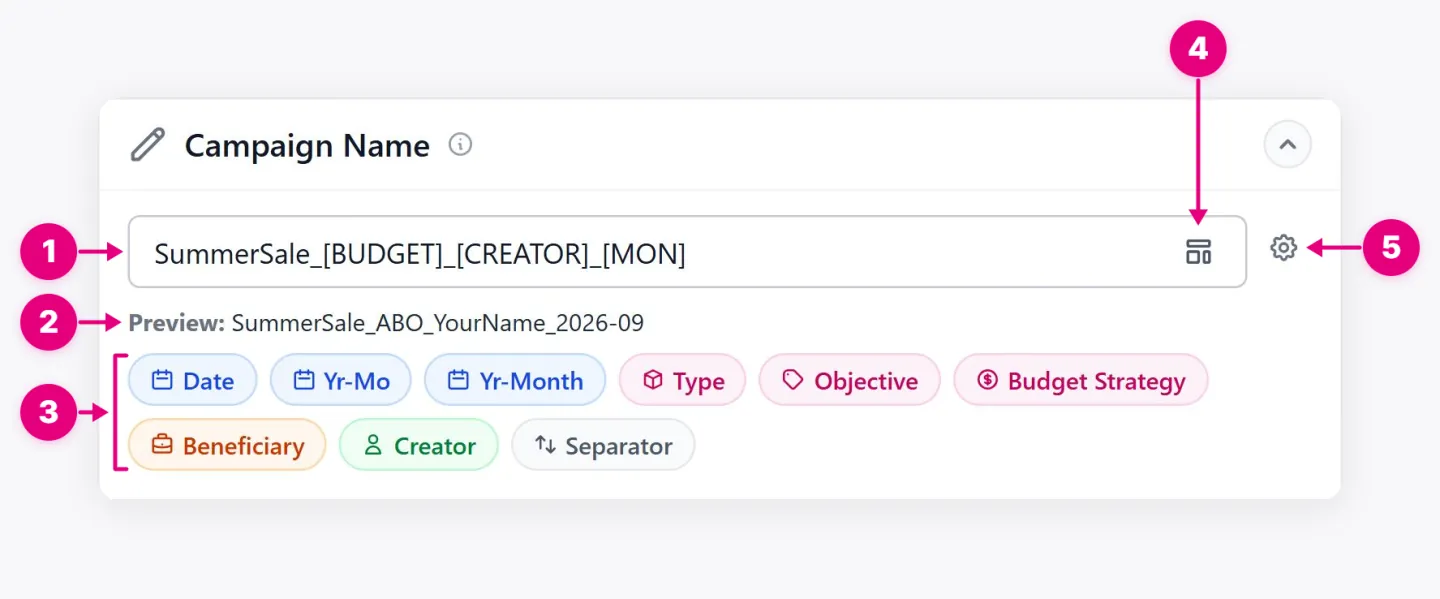
The campaign name is how you find, filter, and compare campaigns in YieldBI and in Meta Ads Manager. This section helps you build names that follow one consistent pattern across your whole team, without typing them by hand.
-
Name field. Where the campaign name is built. Combine your own text with naming tags so every name carries the same information in the same order.
-
Preview. Shows the finished name with every tag filled in, so you can confirm exactly what will appear in reports and in Meta Ads Manager before you continue.
-
Naming tags. Add campaign details to the name automatically, so names stay accurate and consistent without manual typing. Each tag fills in from the campaign’s own settings:
Tag Adds Date The creation date Yr-Mo Year and month in numbers Yr-Month Year and month name Type The campaign type, such as Acquisition Objective The campaign objective, such as Sales Budget Strategy Whether the budget is set per campaign (CBO) or per ad set (ABO) Beneficiary The brand the ads are for Creator The person who built the campaign Separator The character that separates each part of the name -
Template browser. Opens your saved naming patterns so you can reuse one instead of rebuilding it, and lets you save the current pattern for next time.
-
Separator settings. Chooses the character placed between each part of the name, so names match the format your team and reporting tools expect.
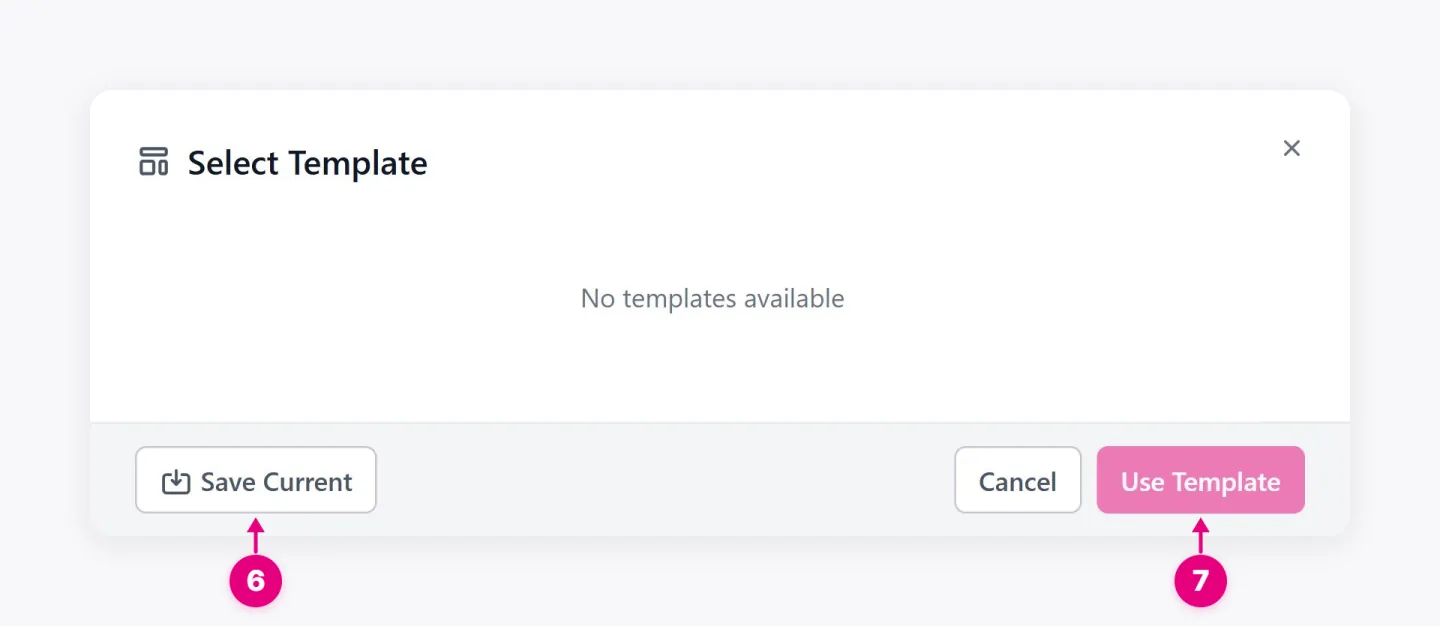
- Save Current. Saves the pattern in the name field as a reusable template.
- Use Template. Applies the selected template to the name field, giving the campaign the same naming structure as the campaigns built before it.
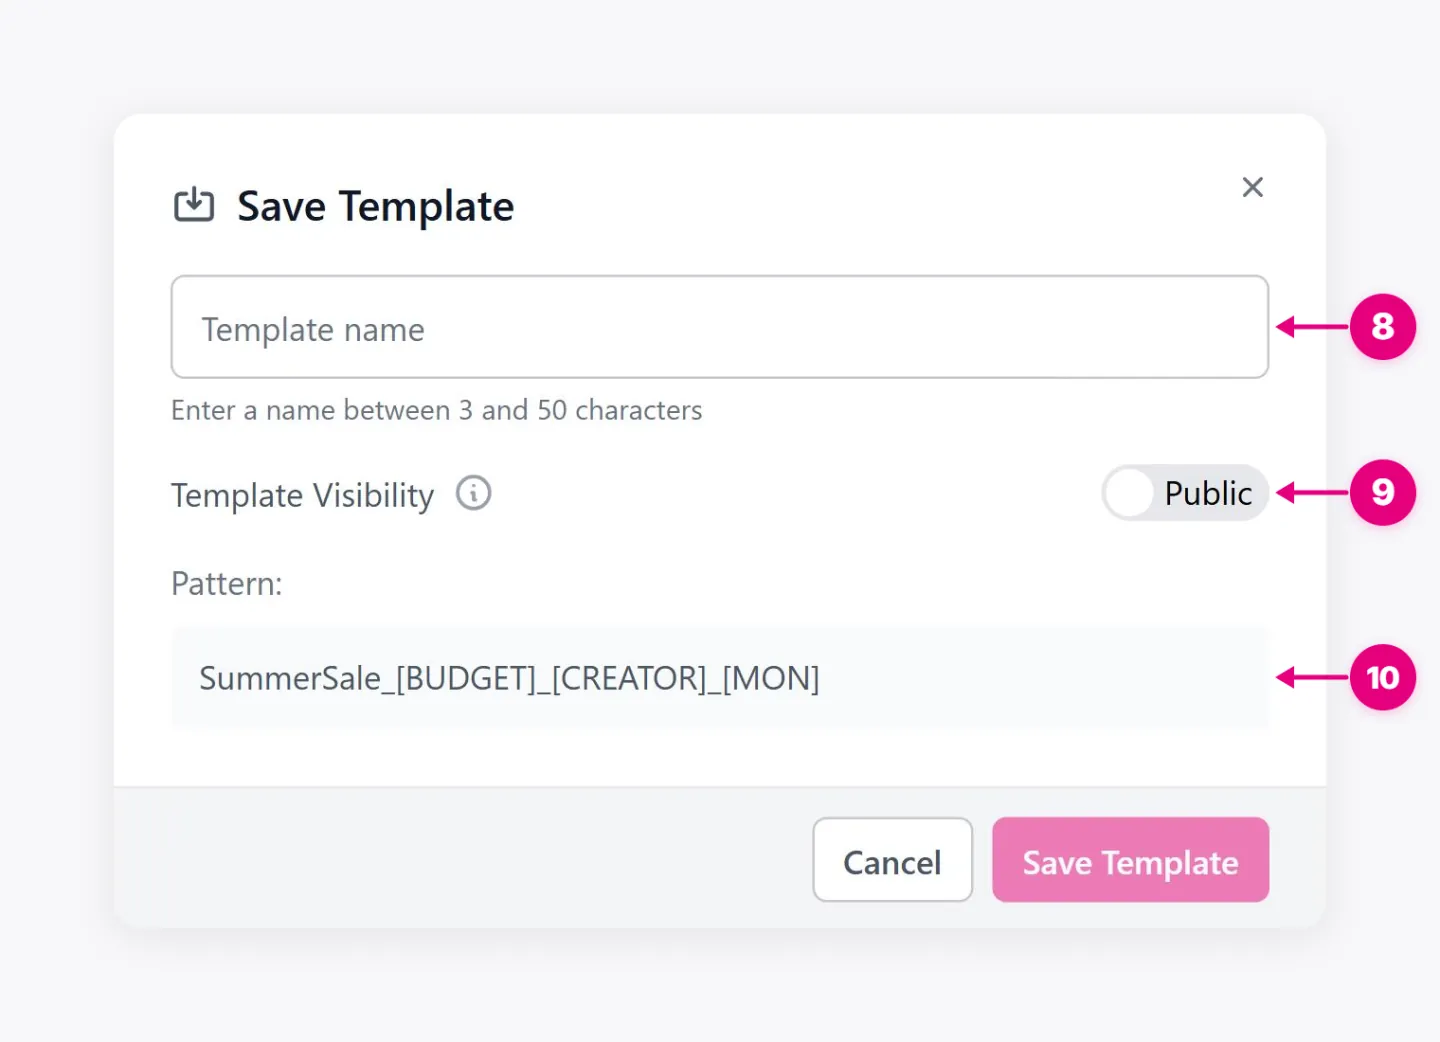
- Template name. Identifies the template so you and your teammates can pick the right pattern later.
- Template Visibility. Decides who can use the template: only you, or everyone in your YieldBI organization when set to Public.
- Pattern. Shows the naming structure that will be saved, including its tags, so you can confirm it before saving.
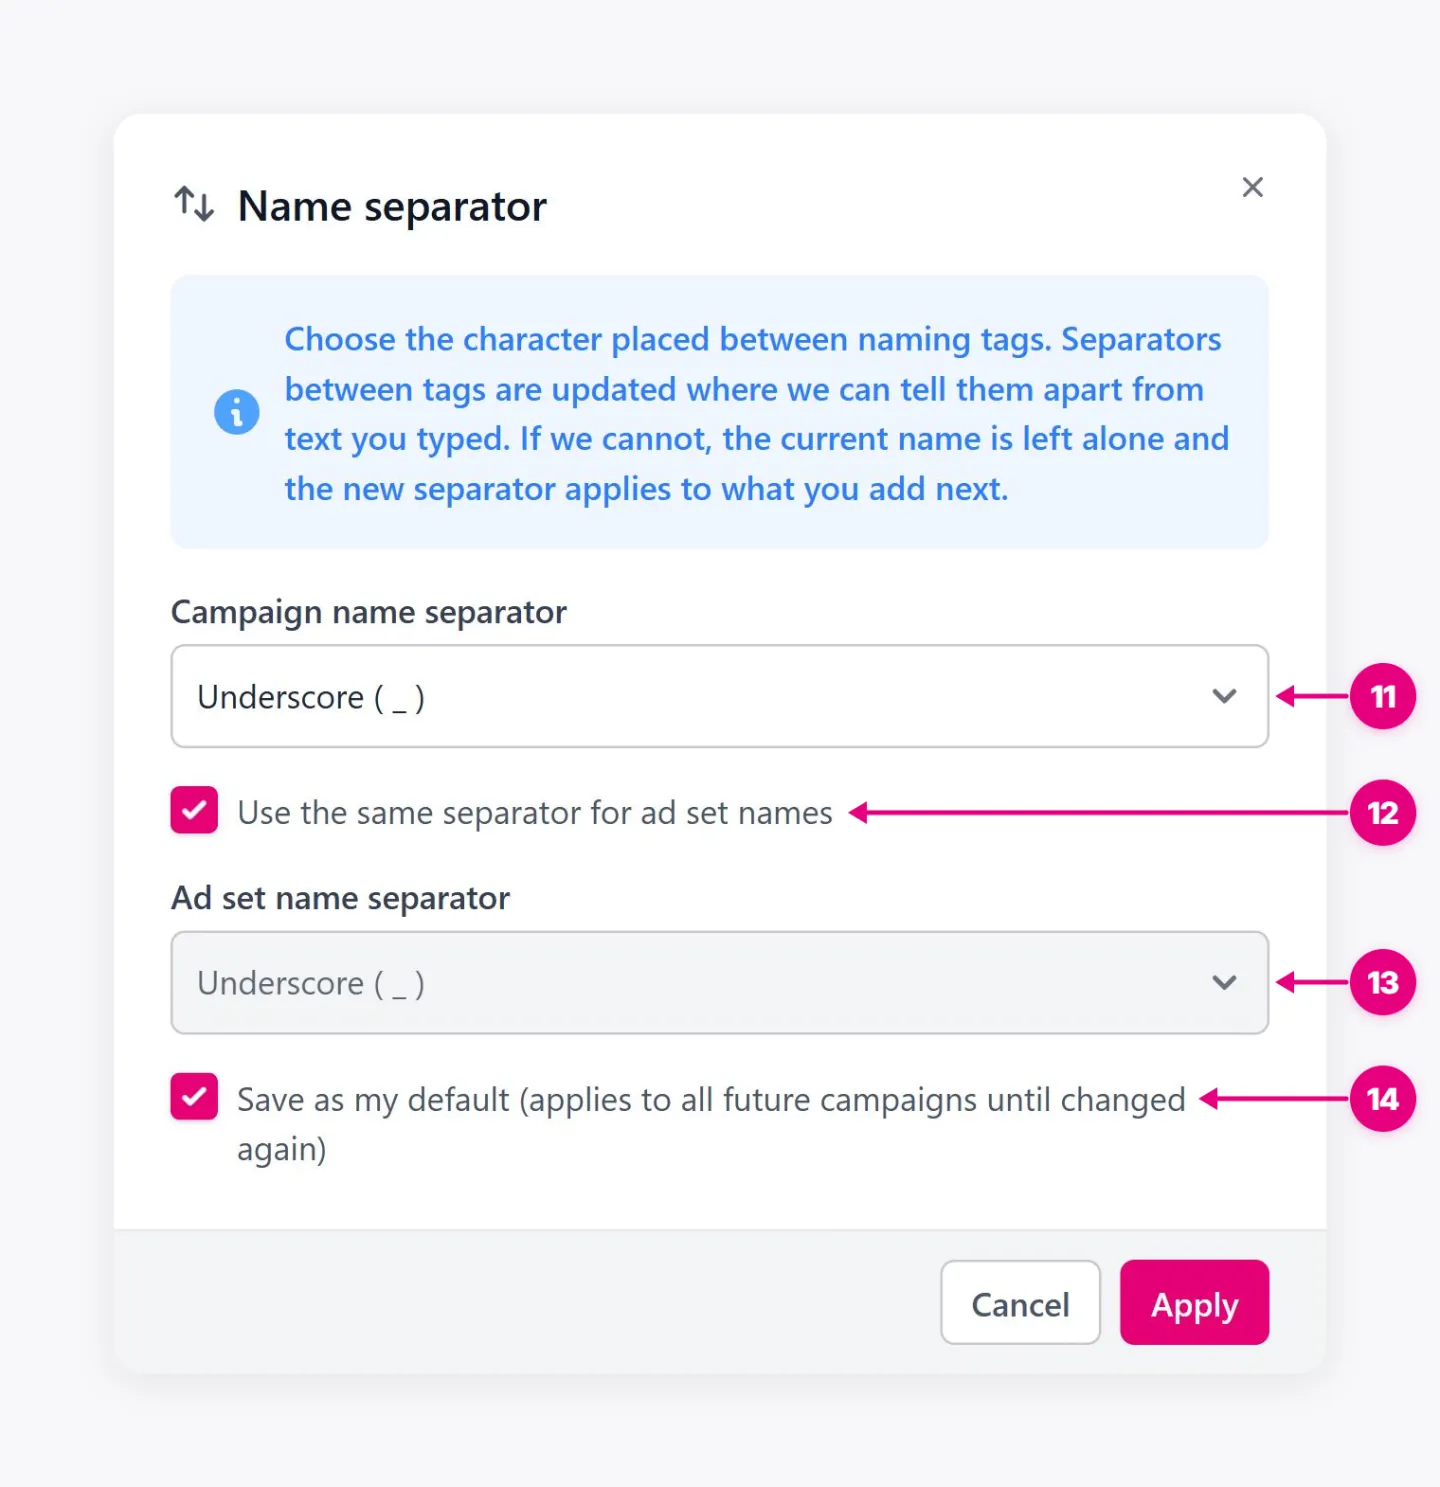
- Campaign name separator. Sets the character between parts of the campaign name: underscore, hyphen, spaced hyphen, dot, or pipe.
- Use the same separator for ad set names. Keeps campaign and ad set names in one matching format.
- Ad set name separator. Sets a different separator for ad set names, for when your reporting treats ad sets separately.
- Save as my default. Applies your separator choice to every future campaign you create, so you only set it once.
3. Campaign Status
Decides whether the campaign is created active or paused in Meta.

- Status. Shows the status the campaign will have when it reaches Meta.
- Status switch. Turns the campaign on or off at creation, so nothing spends until you are ready.
4. Beneficiary Information
Tells Meta who the ads are for and who pays for them, for transparency rules such as the EU Ad Library.
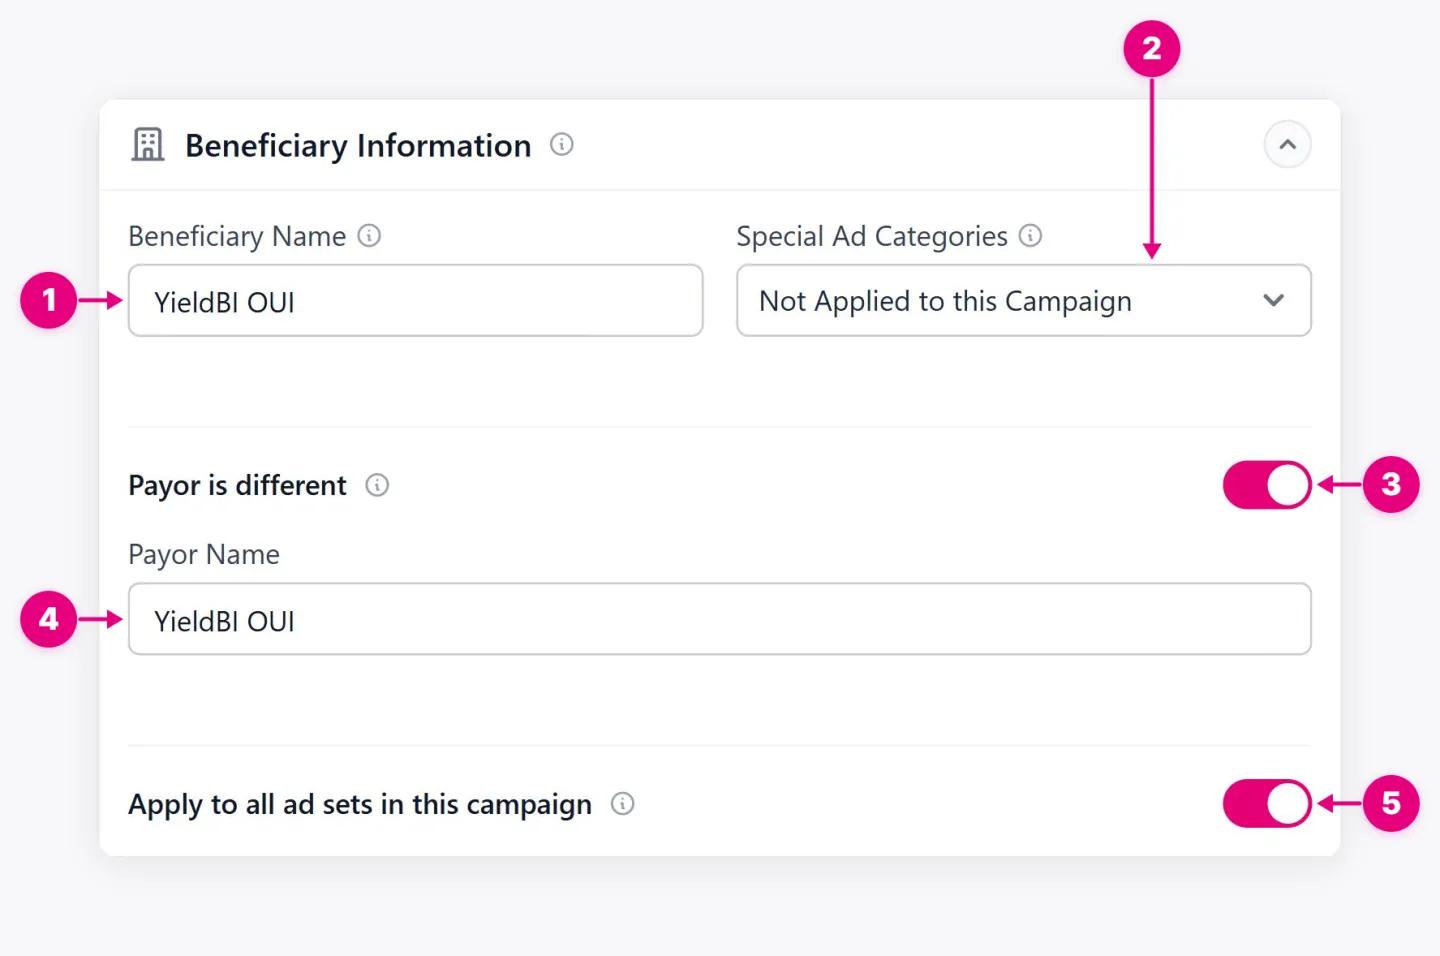
- Beneficiary Name. The brand or person that benefits from the ads.
- Special Ad Categories. Declares whether the ads fall into a regulated category.
- Payor is different. Lets you name a separate payer, such as an agency paying for a client’s ads.
- Payor Name. The business that pays for the ads.
- Apply to all ad sets in this campaign. Copies the beneficiary and payer to every ad set the campaign creates.
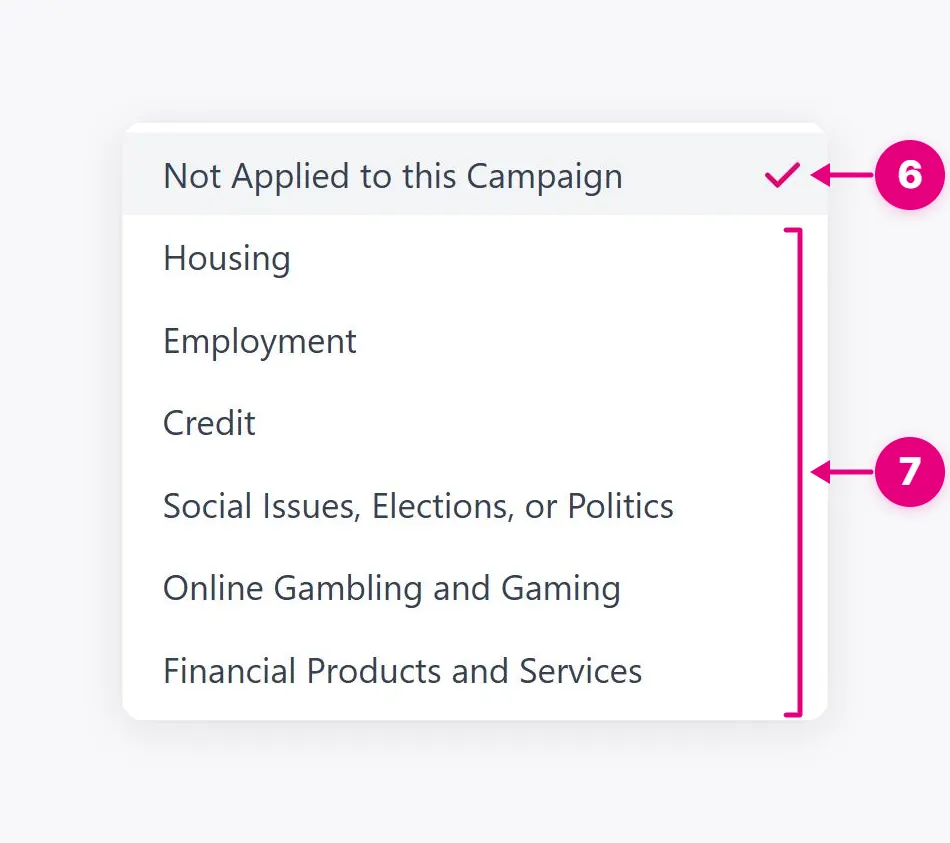
- Not Applied to this Campaign. The standard choice for ads outside regulated categories.
- Regulated categories. Choose the category that applies to the ad. The menu shown here lists Housing, Employment, Credit, Social Issues, Elections, or Politics, Online Gambling and Gaming, and Financial Products and Services.
For Housing, Employment, Credit, and Financial Products and Services, the wizard asks you to confirm audience restrictions. Applying one of these categories sets age to 18-65+, removes gender targeting, location exclusions, ZIP or postal-code targeting, lookalike and saved audiences, detailed-targeting exclusions, and audience expansion. If the draft already uses a restricted setting, applying the category resets it. Check the targeting step again before continuing. Other categories can have separate country or authorization requirements.
5. Campaign Type
Labels the campaign by the audience it is built to reach, which organizes reporting by funnel stage.
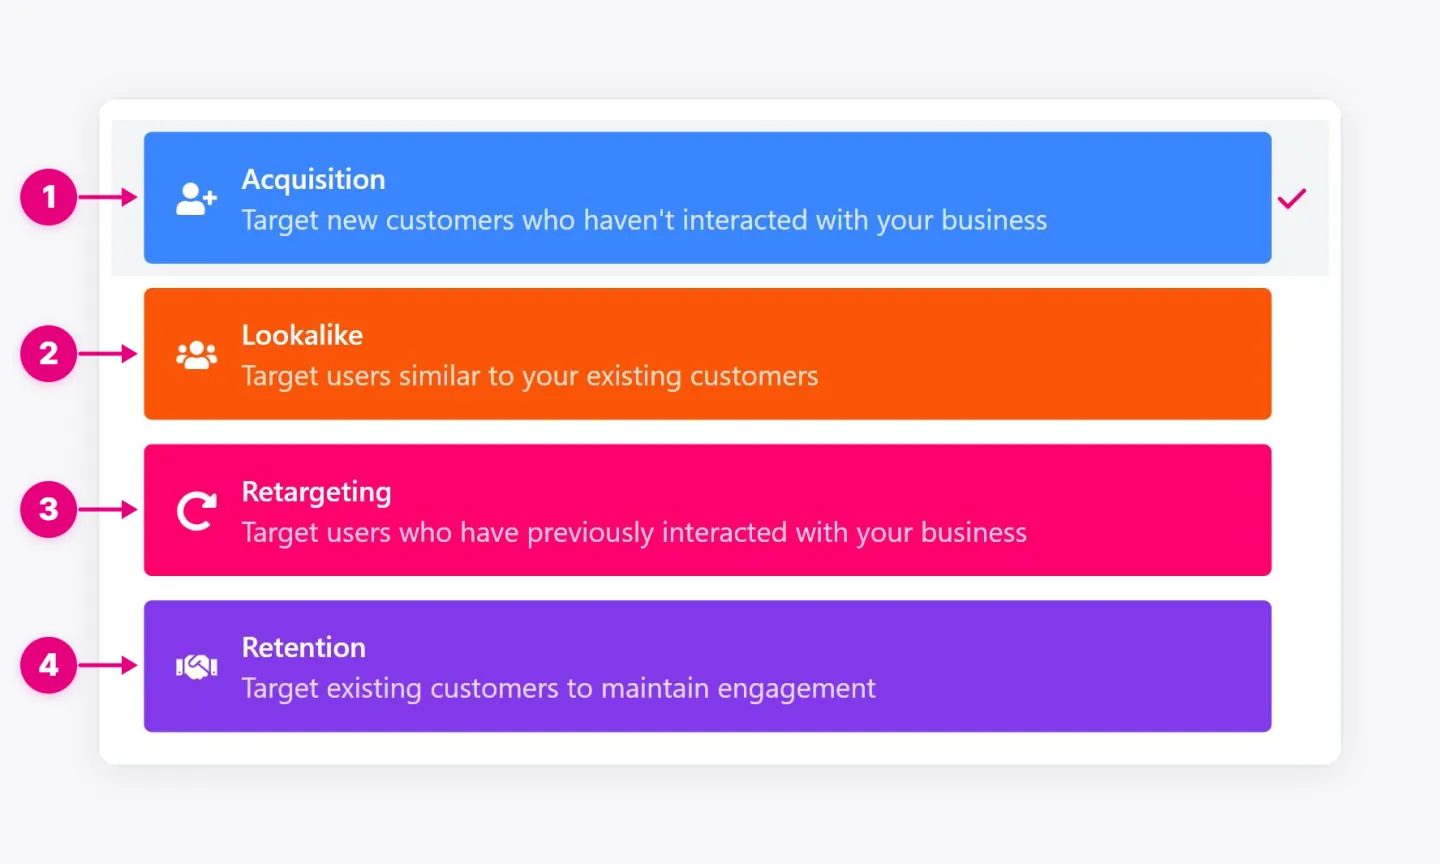
- Acquisition. Reaches new customers who haven’t interacted with your business.
- Lookalike. Reaches people similar to your existing customers.
- Retargeting. Reaches people who already interacted with your business.
- Retention. Reaches existing customers to drive repeat purchases.
6. Campaign Objective
Tells Meta which result the campaign is for. The objective decides who Meta shows the ads to and which options appear later in the wizard.
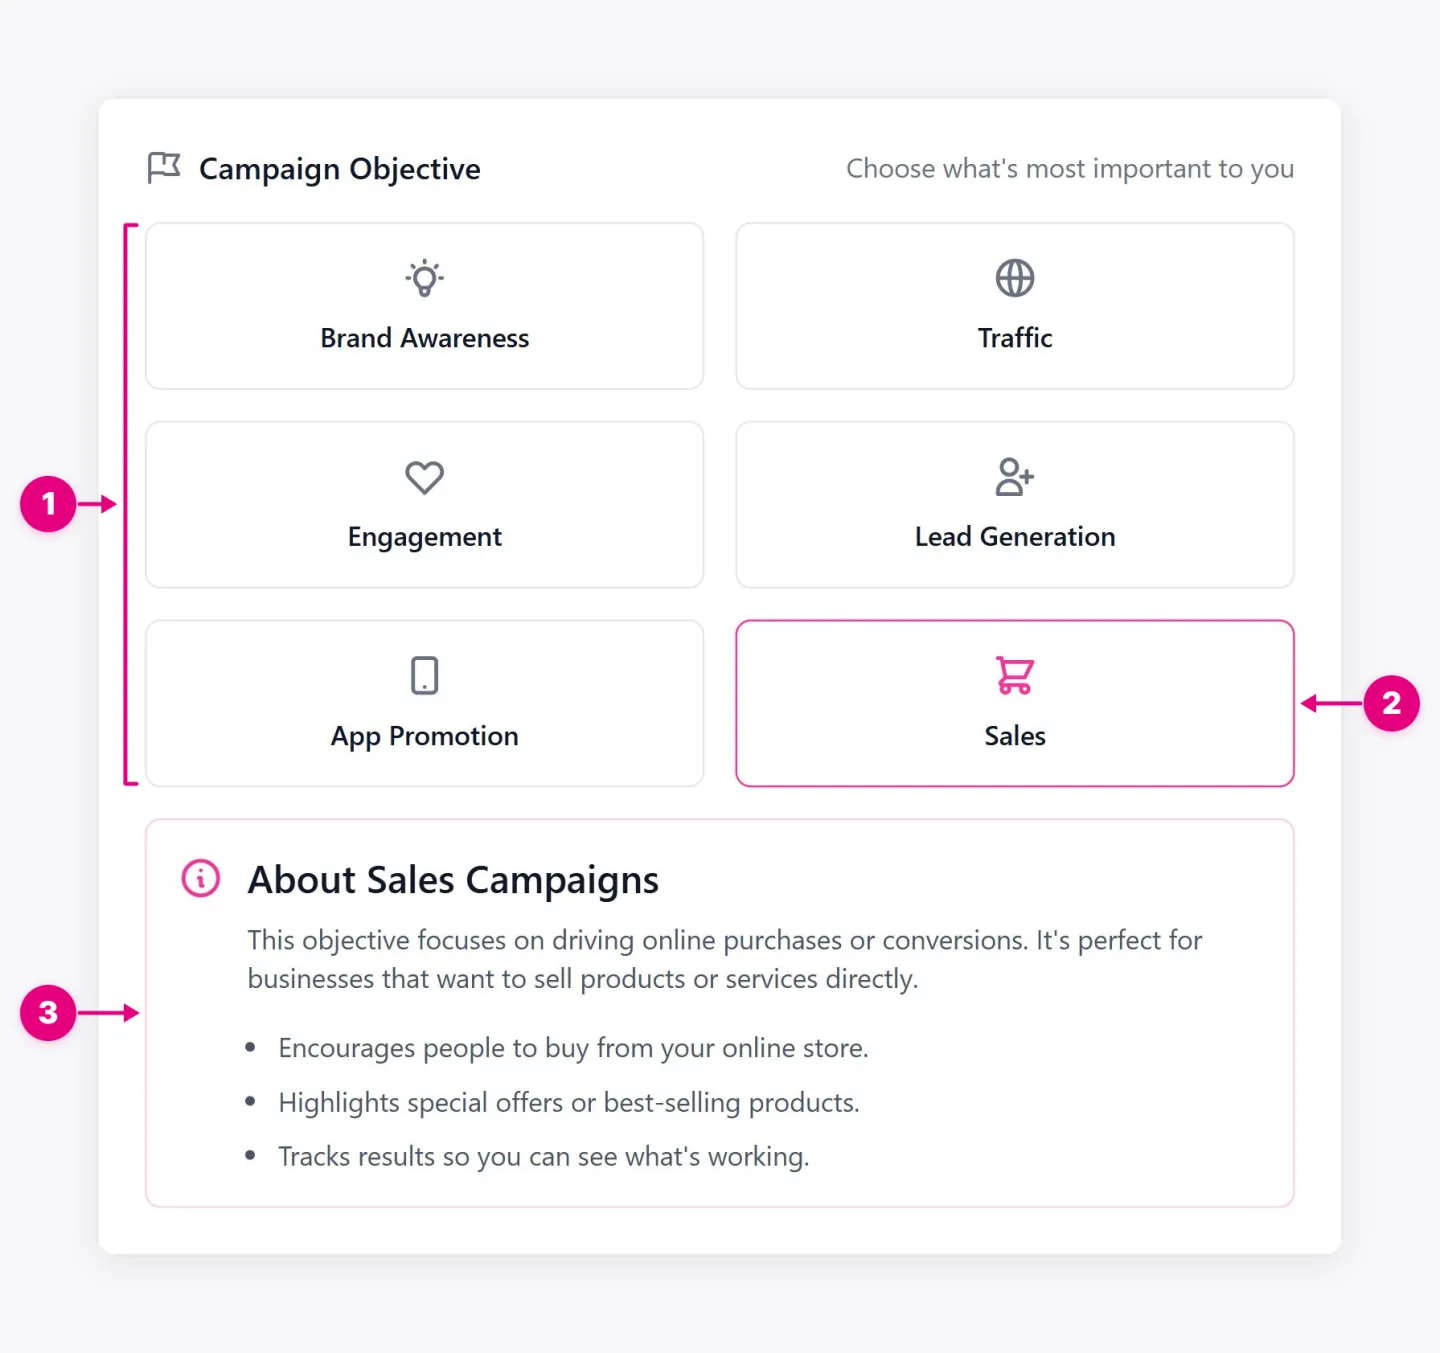
- Objectives. Brand Awareness, Traffic, Engagement, Lead Generation, App Promotion, and Sales, each optimizing for a different result.
- Selected objective. The result Meta will optimize toward. Sales focuses on purchases.
- About panel. Explains what the selected objective is designed to achieve.
7. Time Zone
Sets the clock used for the campaign’s schedule.
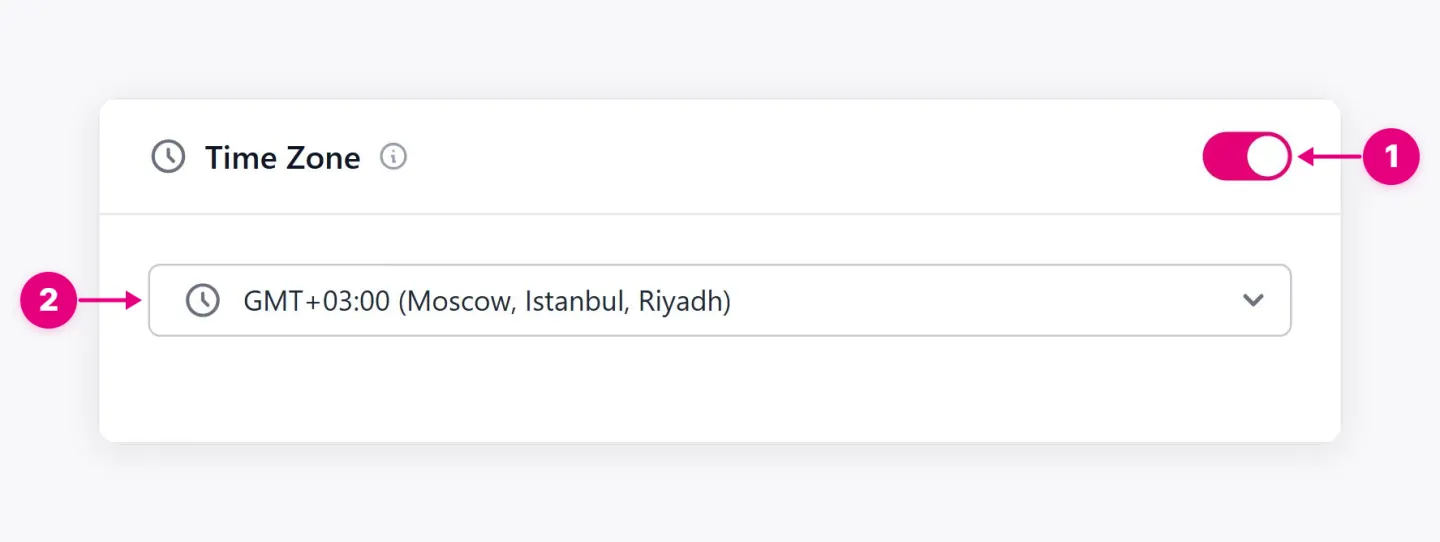
- Time zone switch. Uses a time zone other than your account’s.
- Time zone. The zone that start times, end times, and budget periods follow.
8. Campaign Budget & Bid Strategy
Decides where the budget lives and how spend is controlled. See campaign budget optimization for the tradeoffs between campaign and ad set budgets.
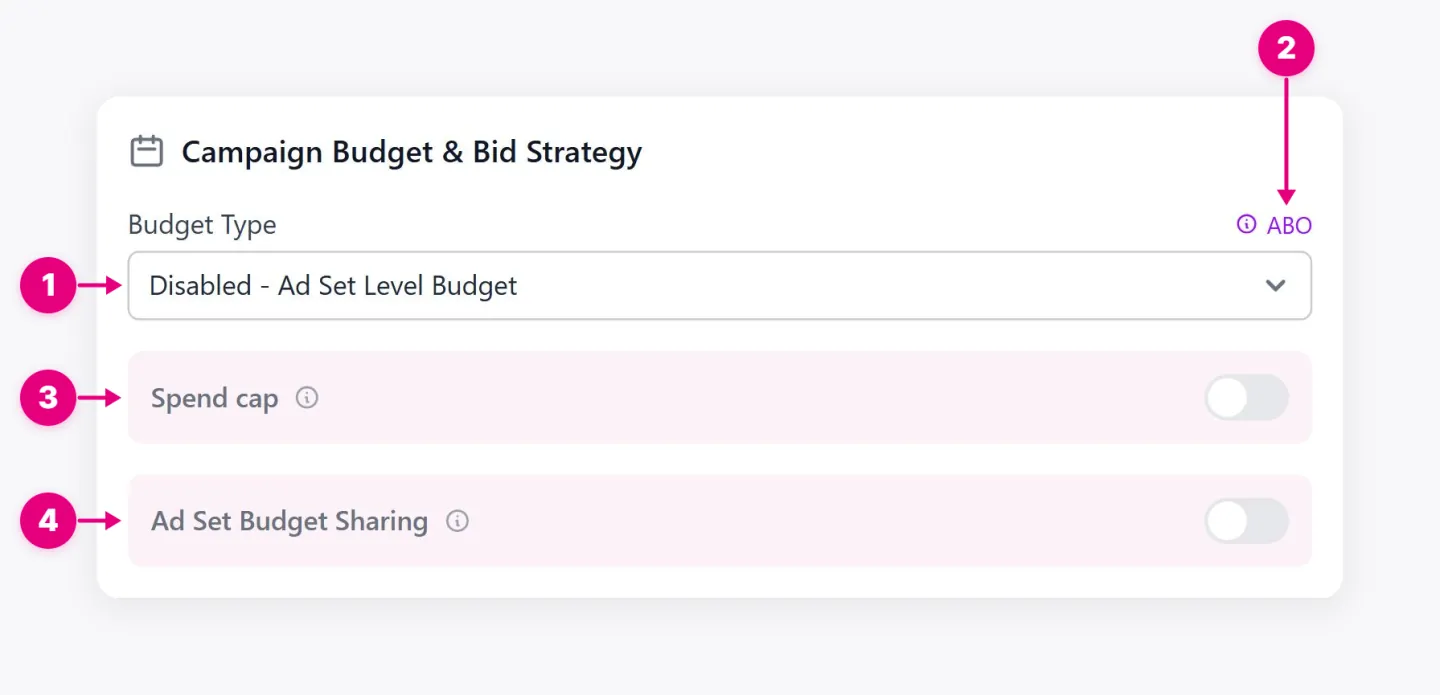
- Budget Type. Sets the budget per ad set (ABO) or once for the whole campaign as a daily or lifetime budget (CBO).
- Budget label. Shows whether the campaign uses ABO or CBO.
- Spend cap. Sets a hard limit on the campaign’s total spend.
- Ad Set Budget Sharing. Lets Meta move up to 20% of each ad set’s budget to better-performing ad sets.
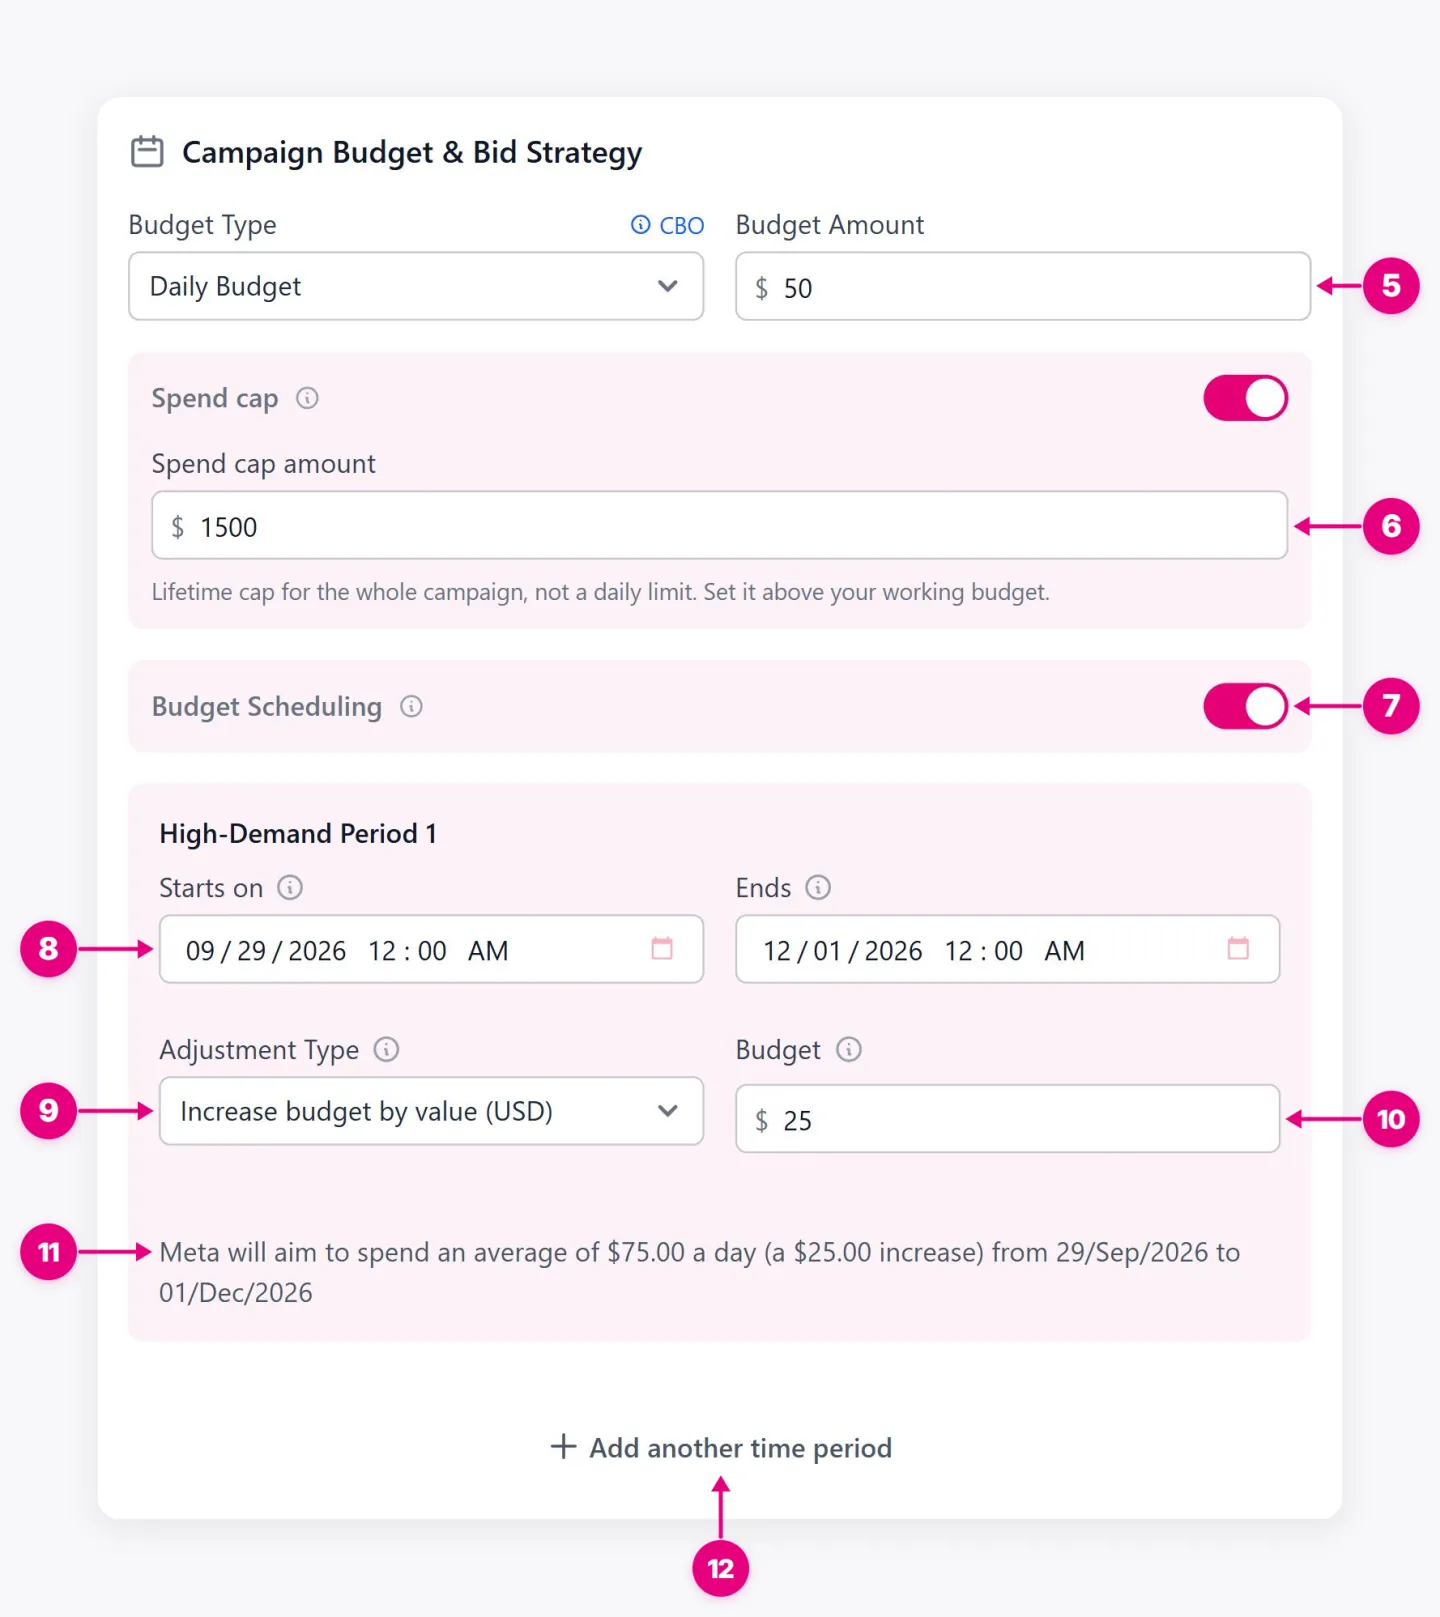
- Budget Amount. The campaign budget Meta distributes across ad sets.
- Spend cap amount. The maximum the campaign can spend over its whole life.
- Budget Scheduling. Raises the budget automatically during high-demand dates, such as a sale.
- Starts on and Ends. The dates of a high-demand period.
- Adjustment Type. Raises the budget by a fixed amount or by a percentage.
- Budget. The size of the increase.
- Spend summary. Shows the average daily spend Meta will aim for during the period.
- Add another time period. Adds more high-demand periods.
Stage 2: Ad Set, Targeting
What is an ad set variant? A variant is a separate ad set generated from a targeting choice. Turning on variants or grouping for a setting splits its choices into separate ad sets. The wizard combines the settings you split: if you create two location groups and two age ranges, with no other variant settings, it generates four ad sets, one for each location-and-age pairing. Settings you do not split stay shared. Check the count in Targeting, then review the generated ad sets before creation. You can edit or exclude an individual ad set on the Review step.
9. Placement Targeting
Decides where ads appear across Meta’s apps, and can split placements into separate ad sets for testing.
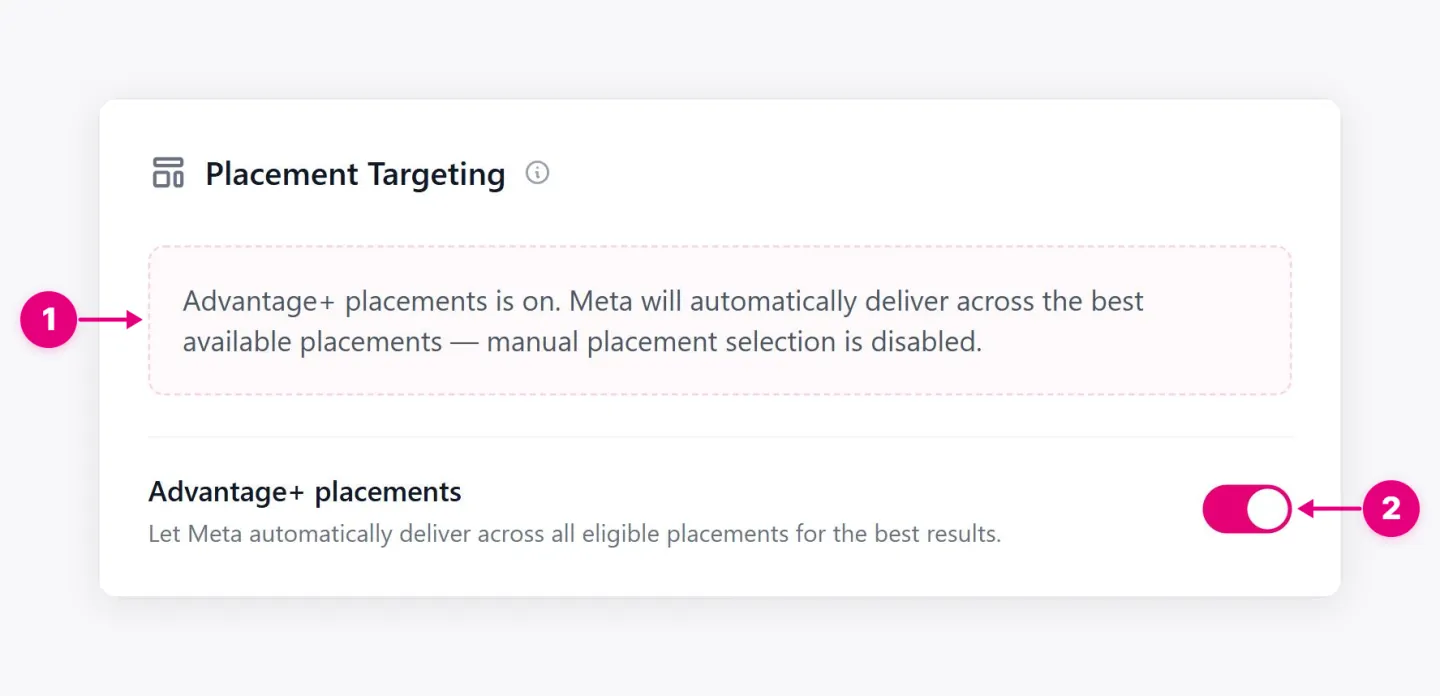
- Advantage+ placements notice. Confirms Meta is choosing placements automatically.
- Advantage+ placements. Lets Meta deliver across all eligible placements for the best results.
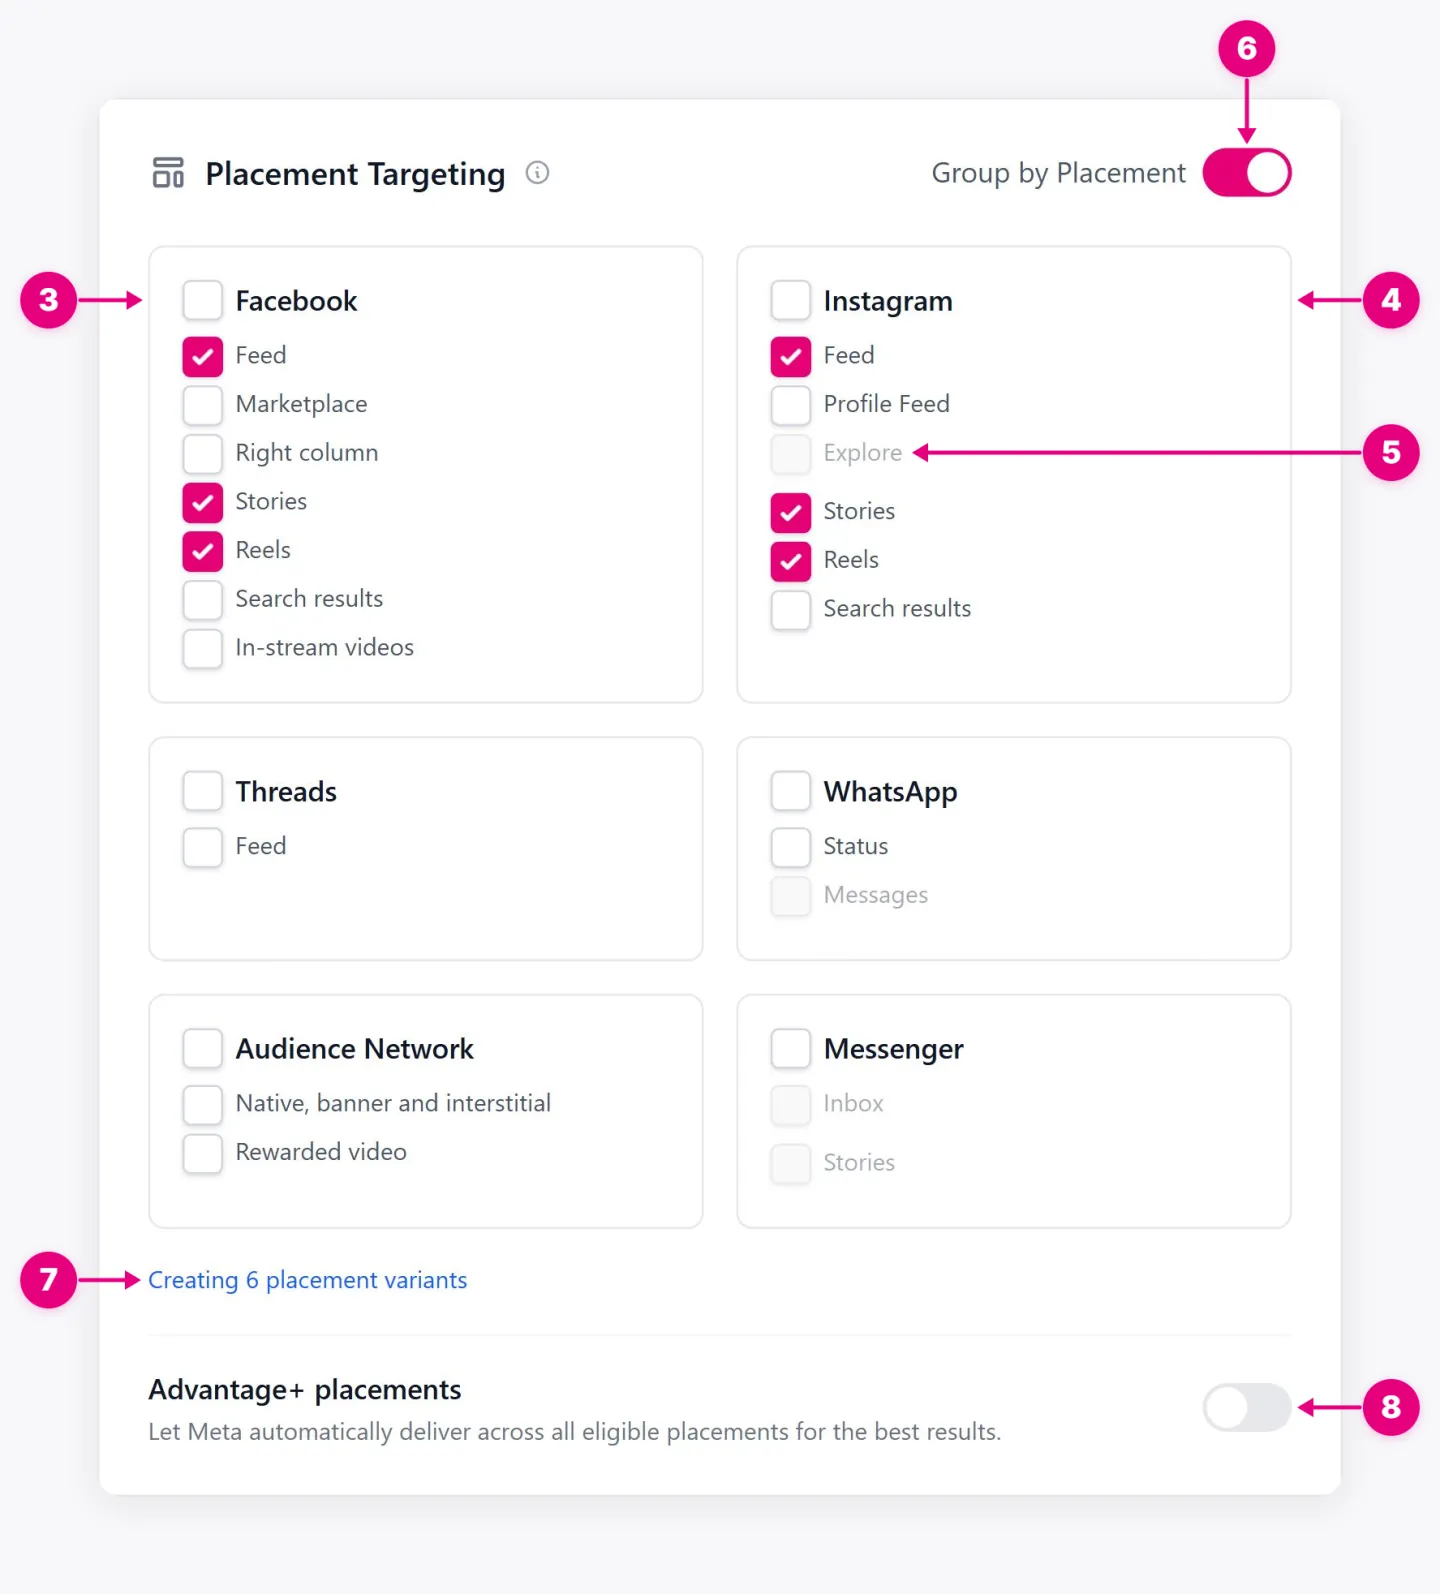
- Facebook placements. Chooses where ads can appear on Facebook.
- Instagram placements. Chooses where ads can appear on Instagram.
- Unavailable placement. Some placements unlock only when a related placement is selected.
- Group by Placement. Splits the selected placements into separate ad sets.
- Variant count. Shows how many ad sets the grouping will create.
- Advantage+ placements, off. Manual selection is available while this is off.
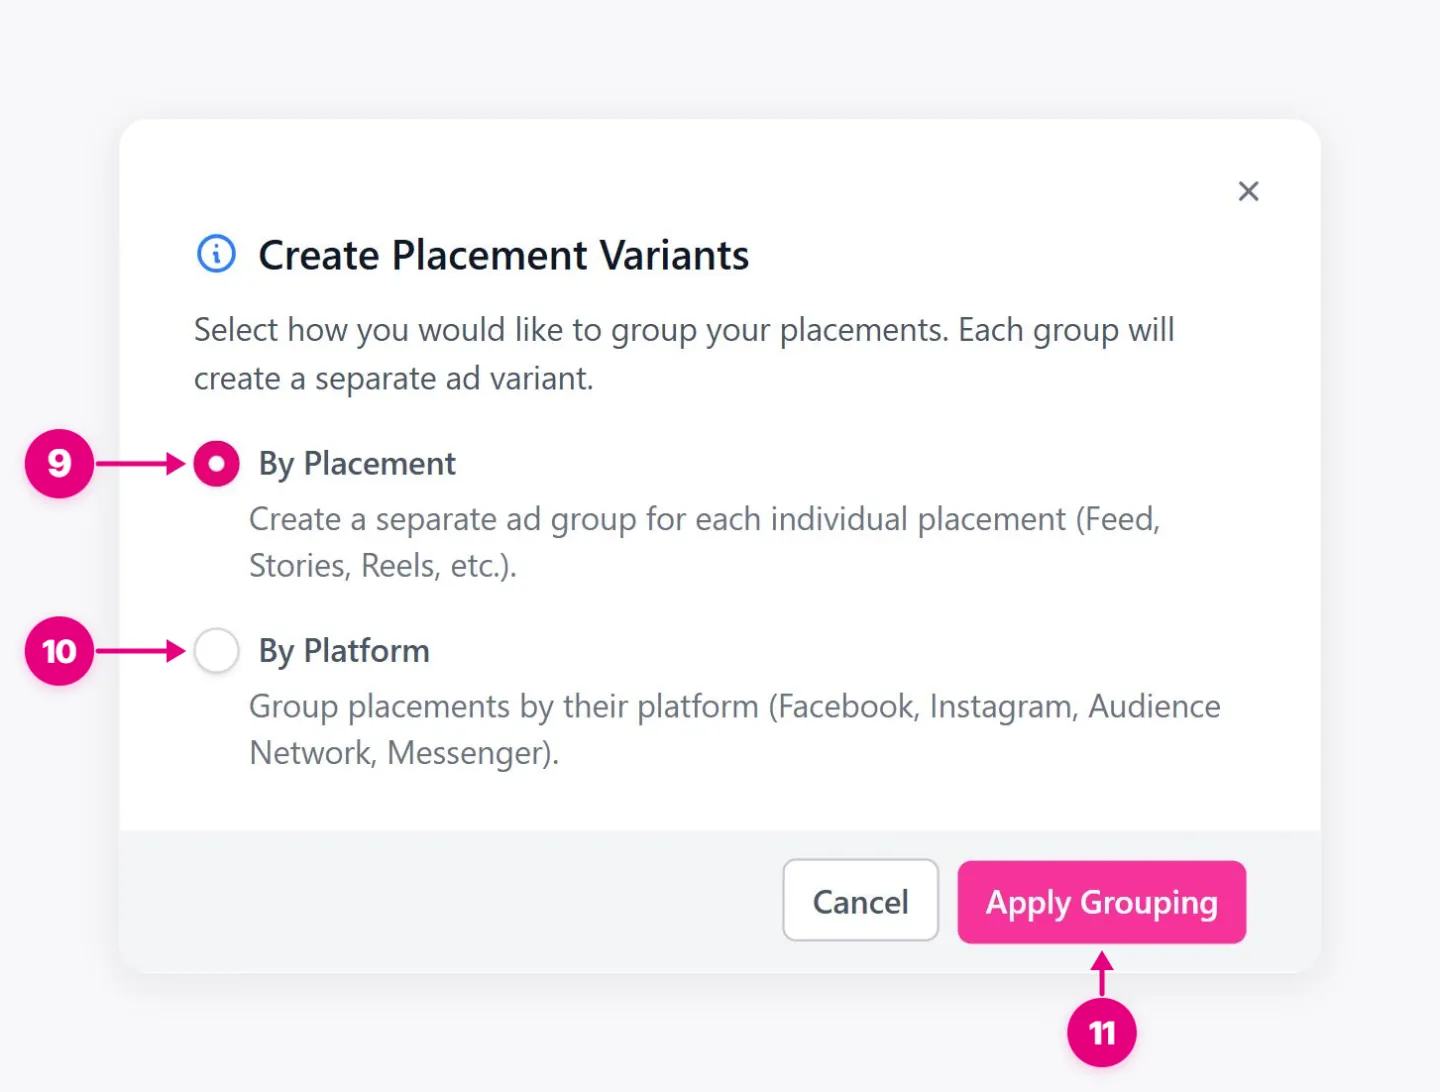
- By Placement. Creates a separate variant for each placement, such as Feed, Stories, or Reels.
- By Platform. Groups selected placements into variants by platform, such as Facebook or Instagram.
- Apply Grouping. Creates the variants.
10. Geographic Targeting
Decides where the people who see your ads live, and can split locations into separate ad sets.
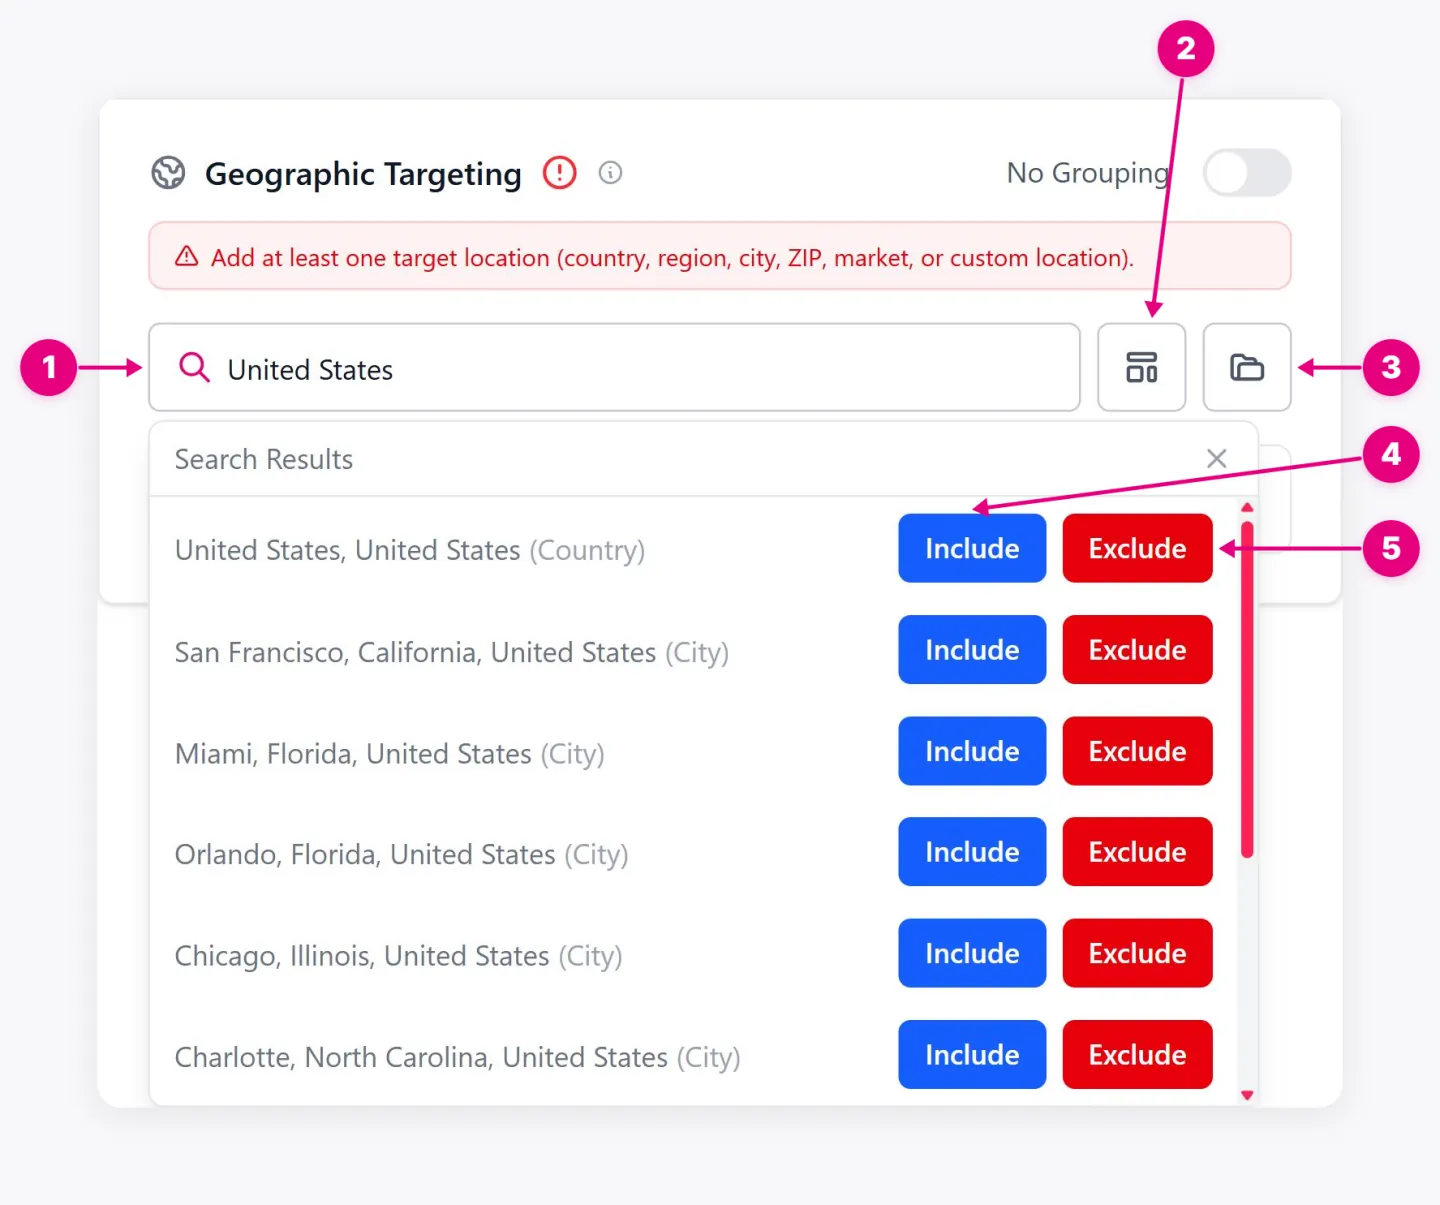
- Location search. Finds countries, regions, cities, ZIP codes, or addresses.
- Location presets. Loads or saves a list of locations you target often.
- Browse Locations. Picks countries and regions from a list.
- Include. Targets the location.
- Exclude. Keeps ads out of the location.
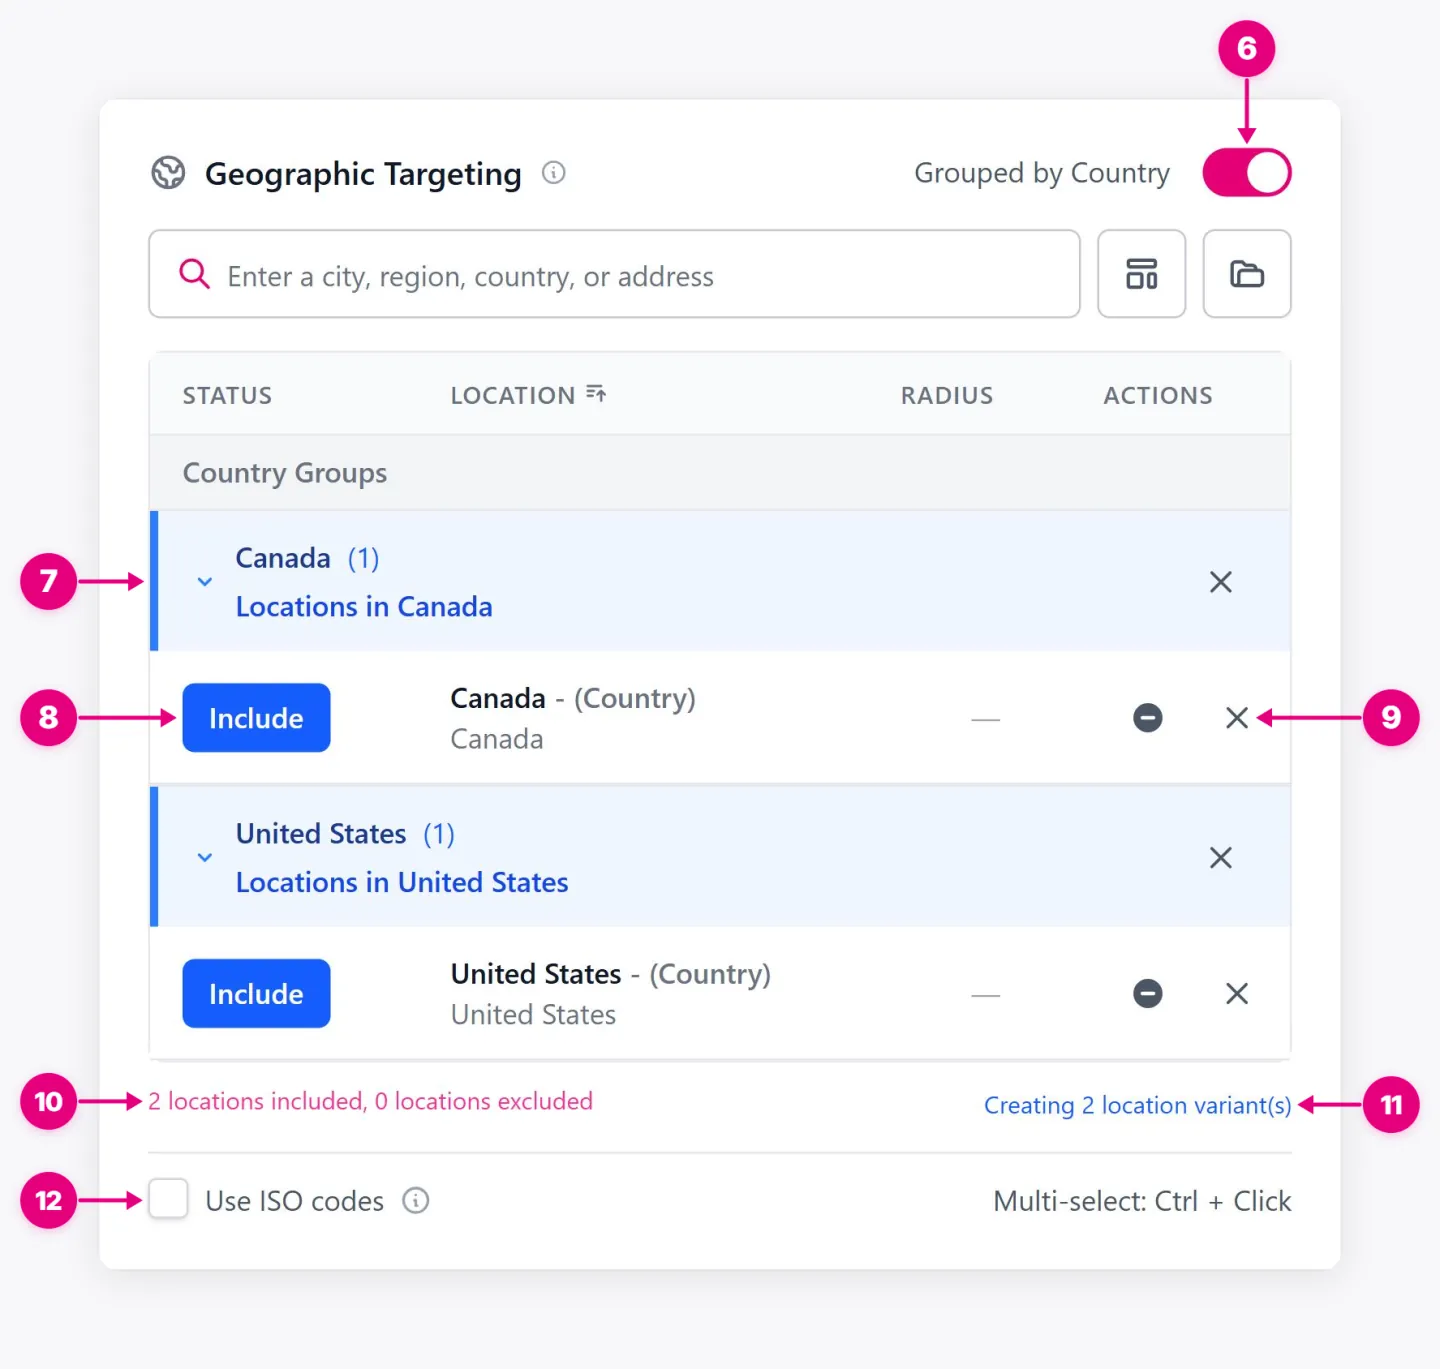
- Grouping switch. Splits locations into separate ad sets.
- Location group. One group becomes one ad set.
- Include / Exclude status. Click Include to change this location to Exclude. Click Exclude to include it again. The button shows the current state.
- Row actions. The minus icon removes the location from its group. The X removes the location from targeting entirely.
- Location summary. Counts included and excluded locations.
- Variant count. Shows how many ad sets the location grouping creates.
- Use ISO codes. Shows two-letter country codes instead of full names.
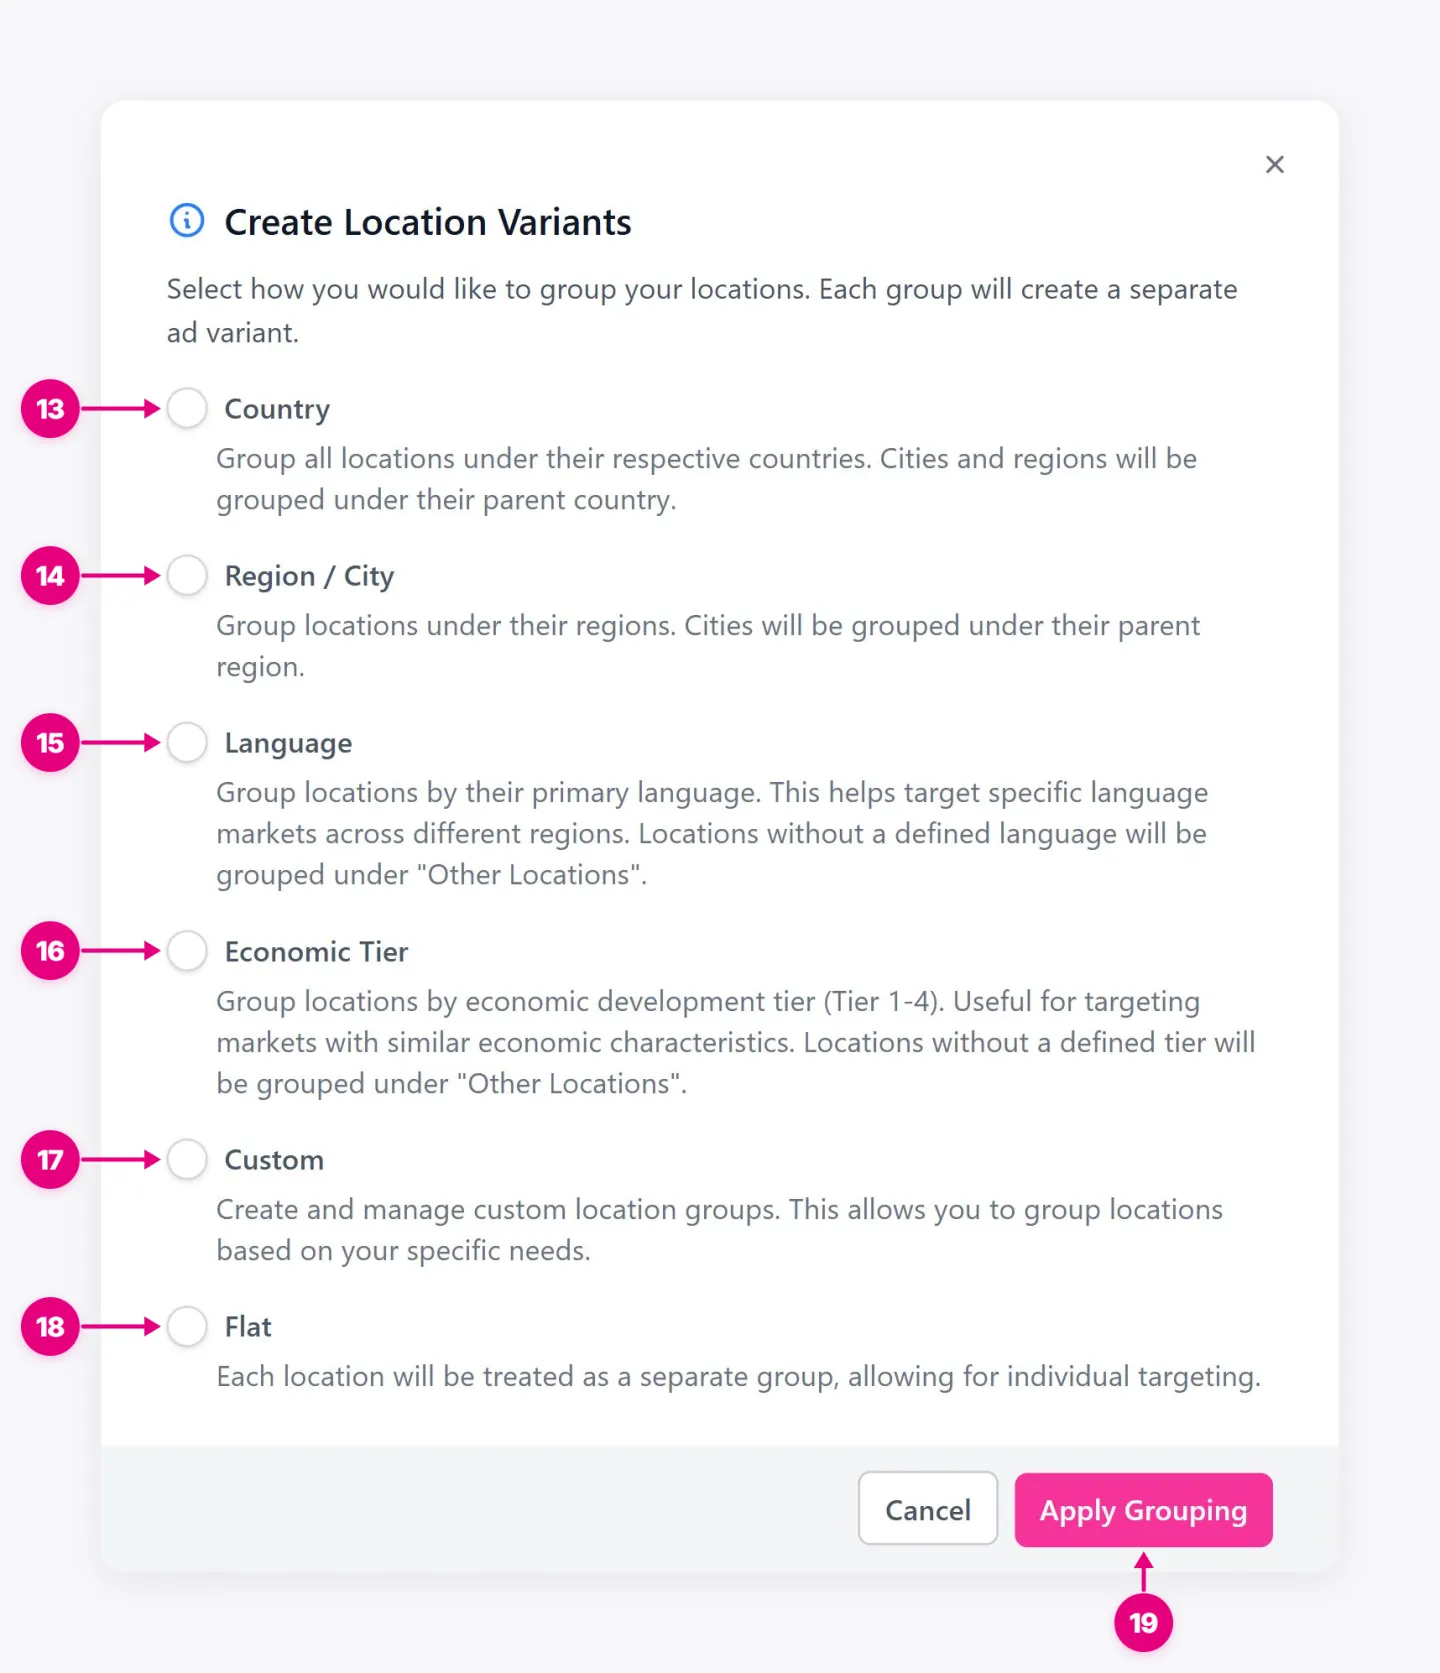
- Country. Groups cities and regions under their country.
- Region / City. Groups cities under their region.
- Language. Groups locations by their primary language.
- Economic Tier. Groups markets with similar economic development.
- Custom. Groups locations your own way.
- Flat. Treats each location as a separate group for individual targeting.
- Apply Grouping. Creates the variants.
11. Languages
Limits delivery to people who use Facebook or Instagram in specific languages.
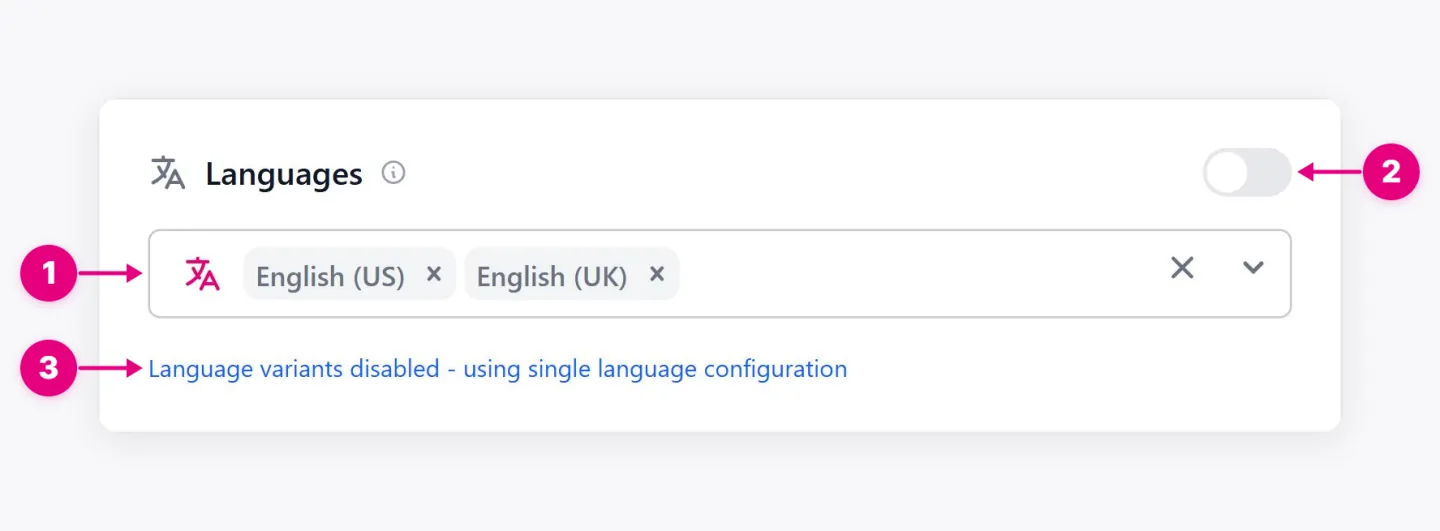
- Languages. The languages your audience uses.
- Language variants. Creates one ad set per language.
- Variant status. Shows whether languages are split into variants.
12. Demographics
Sets the gender and age of the audience, and can split each into separate ad sets.
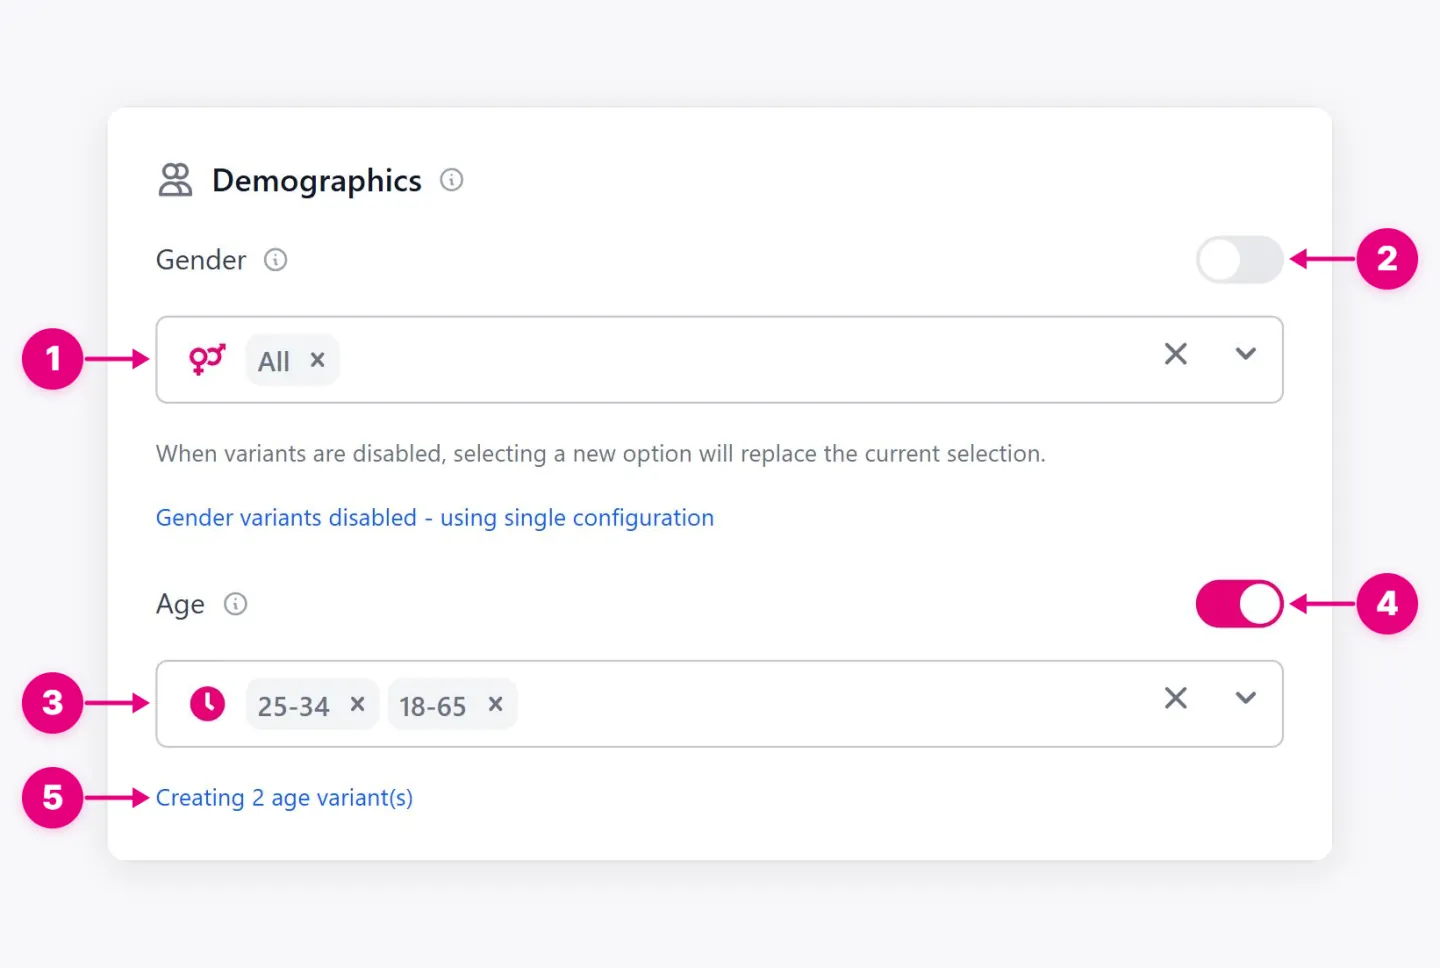
- Gender. Chooses All, Male, or Female.
- Gender variants. Creates one ad set per gender.
- Age. Chooses one or more age ranges.
- Age variants. Creates one ad set per age range.
- Variant count. Shows how many age variants will be created.
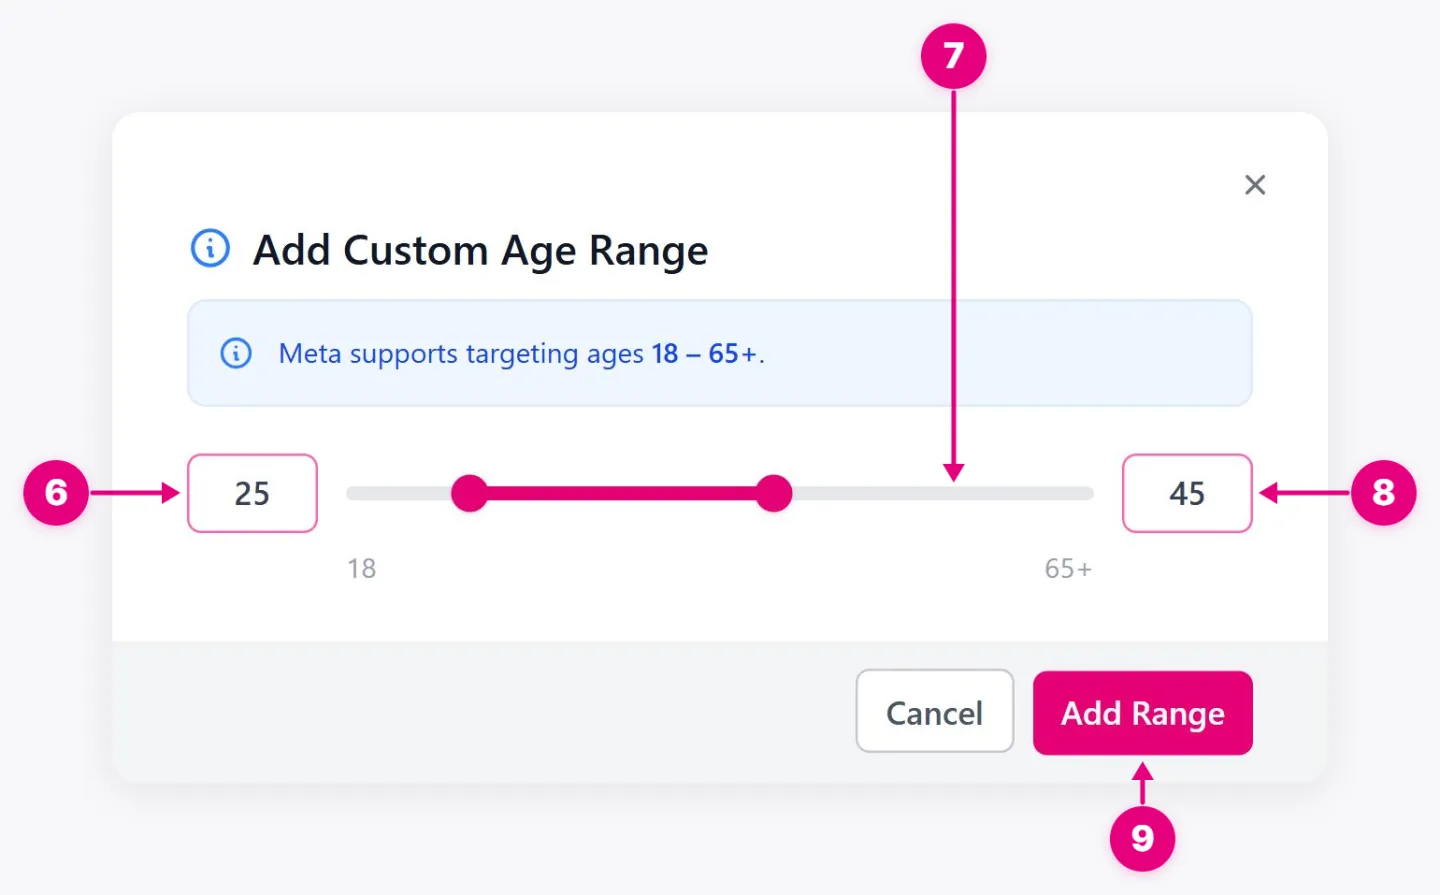
- Minimum age. The youngest age to target.
- Range slider. Adjusts the range within what Meta supports, 18 to 65+.
- Maximum age. The oldest age to target.
- Add Range. Adds the custom range to the age list.
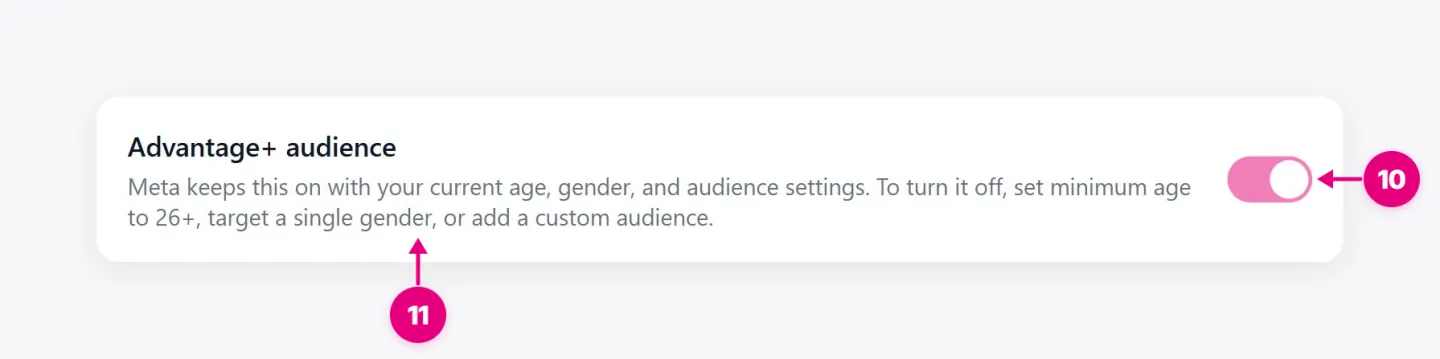
- Advantage+ audience. Lets Meta reach people outside your age, gender, and audience settings when it predicts better results.
- When it turns off. Explains which settings switch it off: a minimum age of 26 or older, a single gender, or a custom audience.
13. Detailed Targeting
Narrows the audience to people with specific interests, behaviors, or demographics.
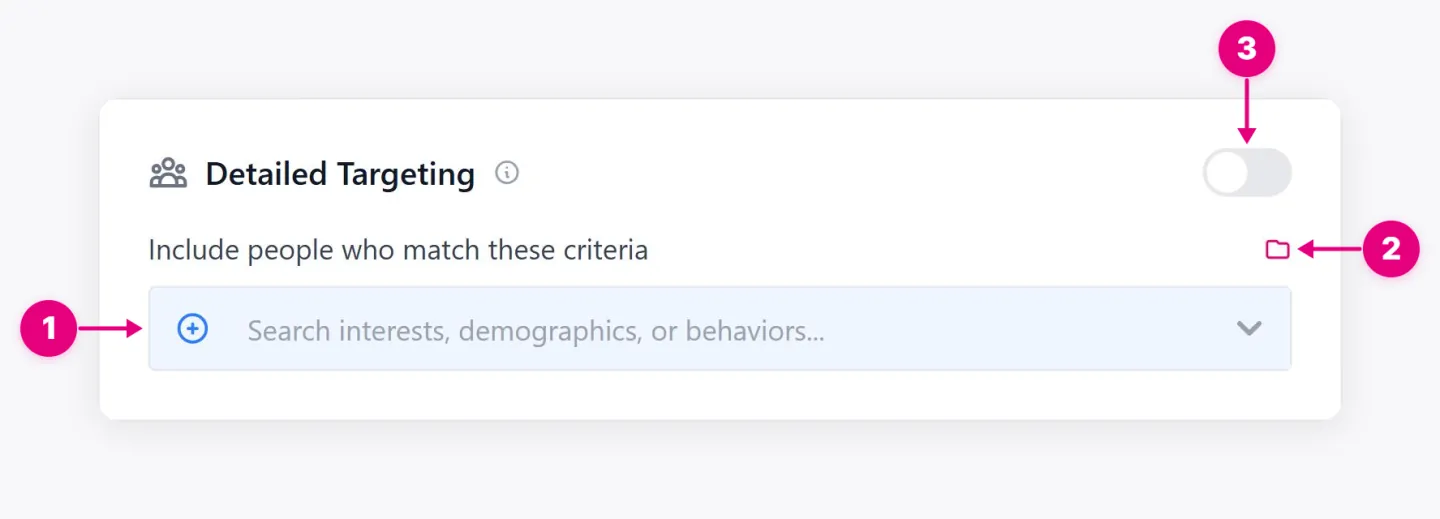
- Search. Finds interests, demographics, and behaviors.
- Browse. Opens the full list of targeting options.
- Detailed targeting variants. Creates one ad set per targeting item.
14. Custom Audiences
Targets or excludes audiences built from your own data, such as site visitors, customers, and lookalikes.
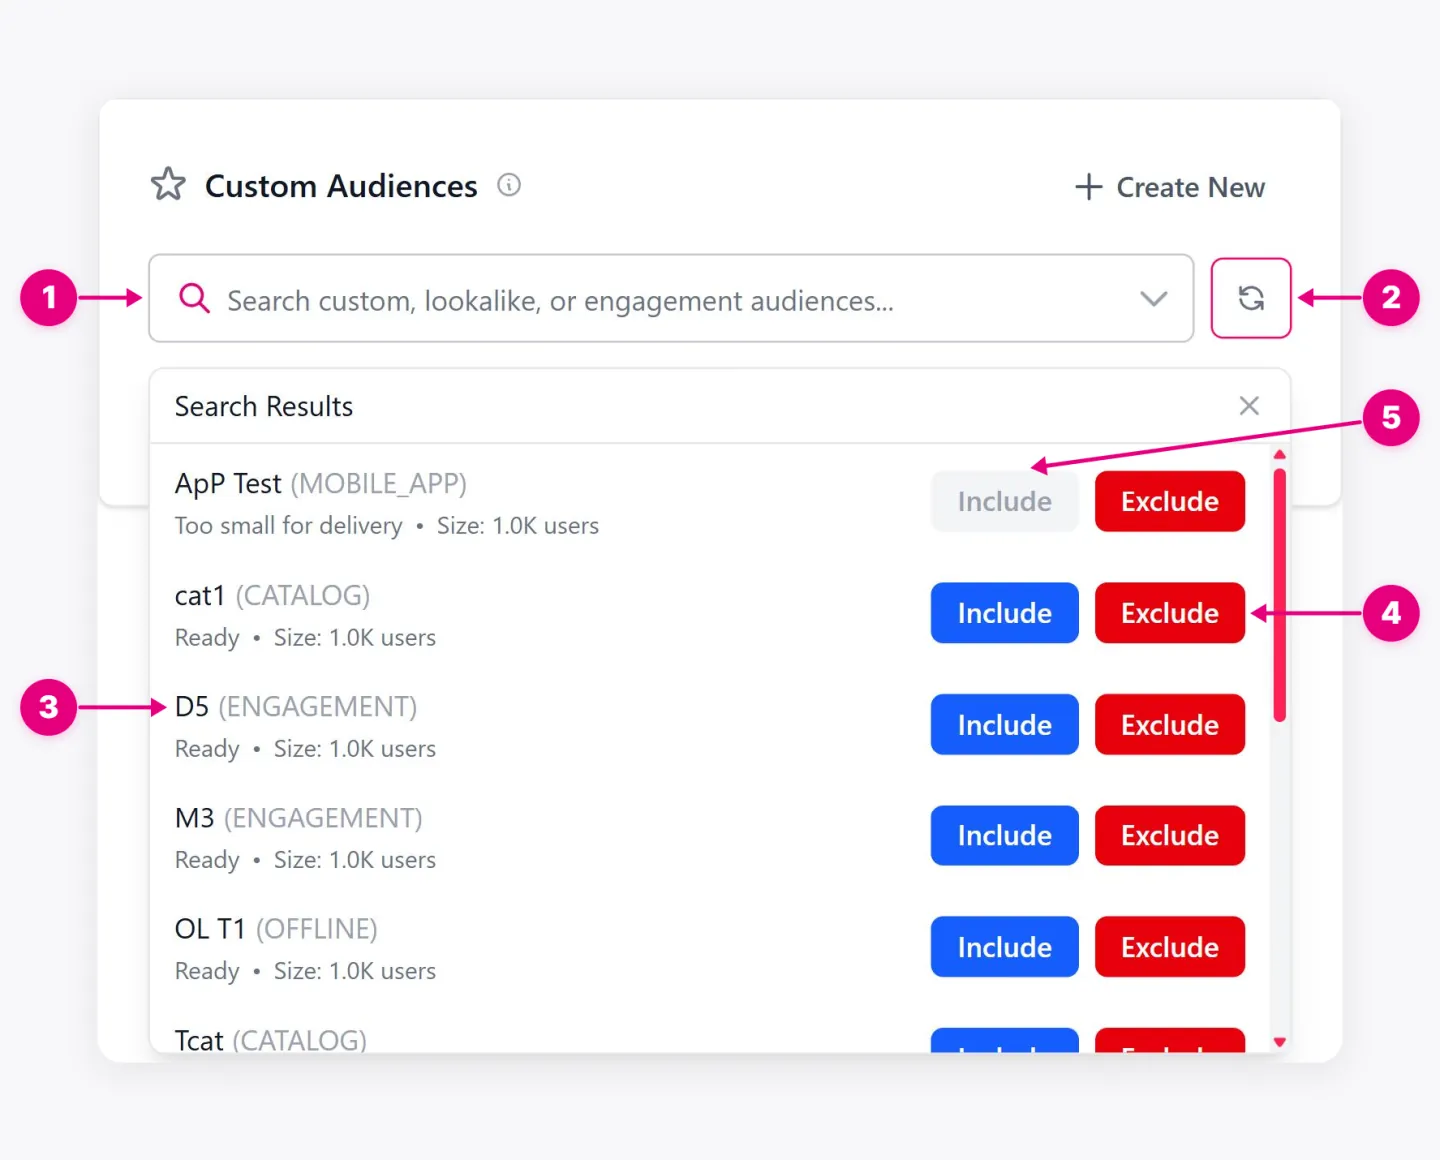
- Audience search. Finds custom, lookalike, and engagement audiences.
- Refresh. Loads audiences recently created in Meta.
- Audience details. Shows each audience’s type, status, and size.
- Include and Exclude. Targets the audience, or keeps it out of the ad set.
- Unavailable audience. Audiences too small for delivery can’t be included.
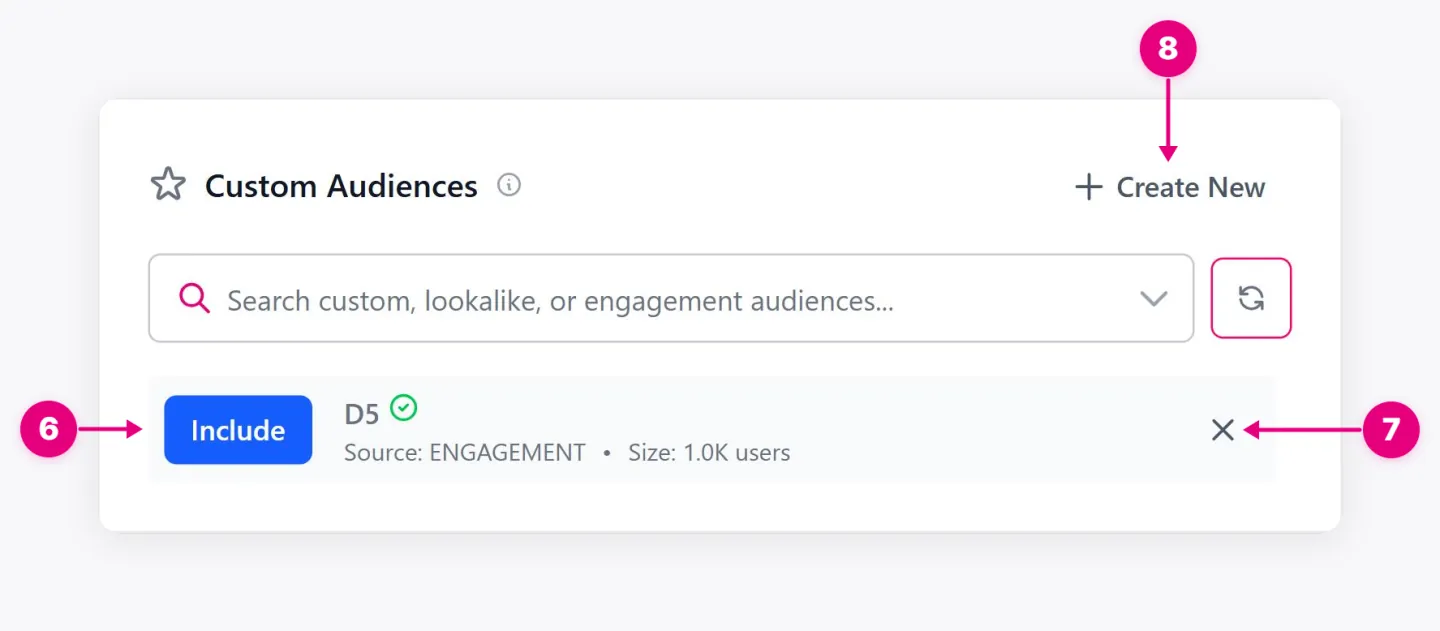
- Selected audience. An audience applied to the ad set.
- Remove. Takes the audience off the ad set.
- Create New. Builds a new audience without leaving the wizard.
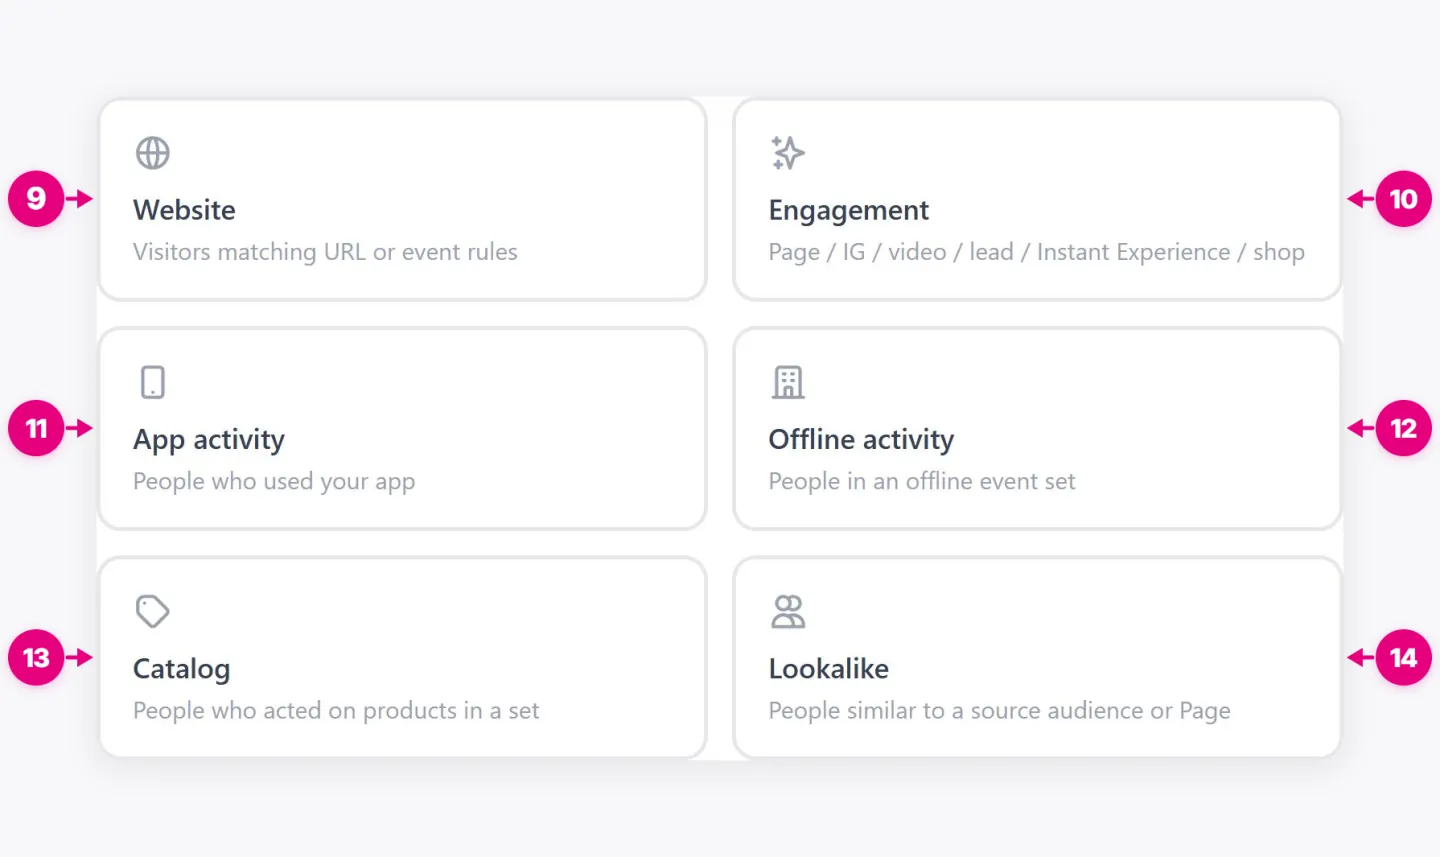
- Website. Visitors matching URL or event rules.
- Engagement. People who engaged with your Page, Instagram, videos, lead forms, Instant Experiences, or shop.
- App activity. People who used your app.
- Offline activity. People in an offline event set.
- Catalog. People who acted on products in a catalog set.
- Lookalike. People similar to a source audience or Page.
15. Tech Targeting
Limits delivery by device and connection.
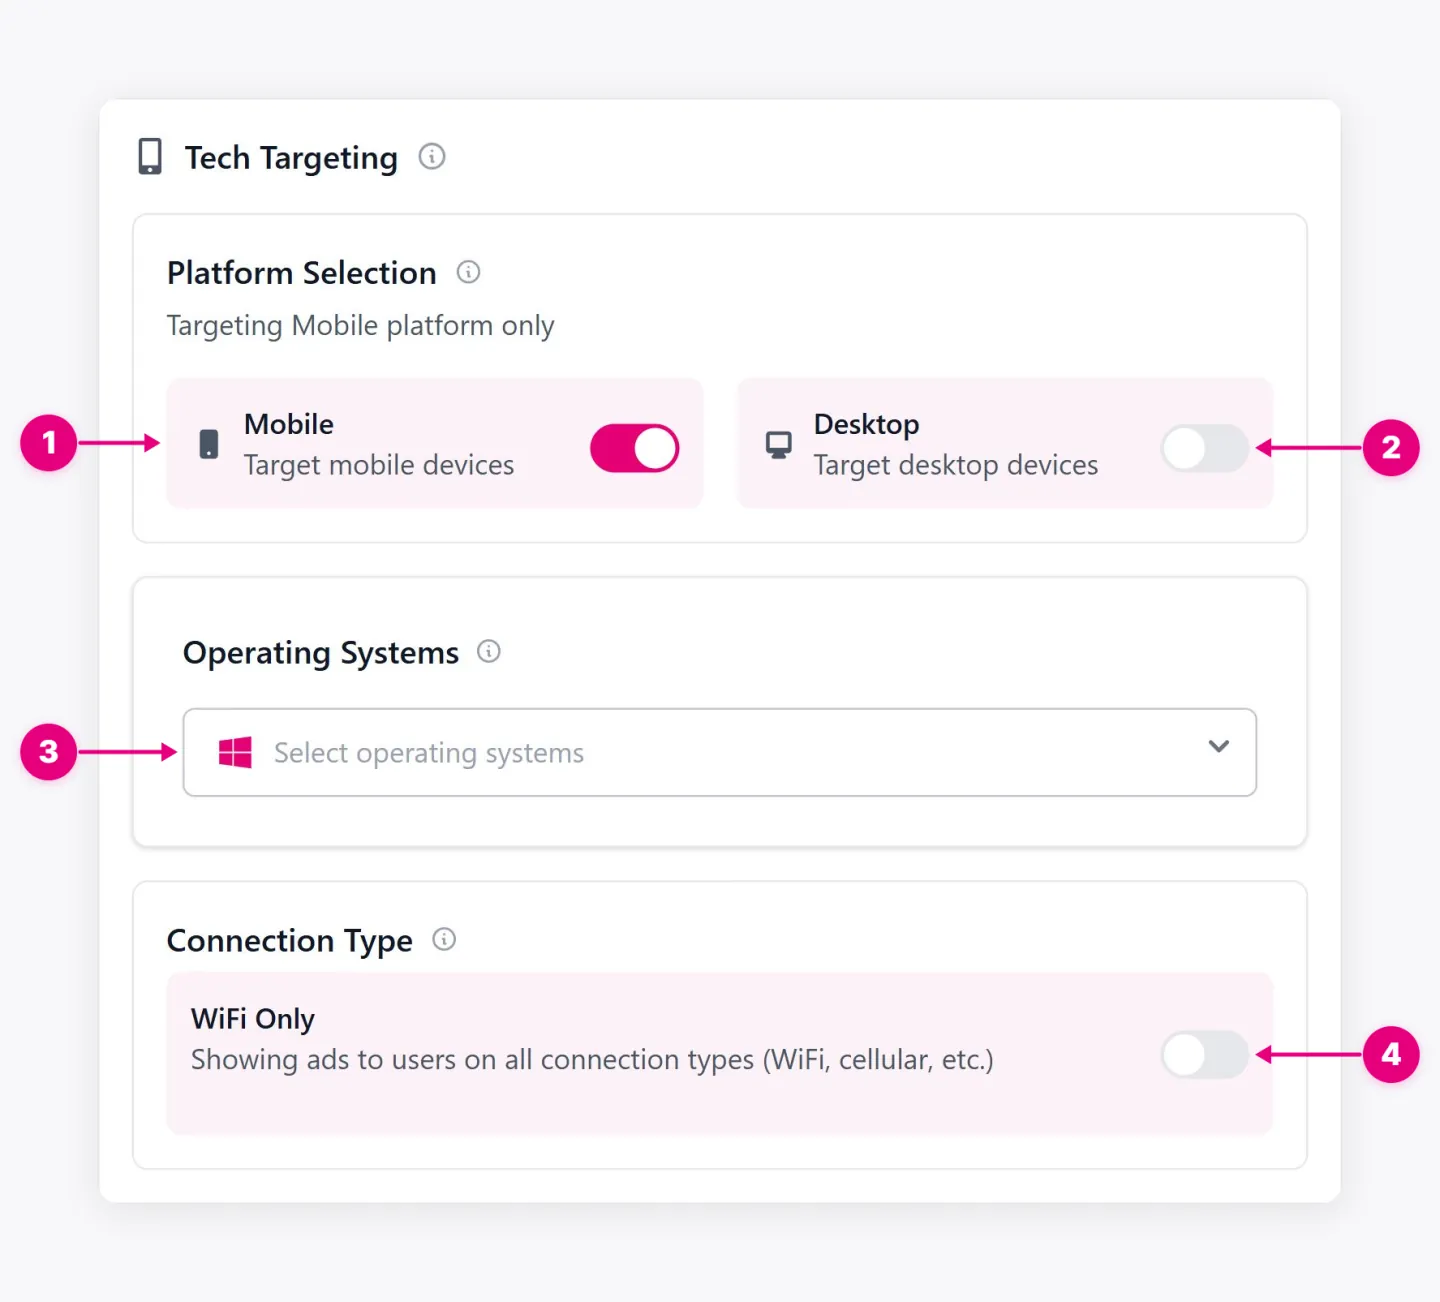
- Mobile. Shows ads on phones and tablets.
- Desktop. Shows ads on computers.
- Operating Systems. Opens the operating-system selection for device targeting.
- WiFi Only. Shows ads only to people connected to WiFi.
Stage 2: Ad Set, Tracking
16. YieldBI Intelligence
An optimization layer that judges the campaign by a business goal, such as revenue, LTV, or lead quality, and recommends or applies changes within limits you set.
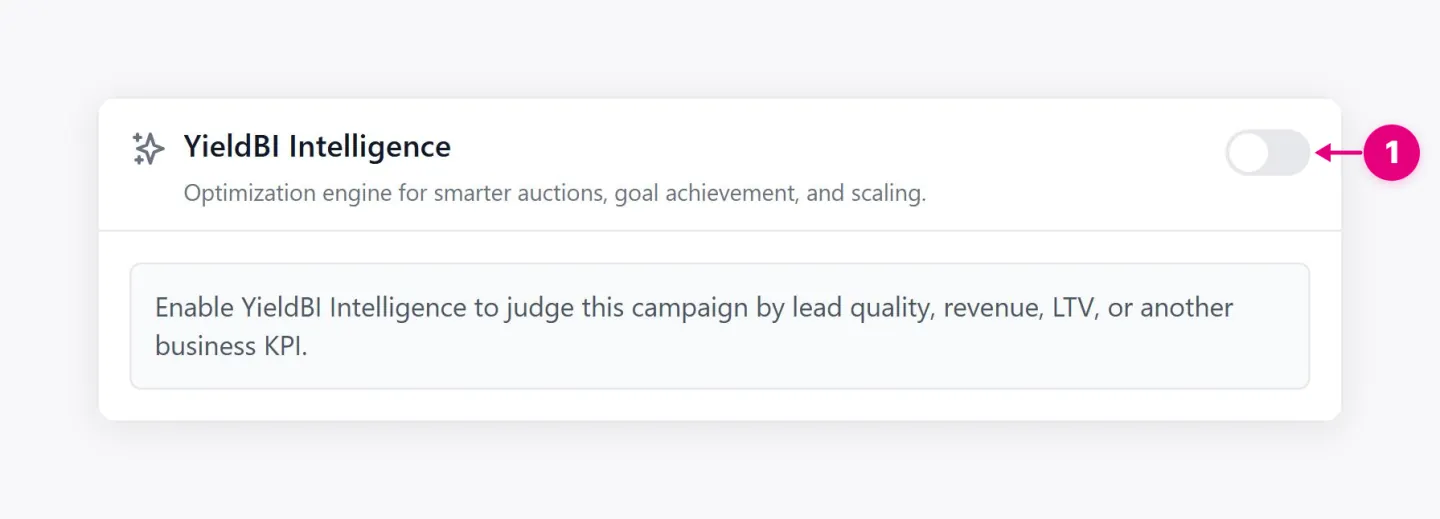
- YieldBI Intelligence switch. Turns the optimization engine on for this campaign.
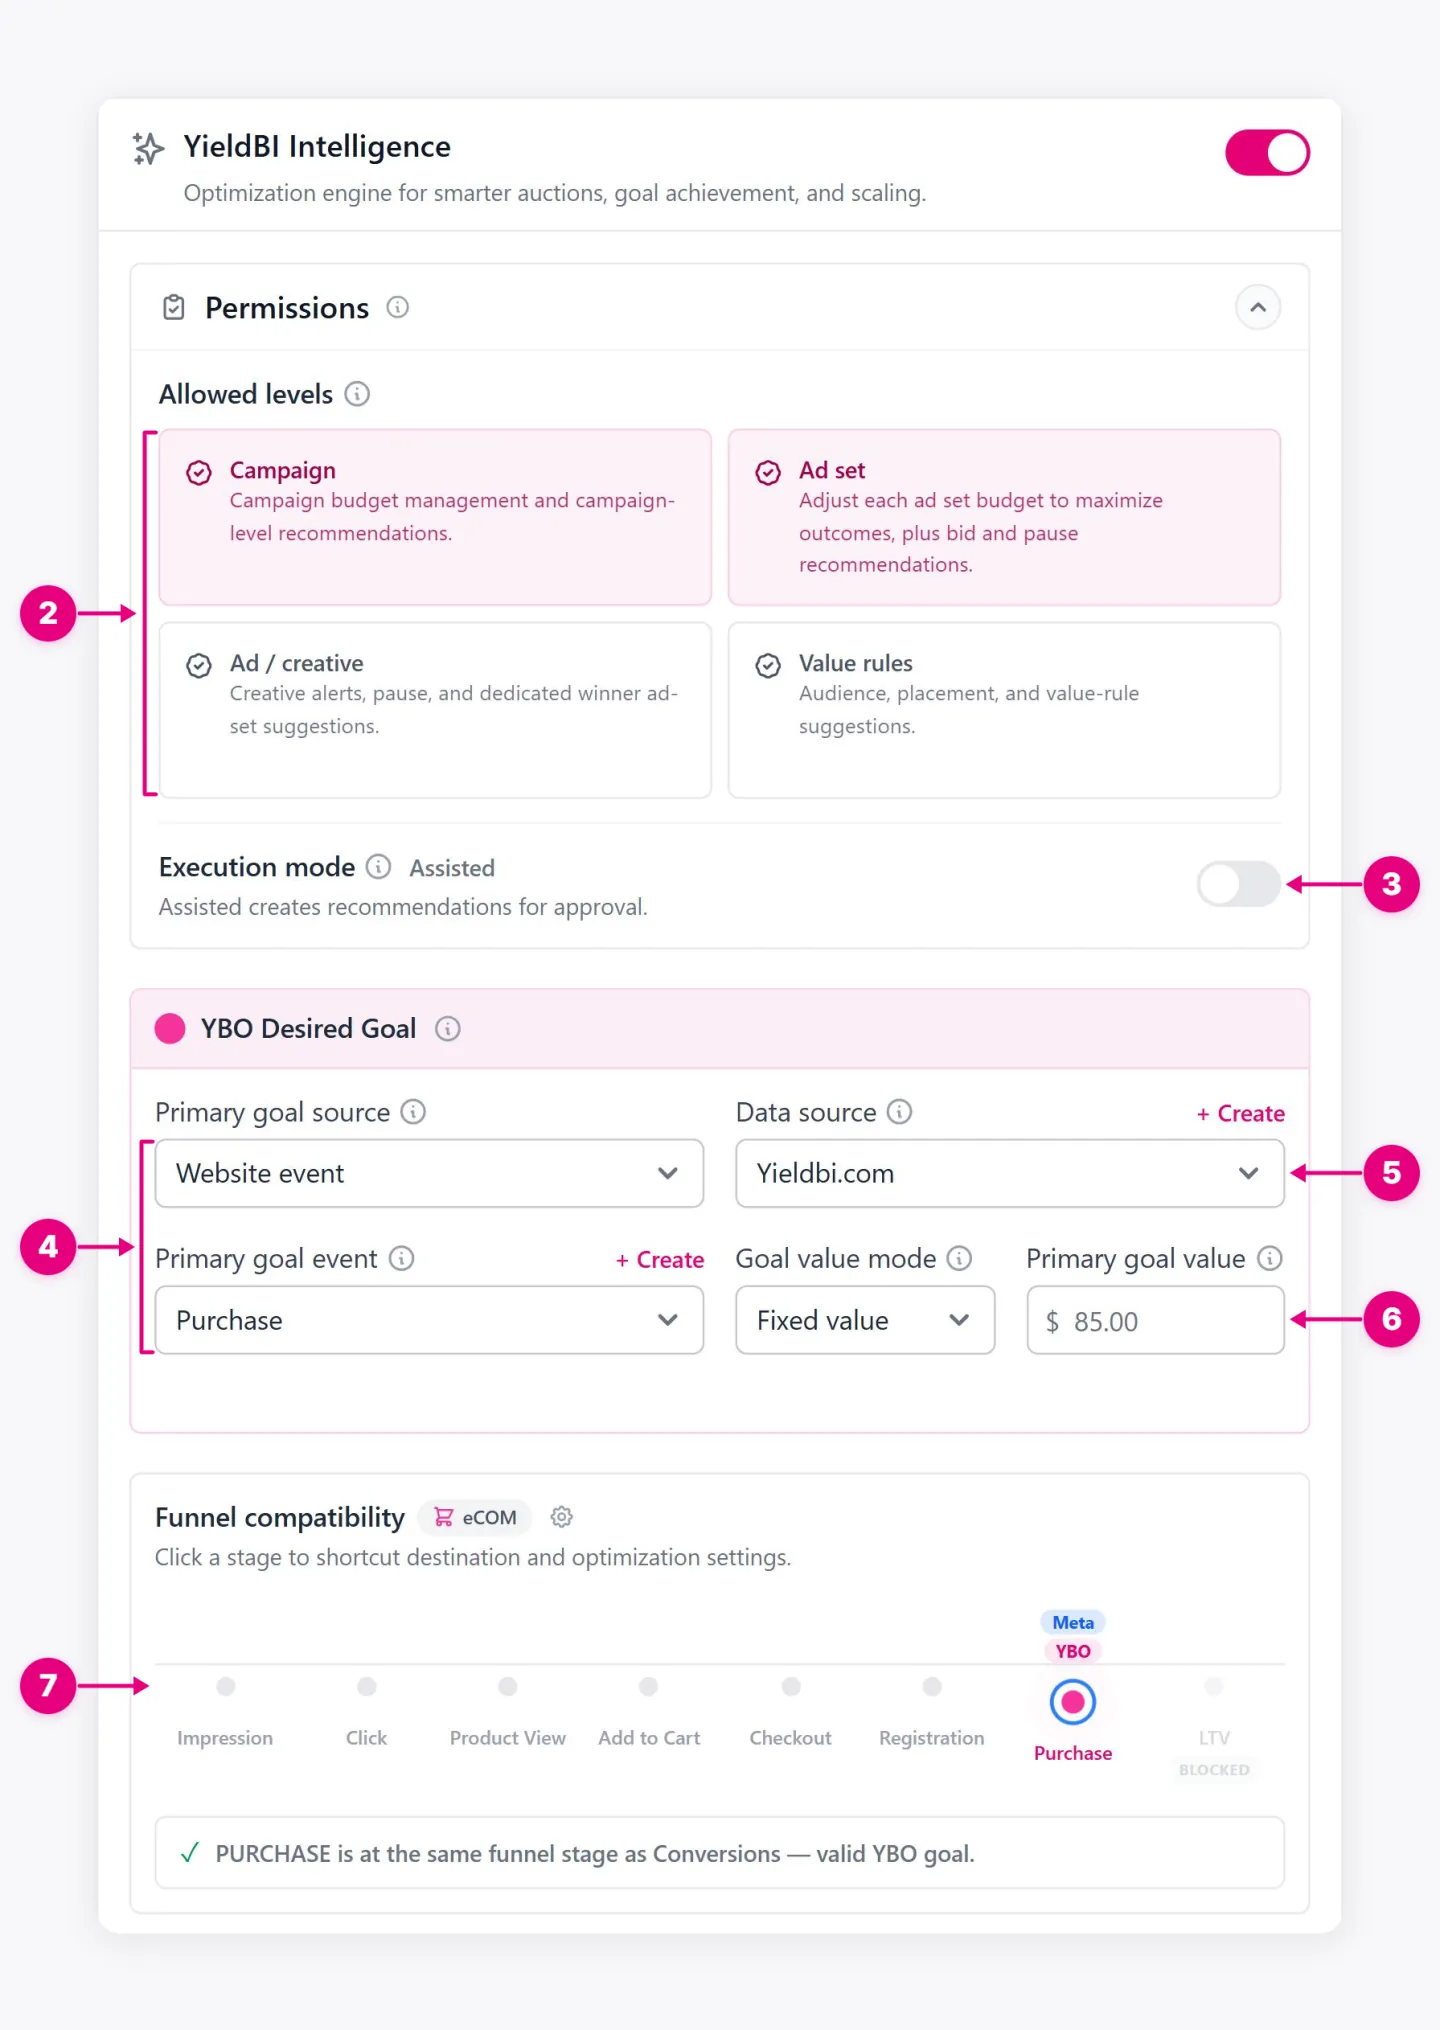
- Allowed levels. Chooses what YieldBI can review: campaign budgets, ad set budgets and bids, ads and creatives, and value rules.
- Execution mode. Decides whether YieldBI only recommends changes for approval or applies allowed actions itself.
- Primary goal source and event. The business result YieldBI judges the campaign by.
- Data source. Where that result is measured.
- Goal value. The value of one goal, used to judge whether results are profitable.
- Funnel compatibility. Checks that YieldBI’s goal and Meta’s optimization event sit at a compatible funnel stage.
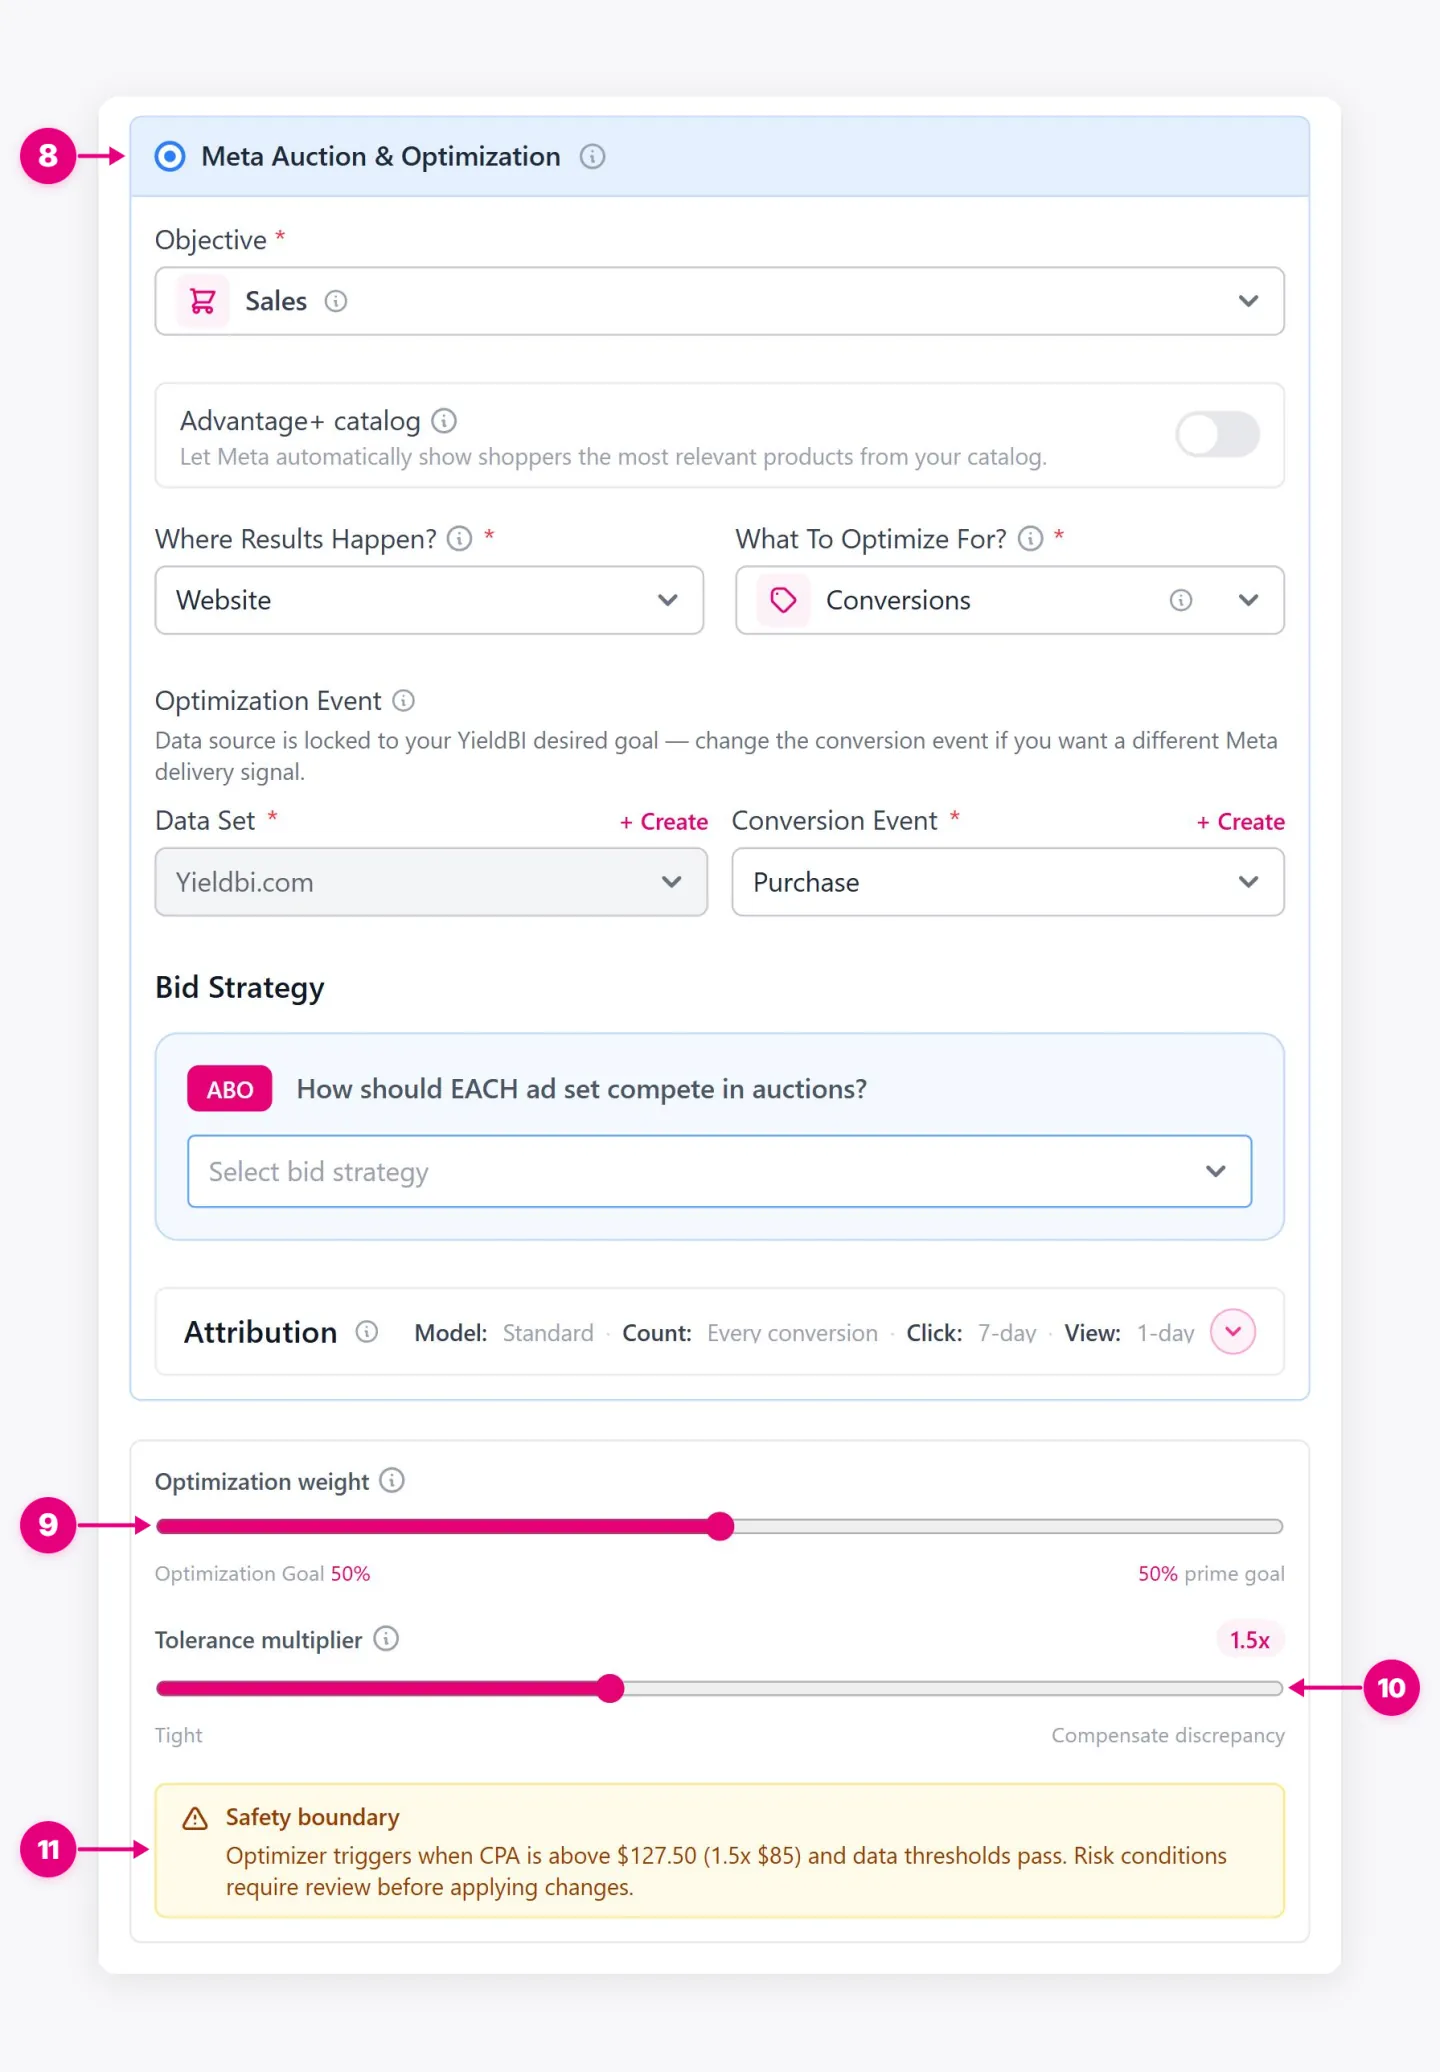
- Meta Auction & Optimization. The Meta delivery settings, linked to your YieldBI goal.
- Optimization weight. Balances YieldBI’s goal against Meta’s optimization goal.
- Tolerance multiplier. How far cost can rise above the goal value before YieldBI acts.
- Safety boundary. States exactly when the optimizer steps in.
17. Campaign Objective
Shows the objective chosen on the Campaign step and lets you change it before setting up tracking.
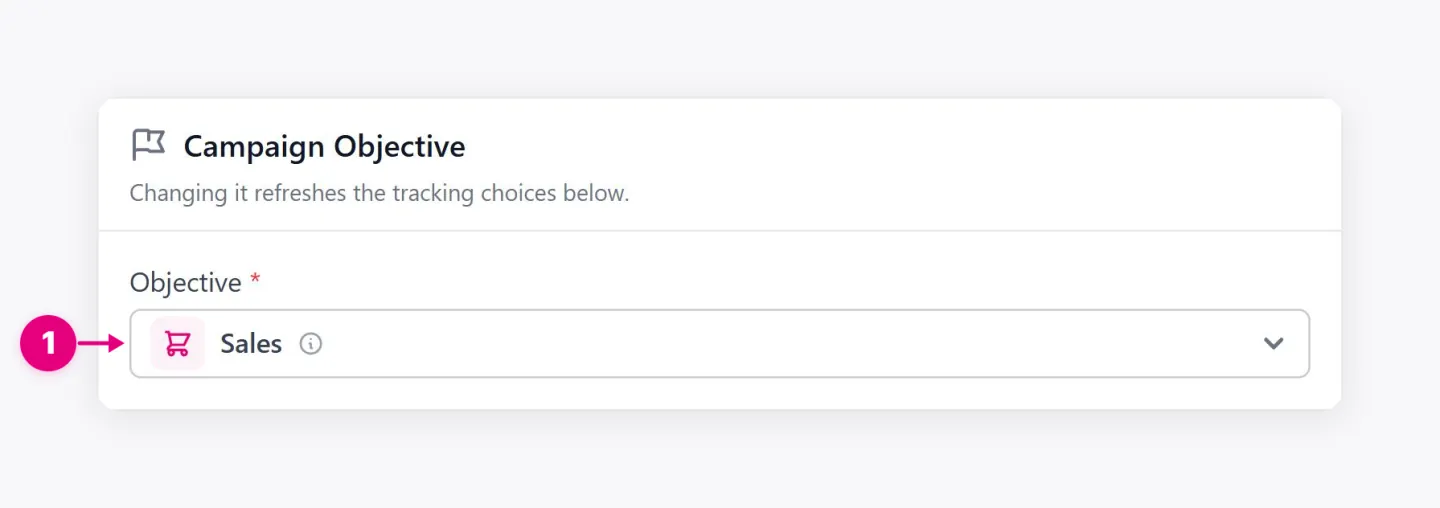
- Objective. The campaign objective. Changing it refreshes the tracking options below.
18. Optimization & Delivery
Tells Meta which result to optimize for and how to bid for it.
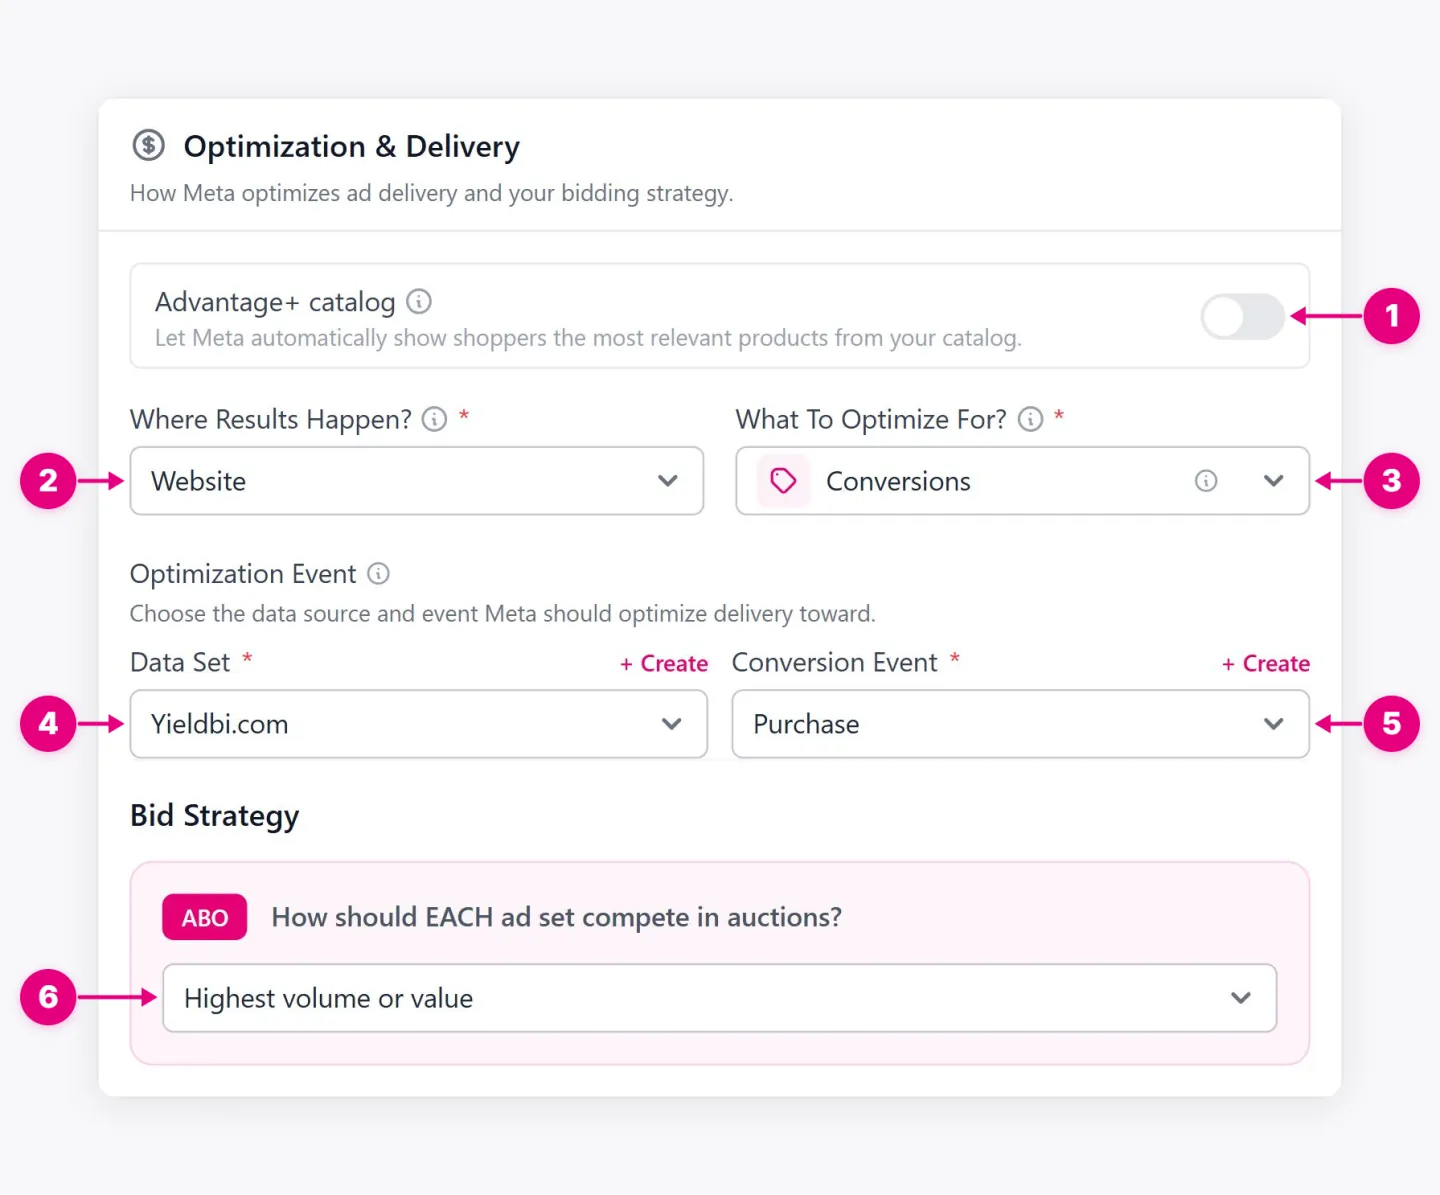
- Advantage+ catalog. Lets Meta show each shopper the most relevant products from your catalog.
- Where Results Happen? Where the conversion happens: website, app, calls, or messages.
- What To Optimize For? The result Meta prioritizes, such as conversions or conversion value.
- Data Set. The pixel or dataset that measures conversions.
- Conversion Event. The event Meta optimizes toward, such as Purchase.
- Bid Strategy. How each ad set competes in Meta’s auctions.
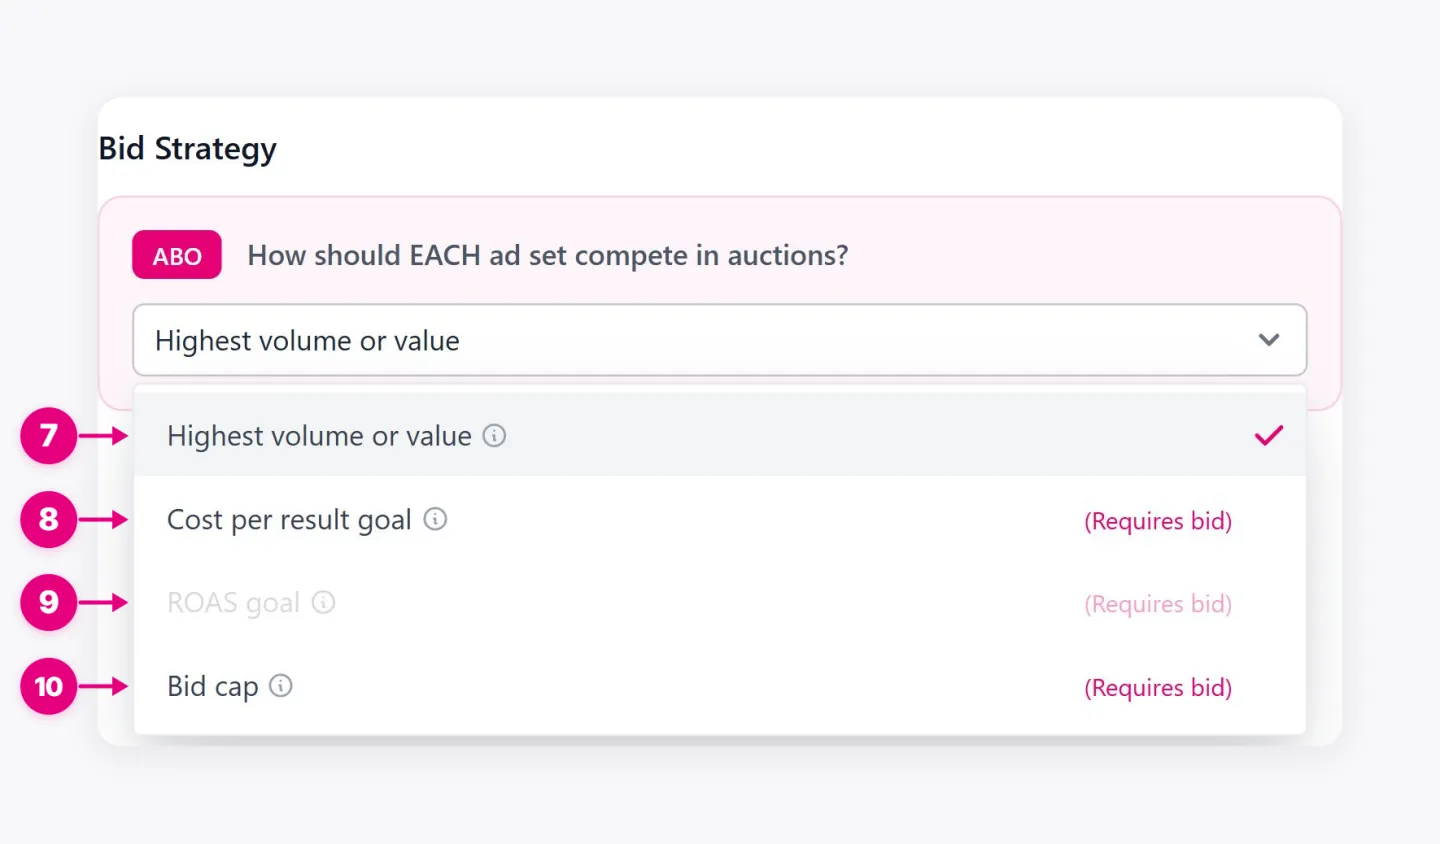
- Highest volume or value. Spends the full budget to get the most results. No bid needed.
- Cost per result goal. Aims to keep the average cost per result at a target you set.
- ROAS goal. A target return-on-ad-spend option, shown unavailable in this example.
- Bid cap. Sets the maximum bid in any single auction.
19. Events
Chooses where conversions are measured and how they are credited to your ads.
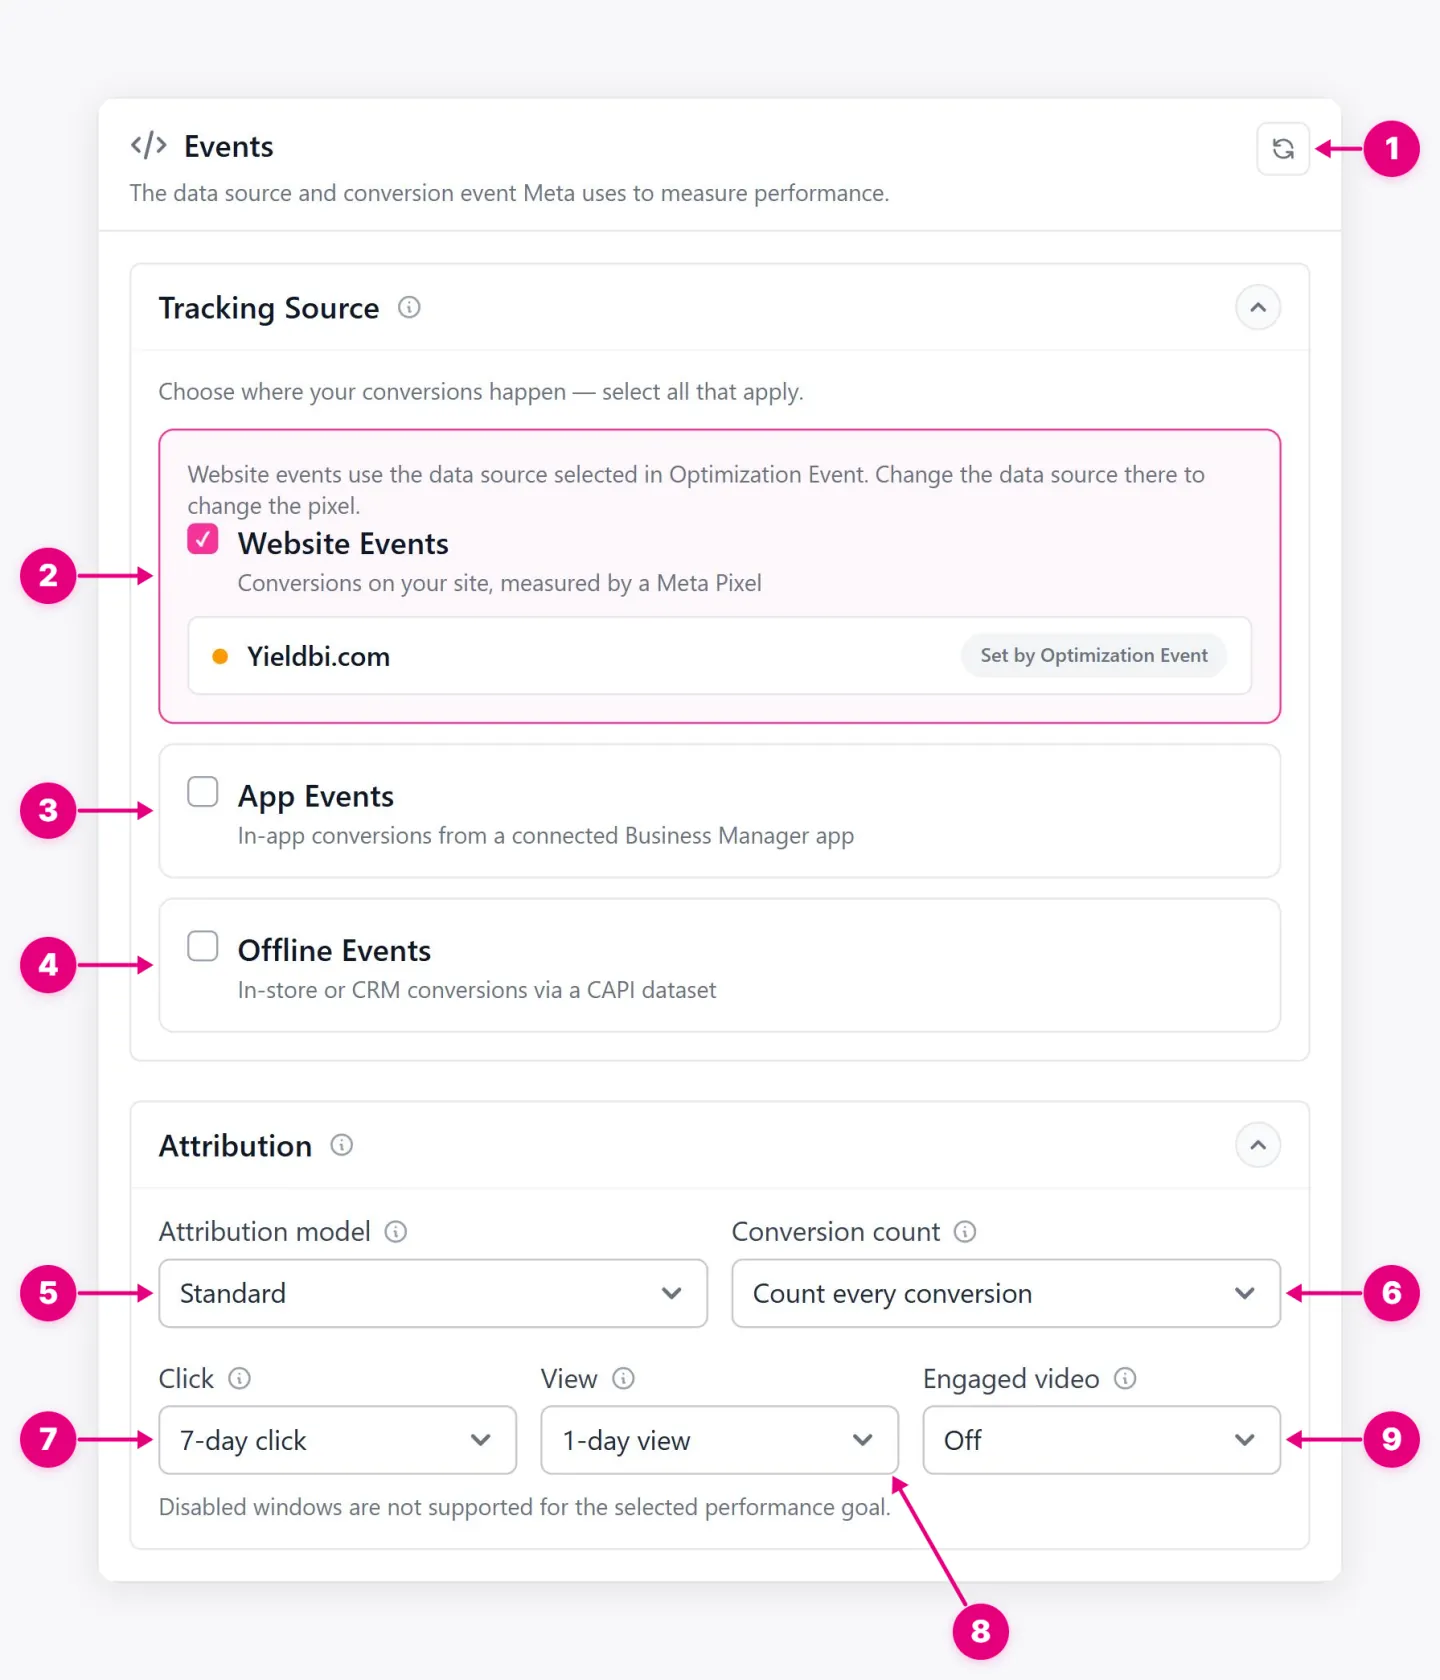
- Refresh. Loads tracking assets recently added in Meta.
- Website Events. Measures conversions on your site through the Meta Pixel.
- App Events. Measures in-app conversions.
- Offline Events. Measures in-store or CRM conversions sent through a dataset.
- Attribution model. Standard uses the windows below. Incremental credits only conversions Meta estimates your ads caused.
- Conversion count. Counts every conversion, or one per person.
- Click window. How long after a click a conversion can be credited.
- View window. How long after someone saw the ad, without clicking, a conversion can be credited.
- Engaged video. Credits app conversions after an engaged video view.
20. Destination
Sets the identity your ads run under and optional defaults for ads you create later. You can change those defaults when creating each ad.
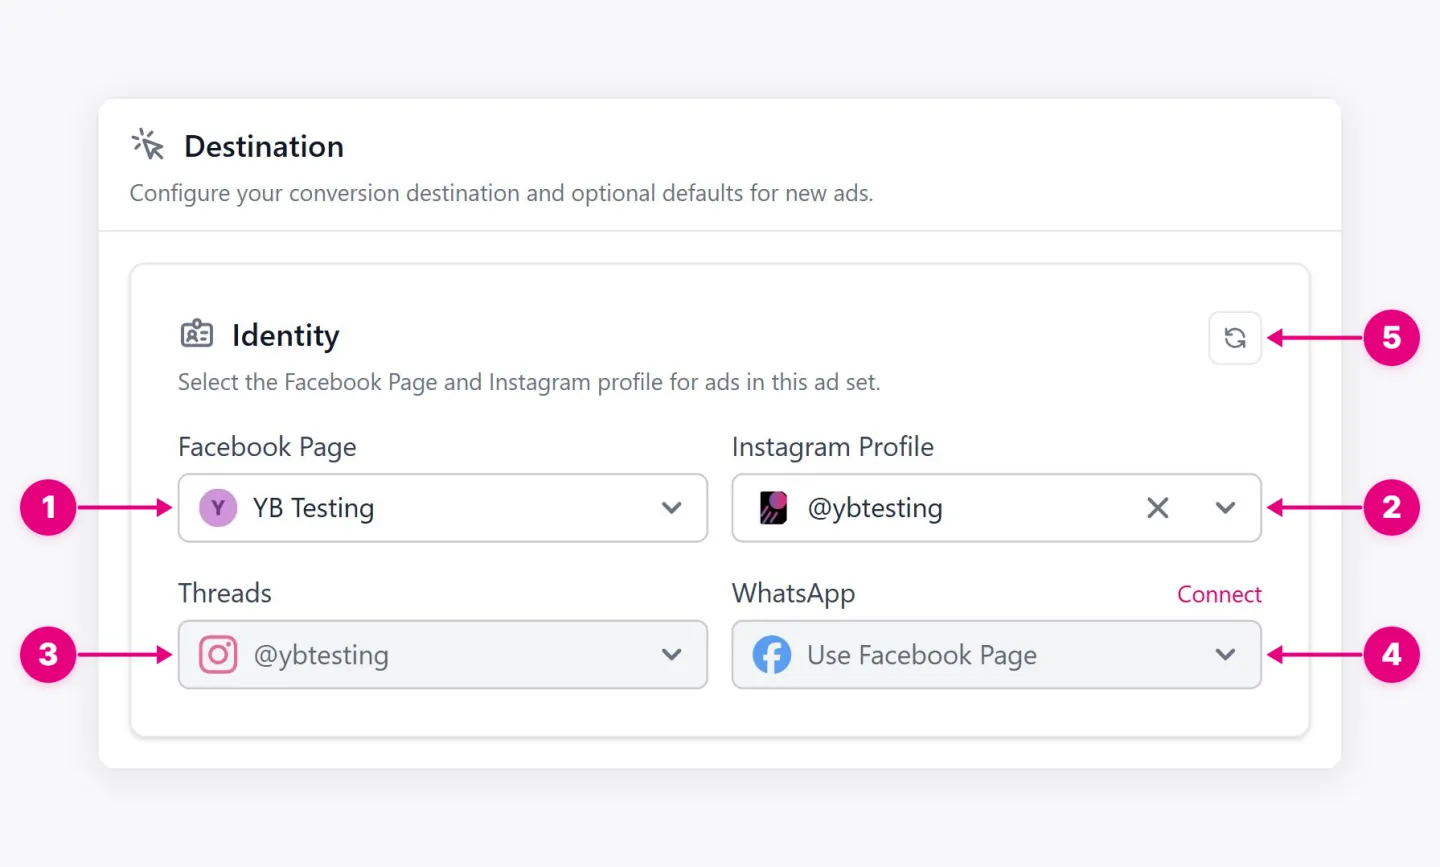
- Facebook Page. The Page whose name and picture appear on the ads.
- Instagram Profile. The profile the ads run from on Instagram.
- Threads. The identity used on Threads.
- WhatsApp. The identity used on WhatsApp. Connect links a number.
- Refresh. Loads Pages and profiles recently connected in Meta.
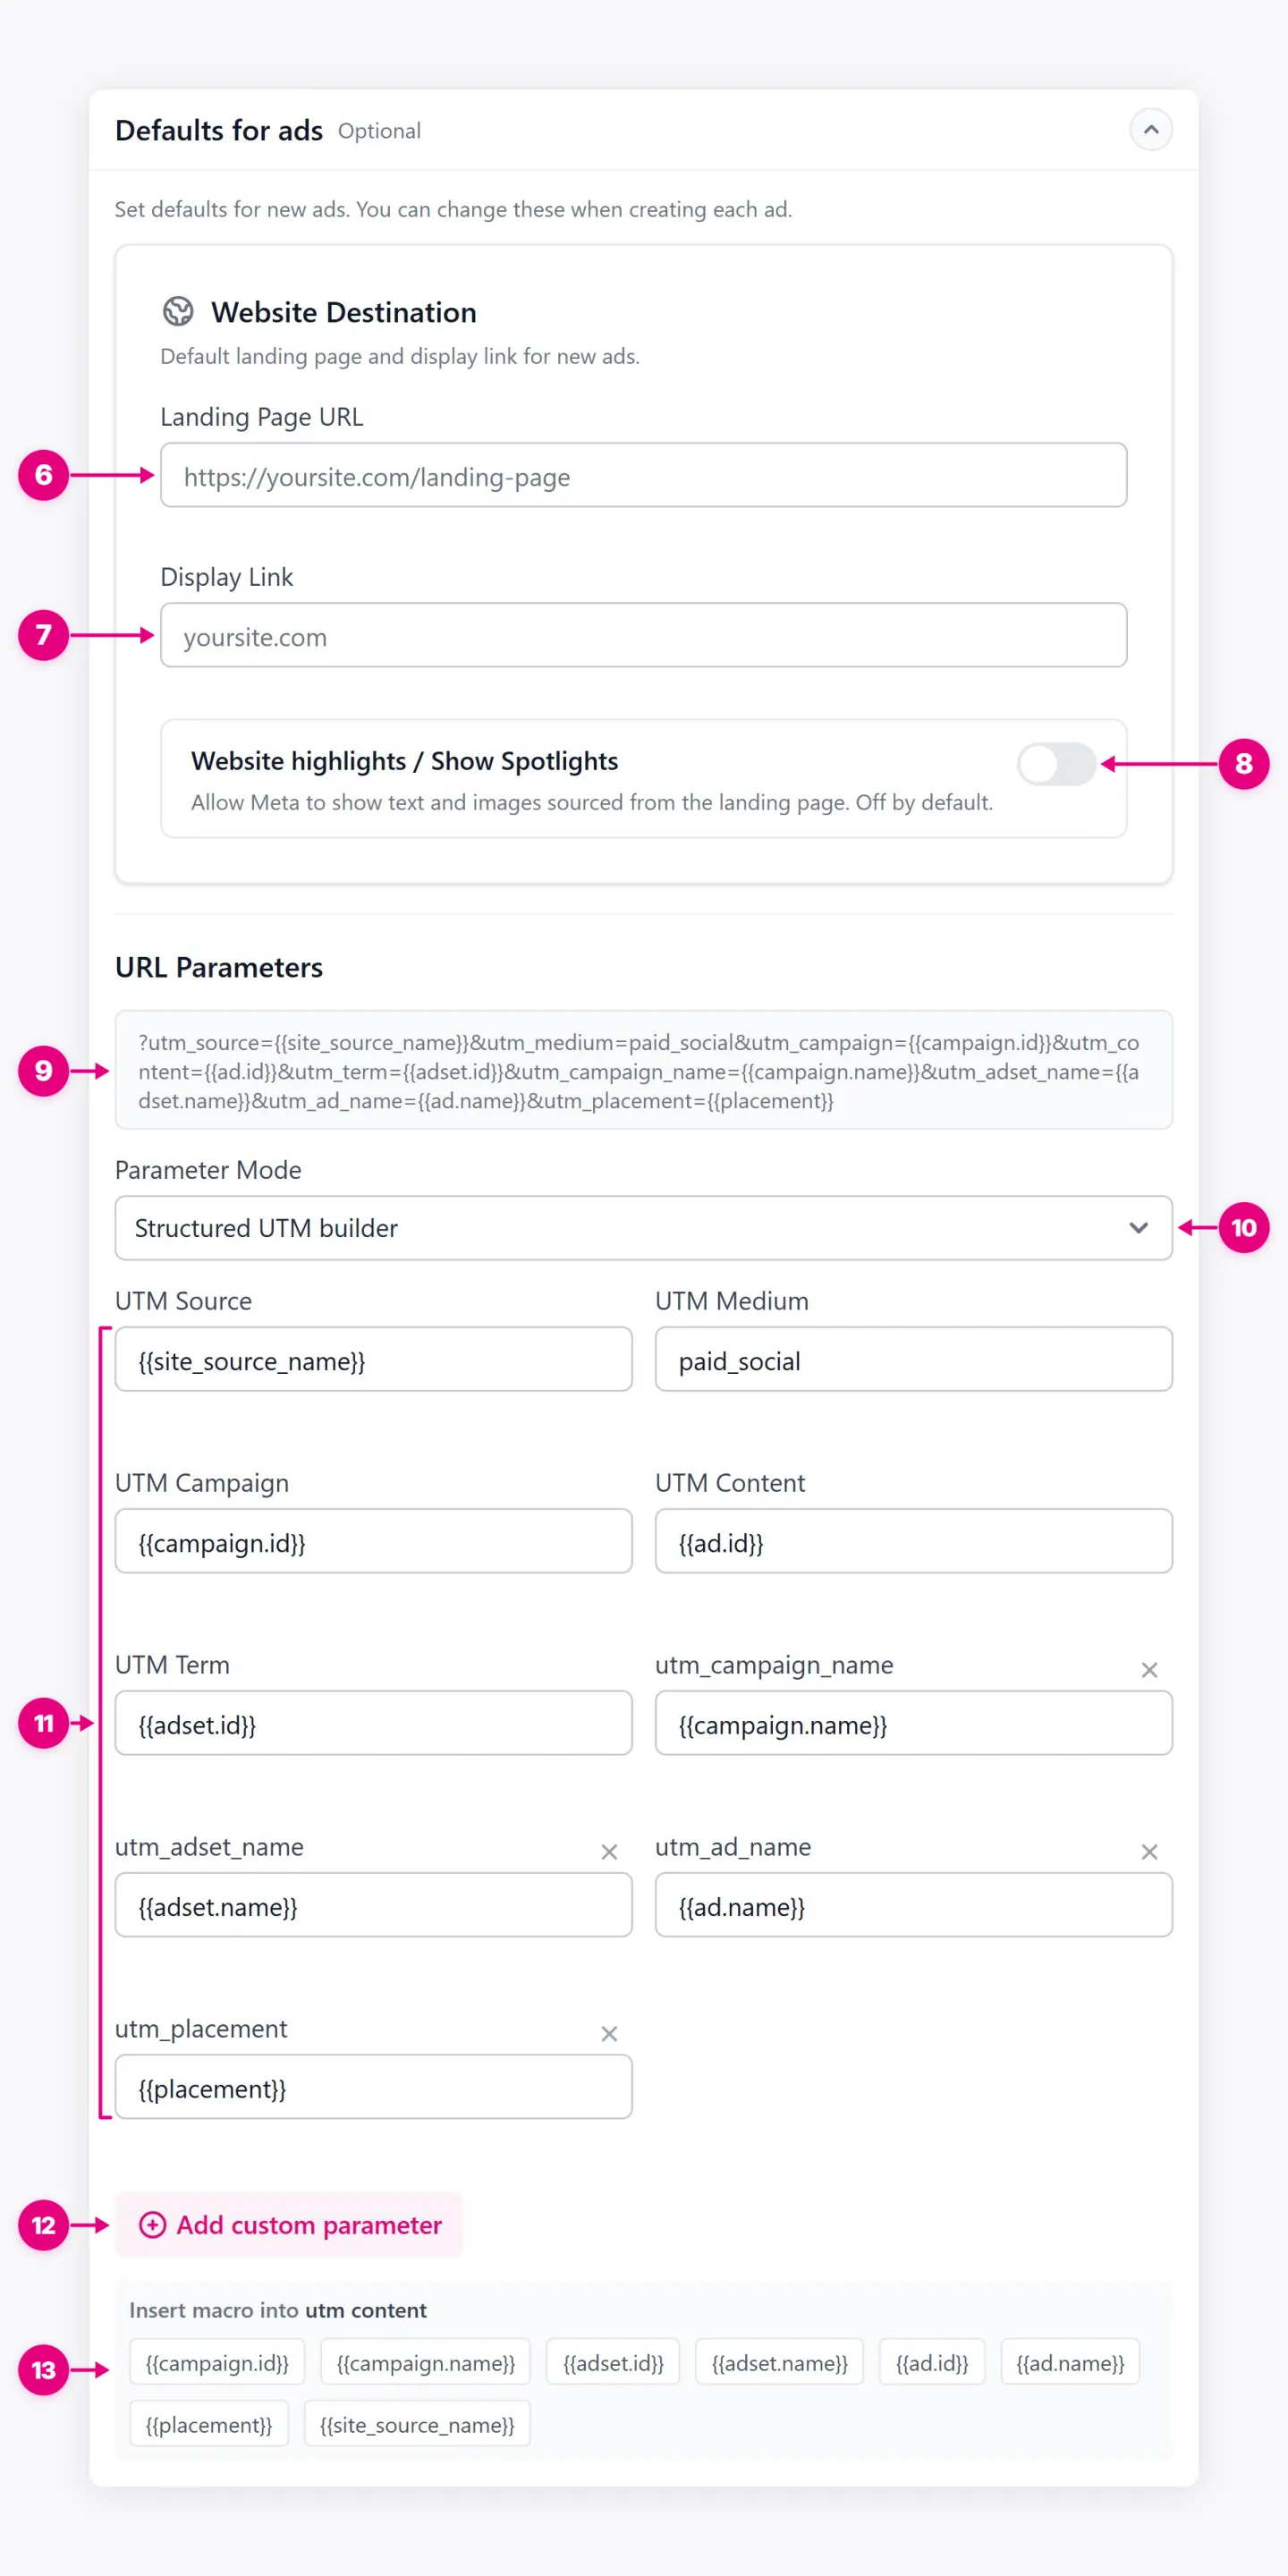
- Landing Page URL. The default page ads send people to.
- Display Link. The short link shown on the ad.
- Website highlights. Lets Meta show text and images taken from your landing page.
- URL Parameters. The tracking string added to every ad link, so sales can be traced to the exact campaign, ad set, ad, and placement.
- Parameter Mode. Edits the parameters field by field or as one string.
- UTM fields. The value of each tracking parameter.
- Add custom parameter. Adds your own tracking parameter.
- Macros. Insert Meta values, such as campaign name or ad ID, that fill in automatically.
Stage 2: Ad Set, Settings
21. Ad Set Settings
Controls when each ad set can spend.
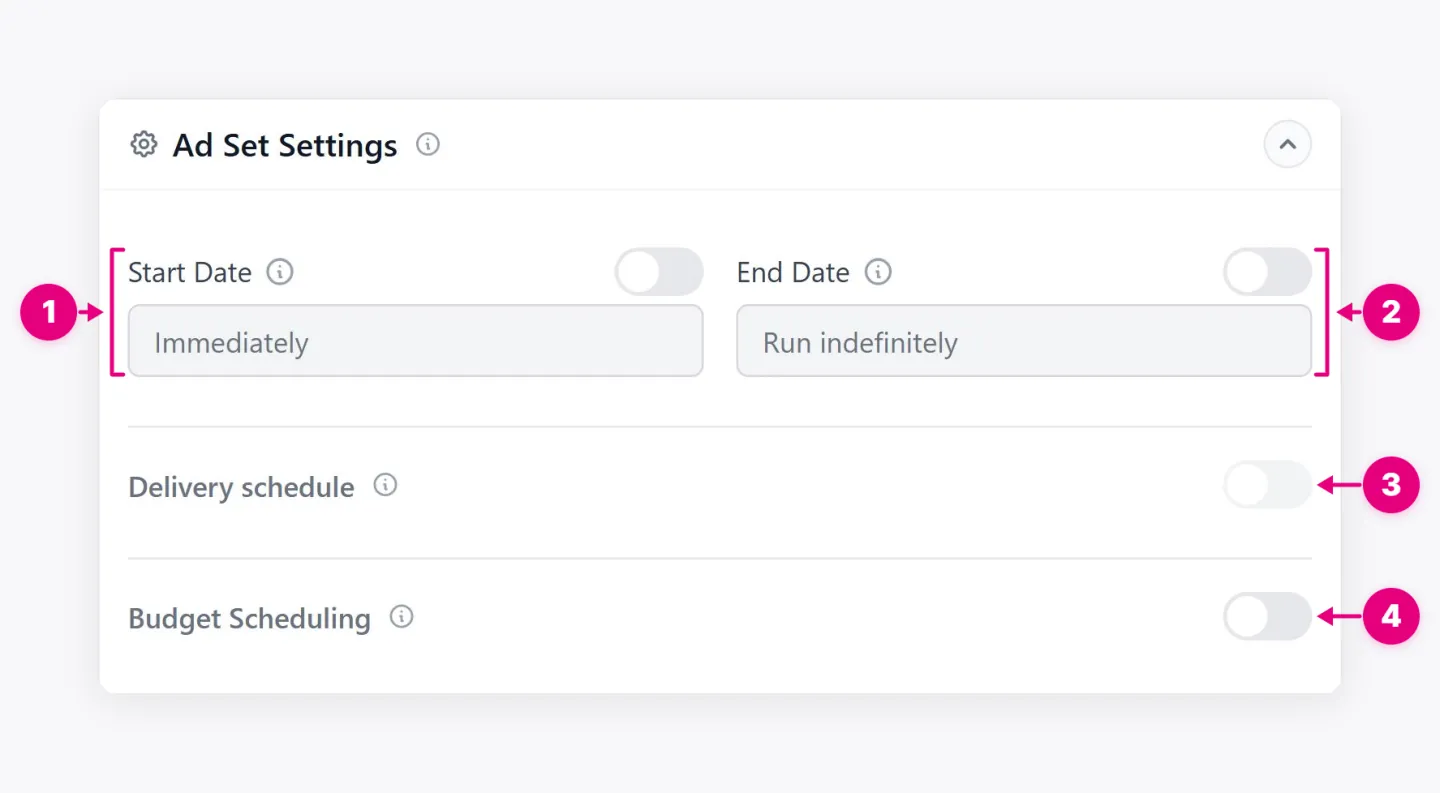
- Start Date. When the ad sets start. Immediately by default.
- End Date. When the ad sets stop. Optional.
- Delivery schedule. Runs ads only on chosen days and hours. Needs a lifetime budget.
- Budget Scheduling. Raises or lowers each ad set’s daily budget during chosen dates.
22. Ad Set Naming
Builds a consistent name for every ad set the wizard creates, so variants are easy to tell apart in reports.
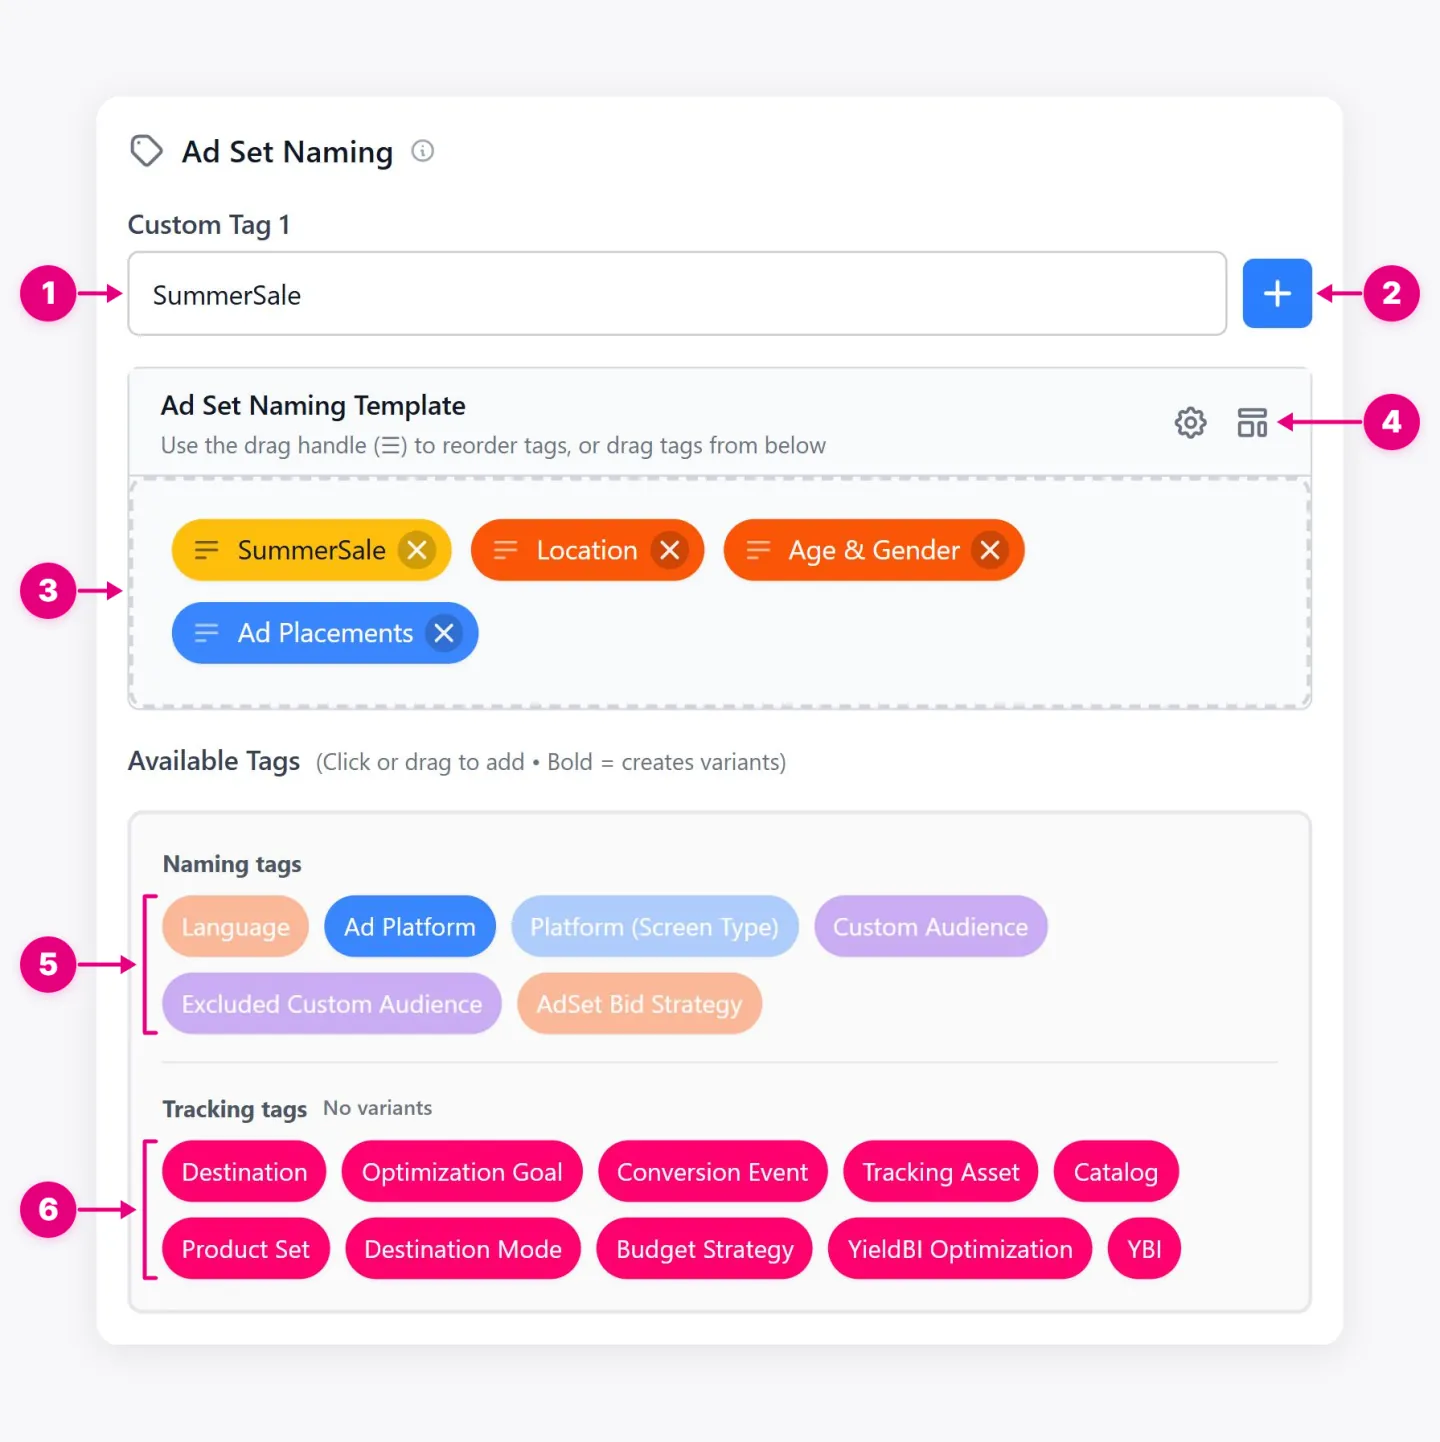
- Custom Tag. Adds your own fixed text, such as a promotion or test name, to every ad set name.
- Add custom tag. Adds another custom tag.
- Naming template. The tags that make up the name, in order. Drag to reorder.
- Separator and template. Change the character between tags, or load a saved naming template.
- Naming tags. Describe targeting. Tags for settings grouped into variants give each ad set a different name.
- Tracking tags. Add tracking details to the name without creating variants.
23. Ad Set Configuration
Lists every ad set the wizard will create, with its name, status, and budget.
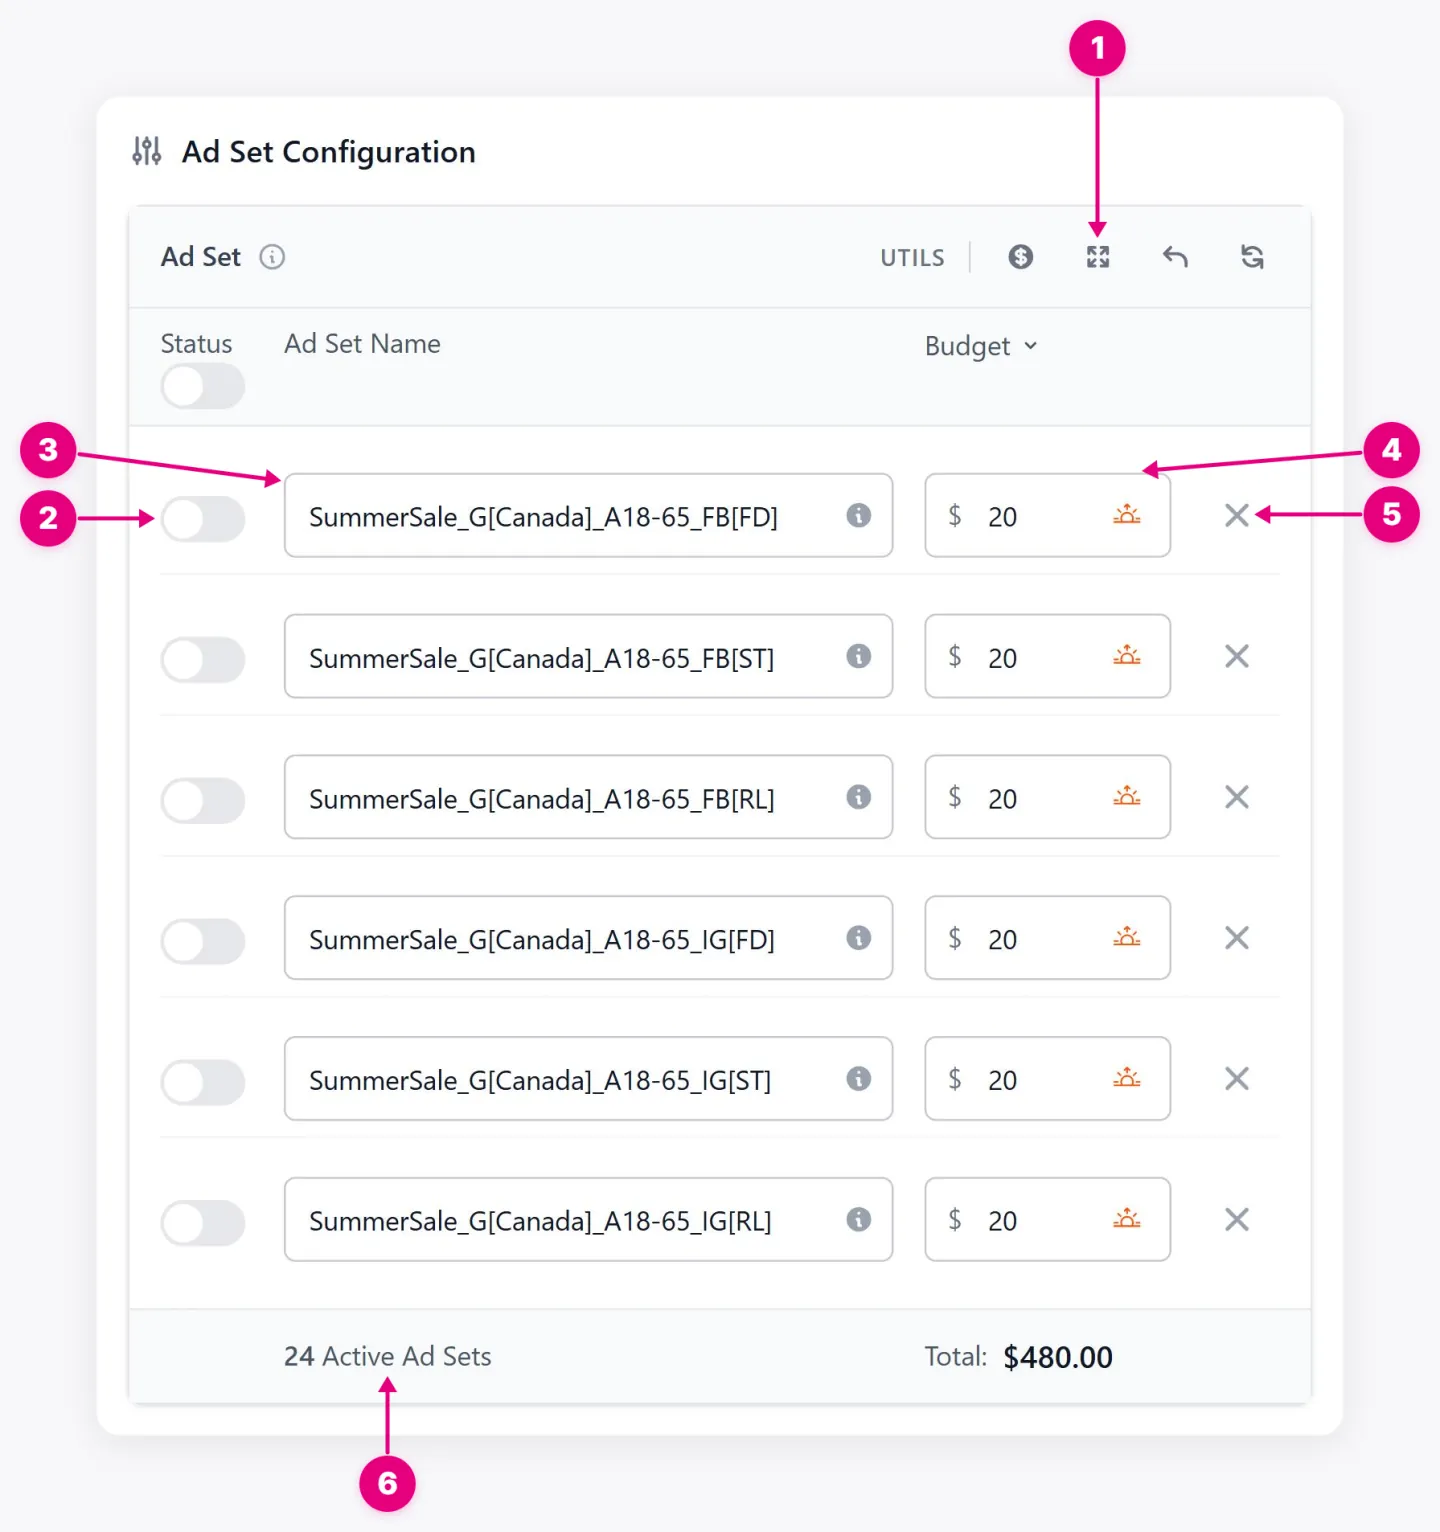
- UTILS. Bulk budget, wider name editing, restoring generated names, and resetting dialog choices.
- Status. Creates the ad set active or paused.
- Ad set name. The generated name. Edit it to override the template for this ad set.
- Budget. The ad set’s daily or lifetime budget.
- Remove. Drops the ad set from the campaign.
- Totals. The number of ad sets and their combined budget.
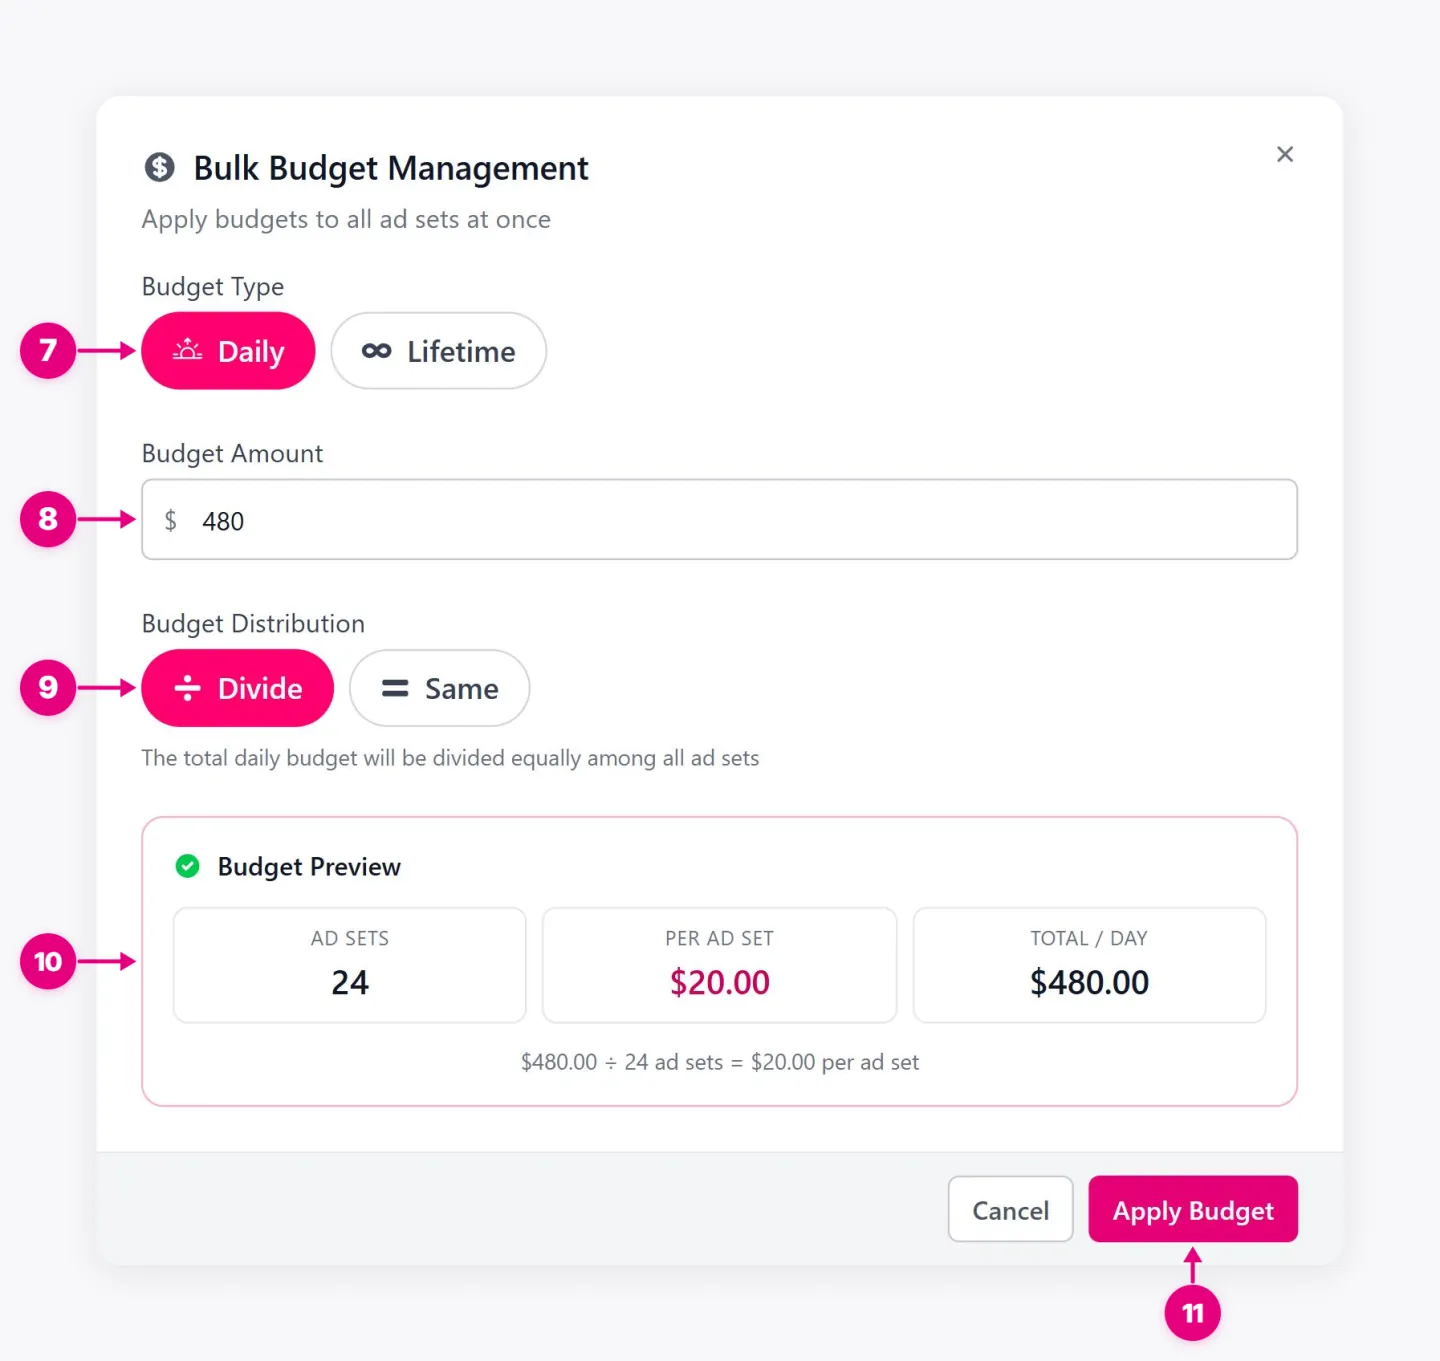
- Budget Type. Daily or lifetime budgets for all ad sets.
- Budget Amount. The amount to apply.
- Budget Distribution. Divide splits the amount across ad sets. Same gives each ad set the full amount.
- Budget Preview. Shows the number of ad sets, the budget per ad set, and the total before you apply.
- Apply Budget. Sets the budget on every ad set at once.
Stage 3: Review
24. Review Campaign
The last check before submission summarizes every setting and every generated ad set. If the wizard finds a blocking error, use Fix before publishing to jump to the affected step and correct it. Warnings also appear there but do not block submission.
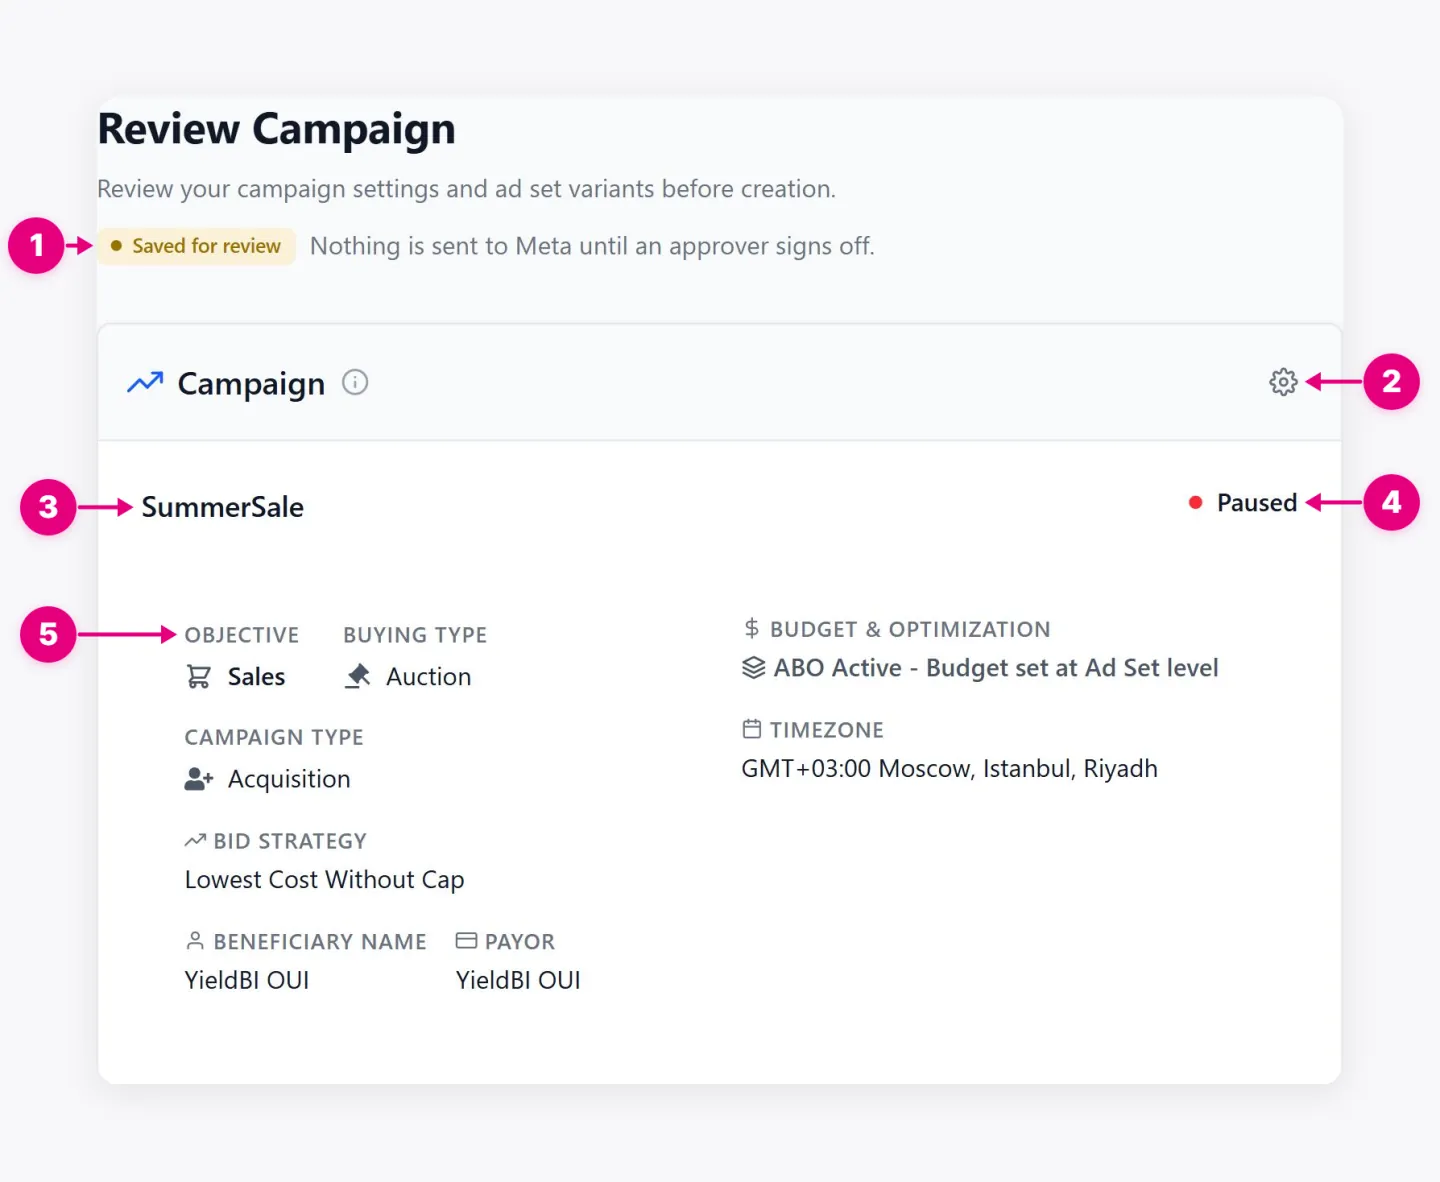
- Saved for review. Shows that the campaign waits for an approver’s sign-off before anything is sent to Meta.
- Edit section. Jumps back to the step where these settings are made.
- Campaign name. The final name, with every naming tag filled in.
- Status. The status the campaign will have when it reaches Meta.
- Campaign settings. A summary of objective, buying type, campaign type, bid strategy, beneficiary, payor, budget type, and time zone.
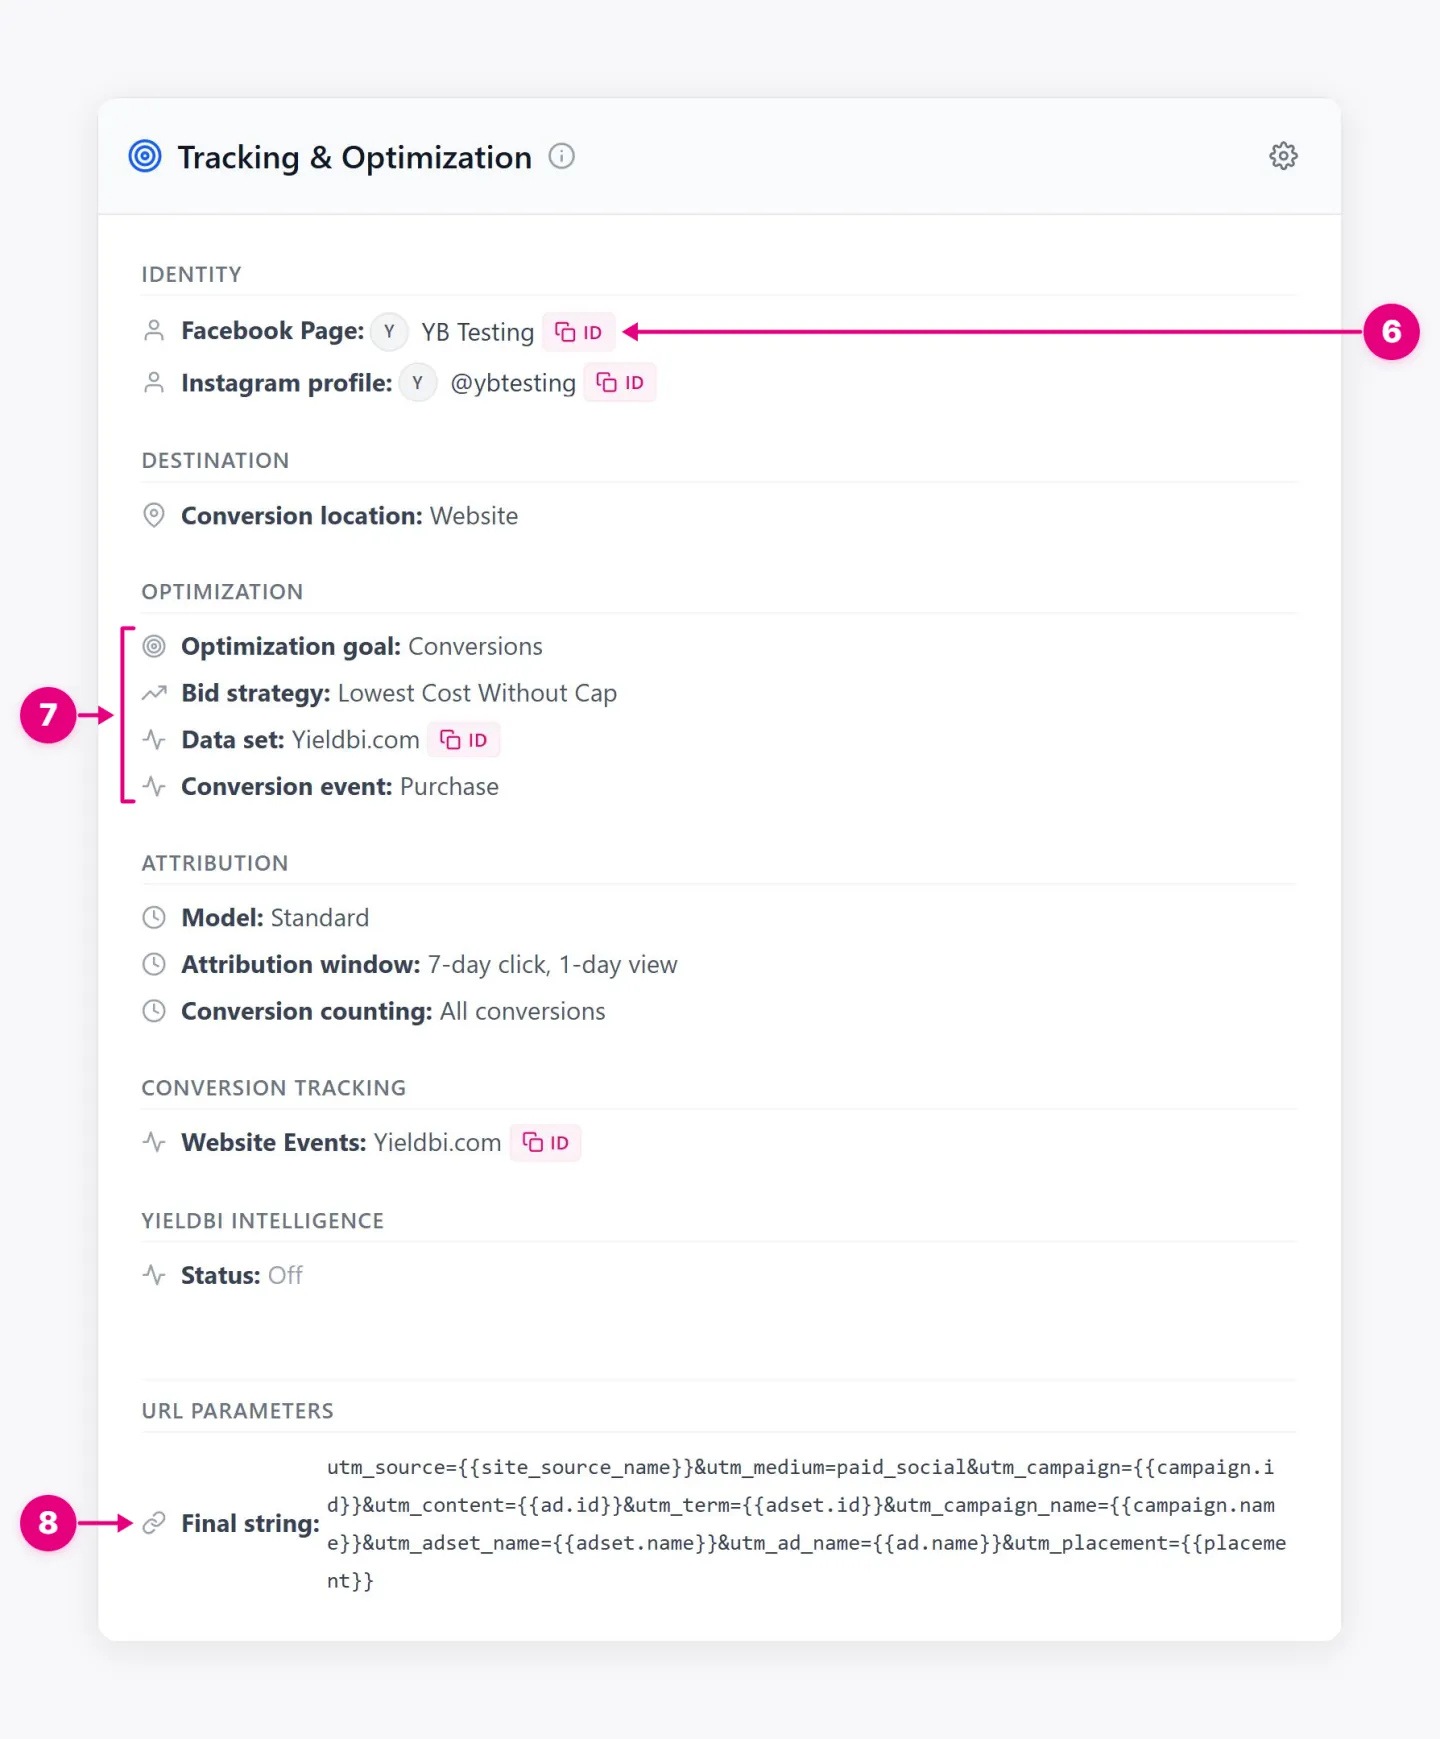
- Copy ID. Copies the Meta ID of a Page, profile, or data set, for checking it in Meta.
- Optimization. The goal, bid strategy, data set, and conversion event Meta will optimize toward.
- URL parameters. The final tracking string added to every ad link.
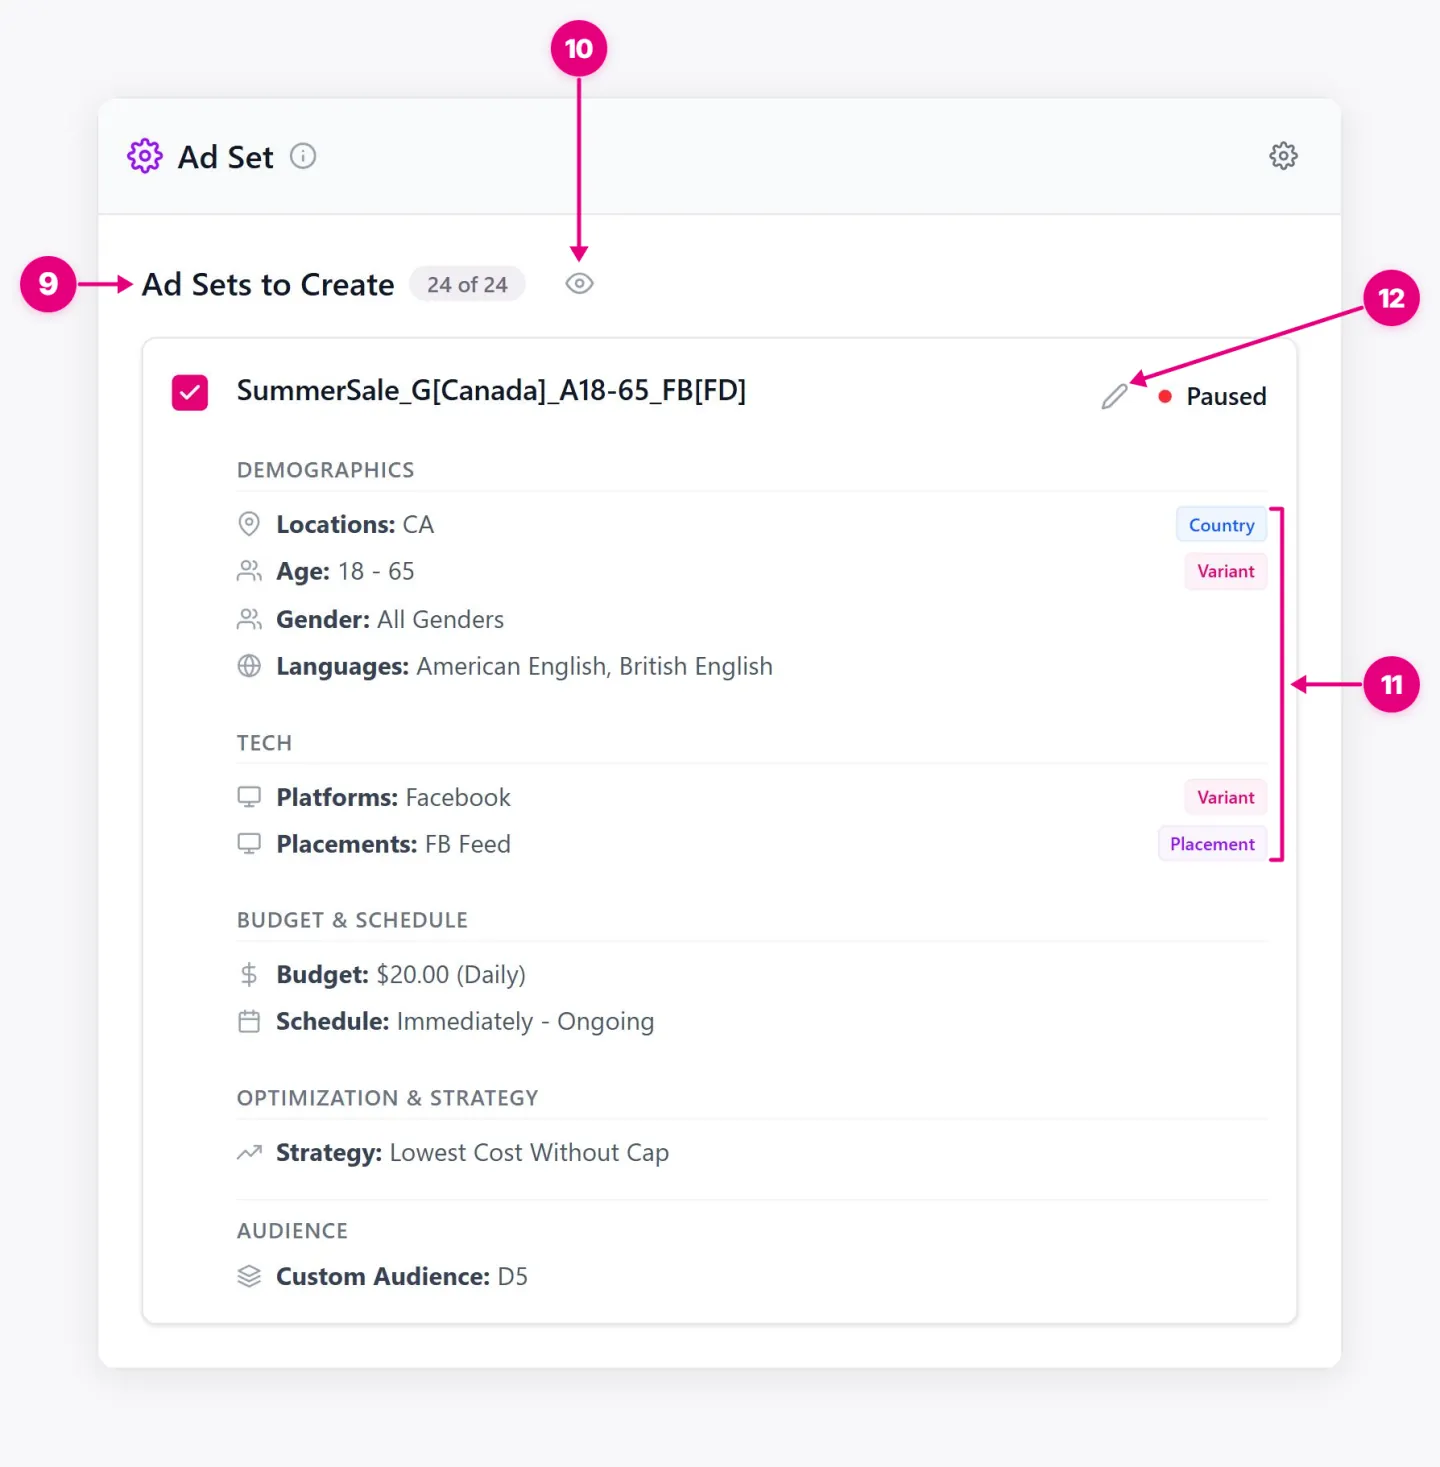
- Ad Sets to Create. How many ad sets the wizard will create, out of all generated variants.
- Dim repeating fields. Fades settings that are the same across every ad set, so the differences stand out.
- Variant labels. Mark the settings that make this ad set different from the others, such as country, age, or placement.
- Edit ad set. Changes one generated ad set on its own.
Each generated ad set also has a checkbox. Clear it to exclude that variant from creation; the card then shows Excluded from creation. Check the remaining ad sets and their budgets before submitting.
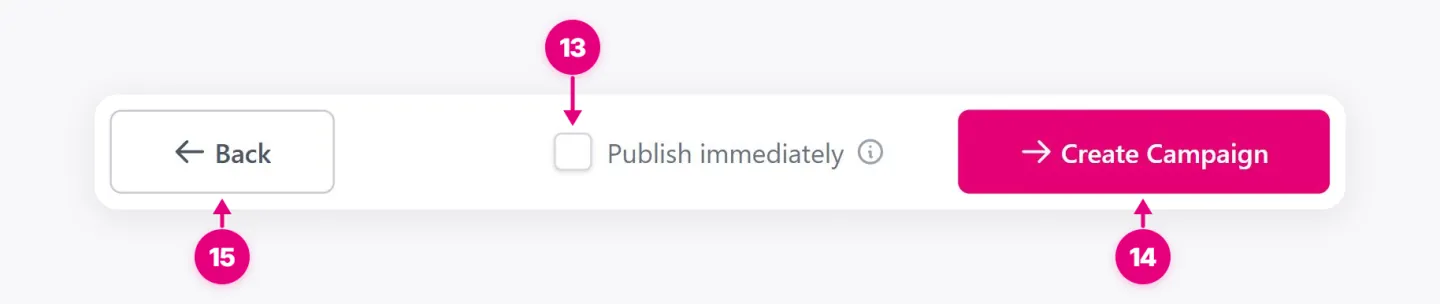
- Publish immediately. Appears only when your account’s review policy lets you choose. If available and selected, it requests direct publishing. The choice may be remembered from your last campaign; the server still applies the current policy. If the option is absent, the policy determines whether the campaign is sent for review or published automatically.
- Create Campaign. Submits the campaign for the review or publishing path allowed by the account policy.
- Back. Returns to the previous step to make changes.
After submission. The result screen shows whether the campaign is waiting for review, created on Meta, still being created, or failed. A campaign can also be created while some ad sets fail; in that case, the draft is kept so you can address and retry the failed ad sets. Use Open review for a campaign awaiting approval or Open in campaign table for one created on Meta. If it has no ad sets yet, add them from the campaign table. Create the ads separately after the campaign and ad sets are ready.
25. Unsaved changes
Protects your work when you close the wizard before creating the campaign.
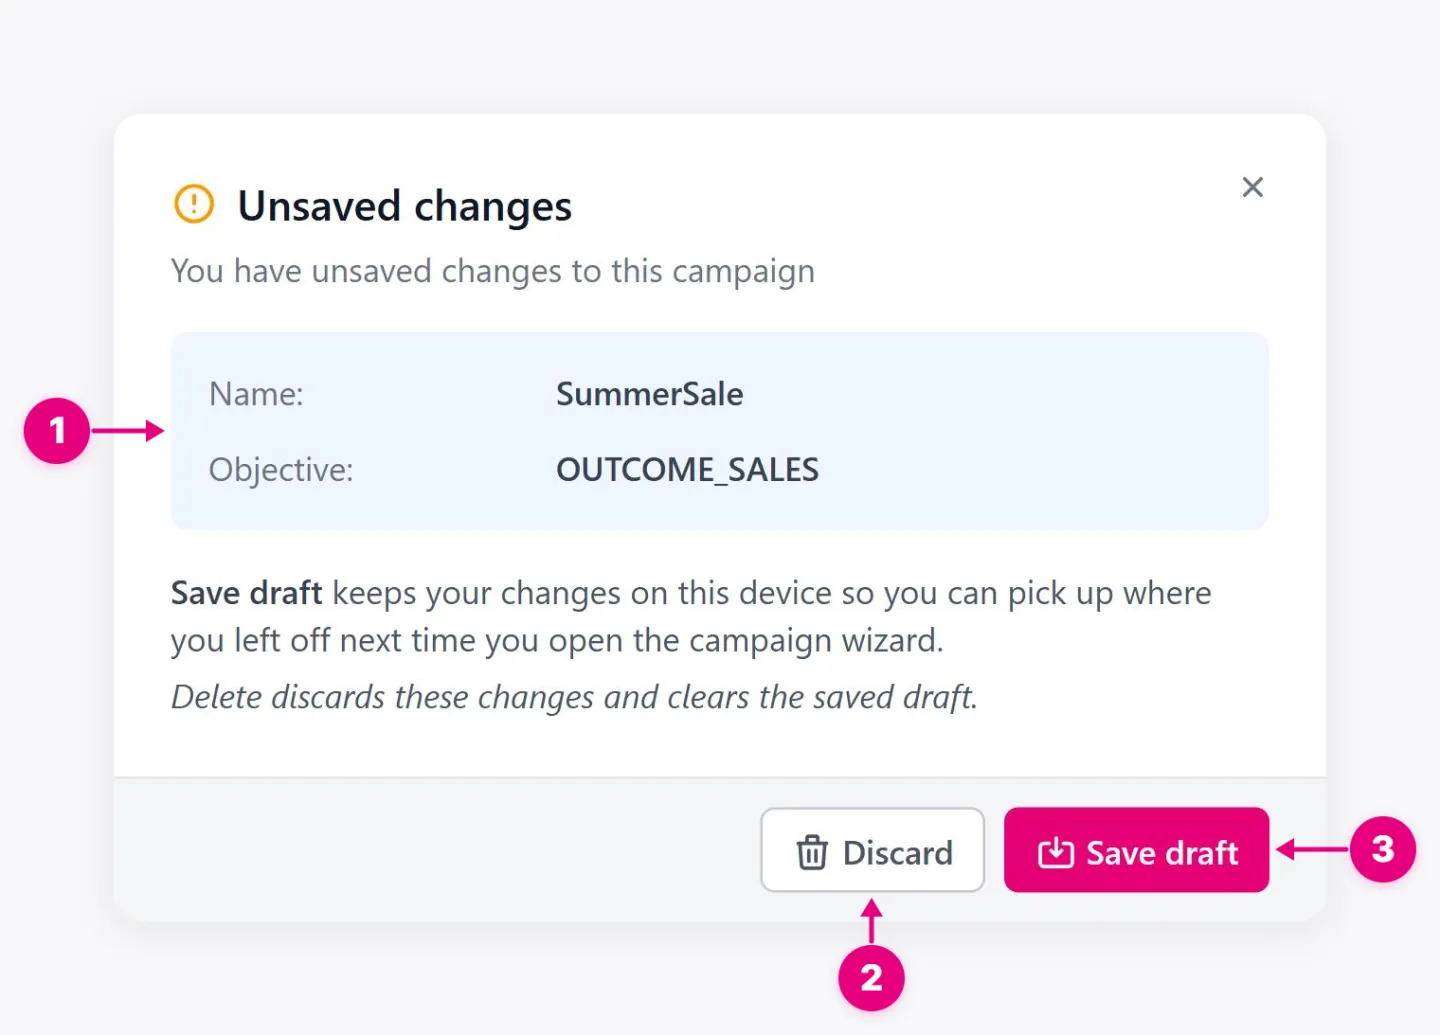
- Campaign summary. Shows which campaign the unsaved changes belong to.
- Discard. Clears the changes and any saved draft.
- Save draft. Keeps your changes on this device, so you can continue next time you open the wizard.
Related reading
The campaign objective decides which audience Meta shows your ads to. Why Sales works better than Traffic for most businesses, and how to pick the right one.
Meta Ads ConceptsCampaign Budget Optimization lets Meta reallocate spend across ad sets automatically. When to use CBO instead of setting fixed budgets by hand.
Meta Ads ConceptsHow Meta's four bid strategies control auction spend, and how to pick the right one as a campaign matures inside YieldBI.
Meta Ads ConceptsWhat triggers Meta's learning phase, why costs run high while it's active, and how to get an ad set through it without resetting progress.