 English
 Français
 Deutsch
 Español
Getting Started
Media Studio: board overview
Learn the Media Studio canvas controls, start or reuse a board, load saved media, and choose the right node for your next creative step.
YieldBI TeamGrowth ResearchUpdated Oct 2026
On this page
Media Studio is a visual workspace for connecting assets, planning creative work, and producing outputs. Start with a new board or a saved template, add the source nodes you need, and connect them to the next step in your workflow. This guide explains the canvas, its controls, and how to reuse saved media. Available assets and results depend on the selected account.
1. Start a board
Open Media Studio from the app navigation and choose the account whose assets you want to use. Add nodes from the left panel, then connect them when a step should use another node’s output. A connection makes the upstream asset available to a downstream step; check the receiving node to confirm which inputs it will use.
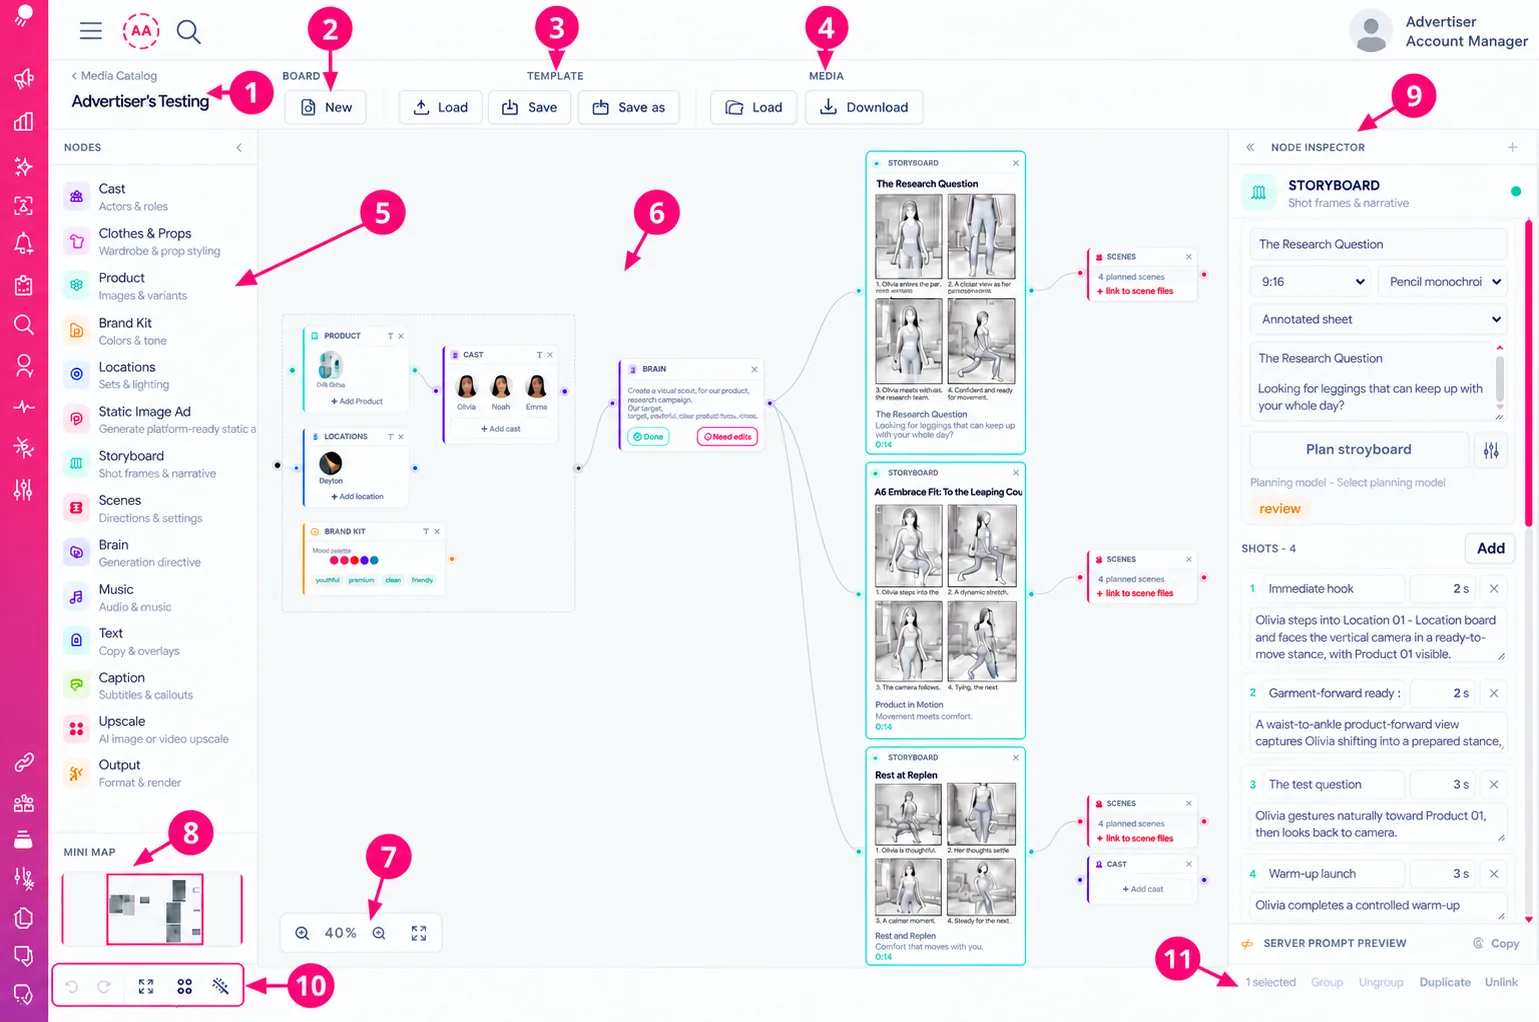
In Media Studio, a board is the working canvas. Nodes are the cards placed on it; connections link nodes so a later step can use an earlier node’s output. The screenshot callouts identify these areas and controls:
- Board name: Identifies the board you are editing, helping you confirm which workflow you are changing before you save or reuse it.
- New: Opens a fresh board, giving you a clean canvas for a different workflow.
- Templates: Load a saved board arrangement or save the current board for reuse. Templates reduce setup work and help keep repeated workflows consistent.
- Media: Load existing account media onto this board as nodes, so you can reuse saved assets without recreating them.
- Node library: Add the node type you need. Source nodes provide inputs; planning and output nodes help turn those inputs into creative work. Choosing only relevant nodes keeps the workflow easier to follow.
- Canvas: The main workspace for placing, arranging, and connecting nodes. It lets you see how the steps in a workflow relate to one another.
- Zoom controls: Zoom in to work on details, zoom out to see more of the board, or fit the whole board into view.
- Mini map: Shows the full board layout and your current view, helping you stay oriented and move around larger workflows.
- Node inspector: Shows settings for the selected node, so you can review or change its options without searching through the canvas.
- Canvas toolbar: From left to right, Undo and Redo (currently unavailable), Fit to view, Snap to grid, and Selection mode. These controls help you navigate, align nodes, and select several at once.
- Selection action bar: Shows the selected-node count and actions for organizing or changing the selection. Group related nodes to move them together, Duplicate nodes to reuse their setup, Ungroup a frame to free its nodes, or Unlink connections while keeping the nodes. Group needs at least two eligible nodes; Ungroup needs a group frame.
2. Canvas toolbar and selection action bar
The bottom toolbar contains canvas controls. When you select one or more nodes, the Selection action bar appears on its right side.
Canvas toolbar controls
- Undo / Redo: The buttons are disabled and marked as coming soon. You cannot undo or redo canvas changes yet.
- Fit to view: Adjust the zoom and position so the whole board fits in the canvas area.
- Snap to grid: Toggle snapping on to place nodes in 10-pixel increments as you drag them. Turn it off to position nodes freely.
- Selection mode: Drag across empty canvas space to select multiple nodes. Switch back to pointer mode to drag the canvas and pan. You can also click nodes to select them individually.
Selection action bar
The Selection action bar shows the selected-node count and the Group, Ungroup, Duplicate, and Unlink text buttons.
- Group: Select at least two top-level nodes and choose Group to put them in a frame. Group related steps to keep a larger workflow organized and move those nodes together. Their connections to the rest of the board remain usable.
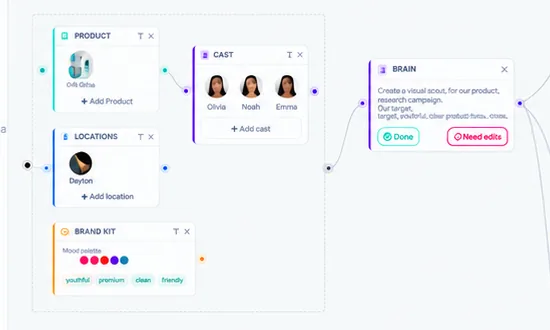
- Ungroup: Select a group frame and choose Ungroup to remove the frame while leaving its nodes on the canvas.
- Duplicate: Create a separate copy of the selected nodes. Connections are not copied, so connect the duplicates if they need their own workflow.
- Unlink: Remove connections entering or leaving the selected nodes. The nodes themselves remain on the canvas.
3. Use Canvas templates
Use a Canvas template to start from a saved arrangement of nodes instead of rebuilding it. Choose New board for a fresh canvas. Loading a template replaces the current canvas, so save any work you want to keep before switching.
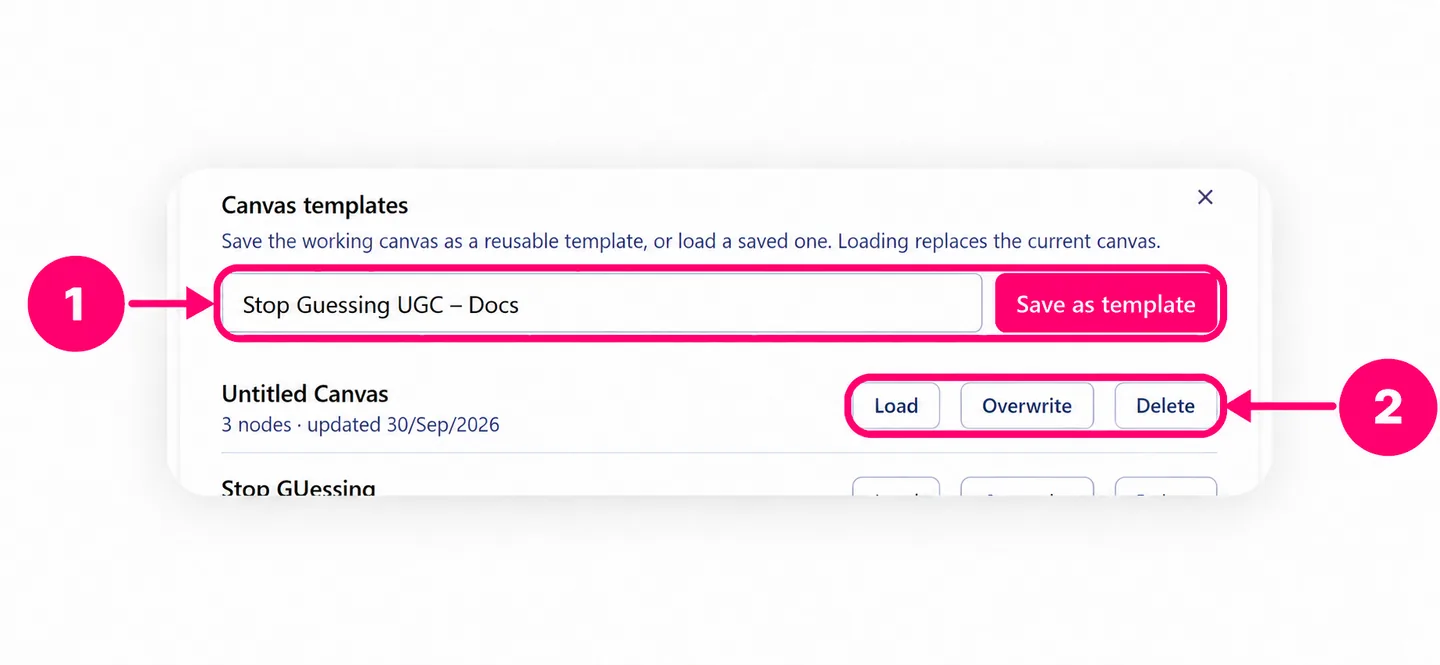
The callout numbering restarts for this image:
- Save as template: Enter a name, then select Save as template to save the current canvas for reuse.
- Saved template actions: Load replaces the current canvas with that template. Overwrite updates the saved template from the current canvas. Delete removes the saved template. Check the confirmation before replacing or deleting anything.
4. Load saved media from the browser
If you already have a saved asset, choose Load in the Media section of the board toolbar. Select an asset type: Actor, Product, Location, Clothes & Props, Music, Static Image, or Brand Kit. Then search or refresh the list. Choose the correct account first; the browser only shows assets available to that account.
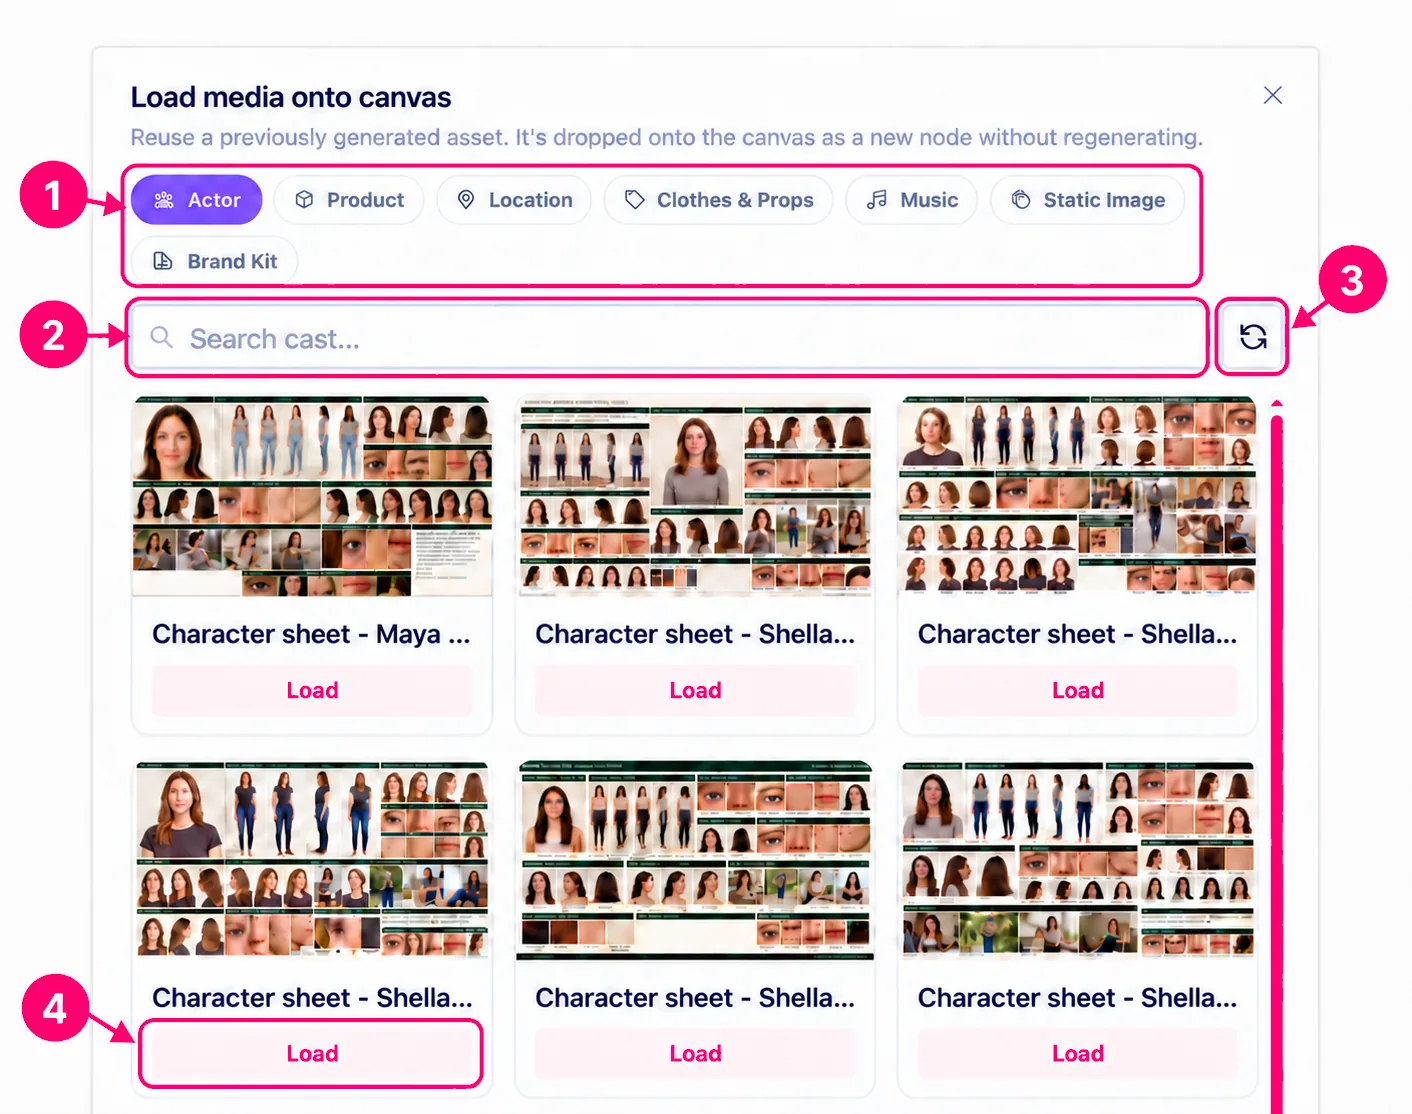
The callout numbering restarts for this image:
- Asset type tabs: Choose which saved media to browse. The list changes to match the selected type.
- Search: Filter the current type by name.
- Refresh: Reload the assets available for the selected account and type.
- Load: Add the chosen asset to the canvas as a new node. This reuses the saved asset rather than generating it again.
The asset appears as a new node of the matching type, for example, an Actor becomes a Cast node. Loading media adds to the current canvas; it does not replace the board. Open the new node to confirm you loaded the intended asset before connecting it. To add an actor to an existing Cast node, use that node’s Load actor action instead.
5. Add a node to the board
Use the node library on the left to add any node type. The Product example below shows the same drag-and-drop action used for Brand Kit, Cast, Clothes & Props, Locations, Brain, and output nodes.
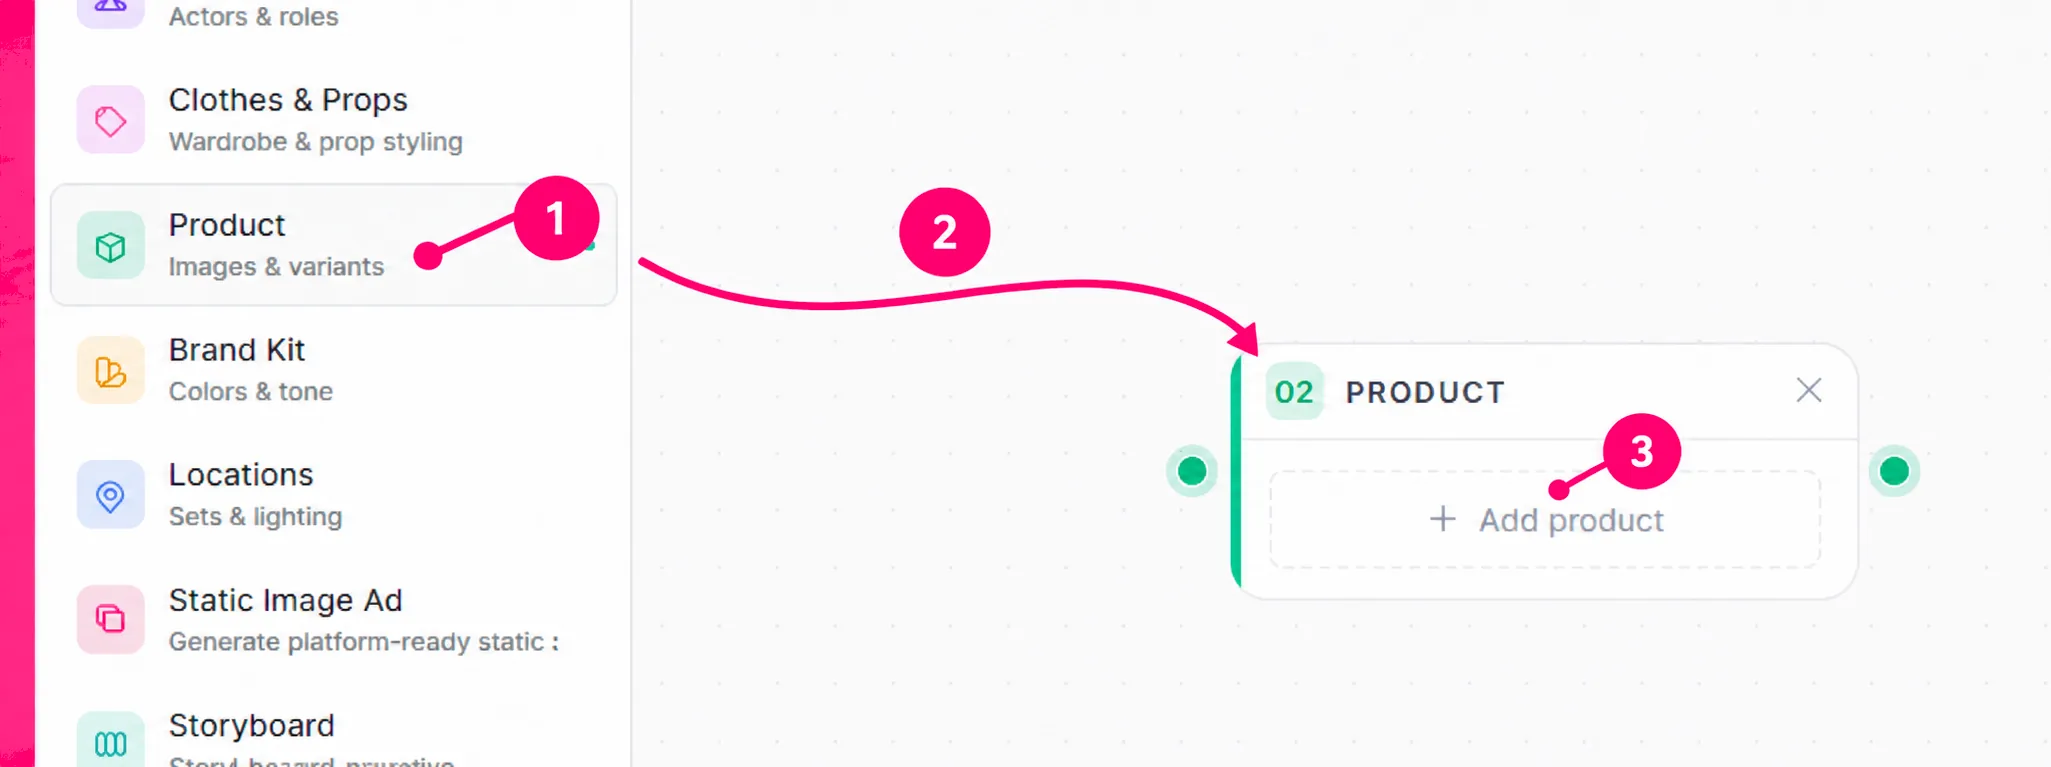
- Node library: Find the type of node you need in the left panel. This example uses Product.
- Drag onto the canvas: Drag the node type from the library and drop it where you want the new node on the board.
- Open the node: Use the action inside the new node to start its setup. In this example, + Add product opens the Product source choices. Other node types have their own controls.
For a saved asset, use the media browser instead. Continue with the guide for your chosen node to configure its content and settings.
6. Choose the next node
Choose source nodes based on what the creative needs. These guides explain how to set them up:
- Brand Kit for brand identity and style.
- Product for product imagery.
- Cast for people and roles.
- Clothes & Props for wardrobe and objects.
- Location for a setting.
For outputs, use Static Ad for a still image or Storyboard with Scenes for video. Add Brain when you want a planning step before creating an output. After connecting sources, check the receiving node’s inputs before generation.
Related reading
Import a Brand Kit from your website, review its extracted identity details and colors, then save the approved kit for other creative nodes.
Getting StartedLearn how to add a Product from a catalog, your library, a URL, or scratch, review its details, and generate a reusable product sheet.
Getting StartedCreate a reusable Cast actor, set appearance and voice metadata, render a reference sheet, and use the result in Media Studio.