 English
 Français
 Deutsch
 Español
Getting Started
Media Studio: create a Product
Learn how to add a Product from a catalog, your library, a URL, or scratch, review its details, and generate a reusable product sheet.
YieldBI TeamGrowth ResearchUpdated Oct 2026
On this page
A Product node holds product details, reference photos, and generation settings for an item you want to show in a creative. Start from a catalog, a saved library Product, a product-page URL, or build it from scratch. This guide explains the controls available at each step. The beauty products in the screenshots illustrate the interface; the same controls apply to other products.
1. Choose how to add the product
In your Product node, select + Add product to open the source choices. For board setup, follow Add a node to the board.
Choose one of the four source cards below. The controls change with your choice. Each numbered explanation matches a callout in the image; numbering restarts at 1 for each image.
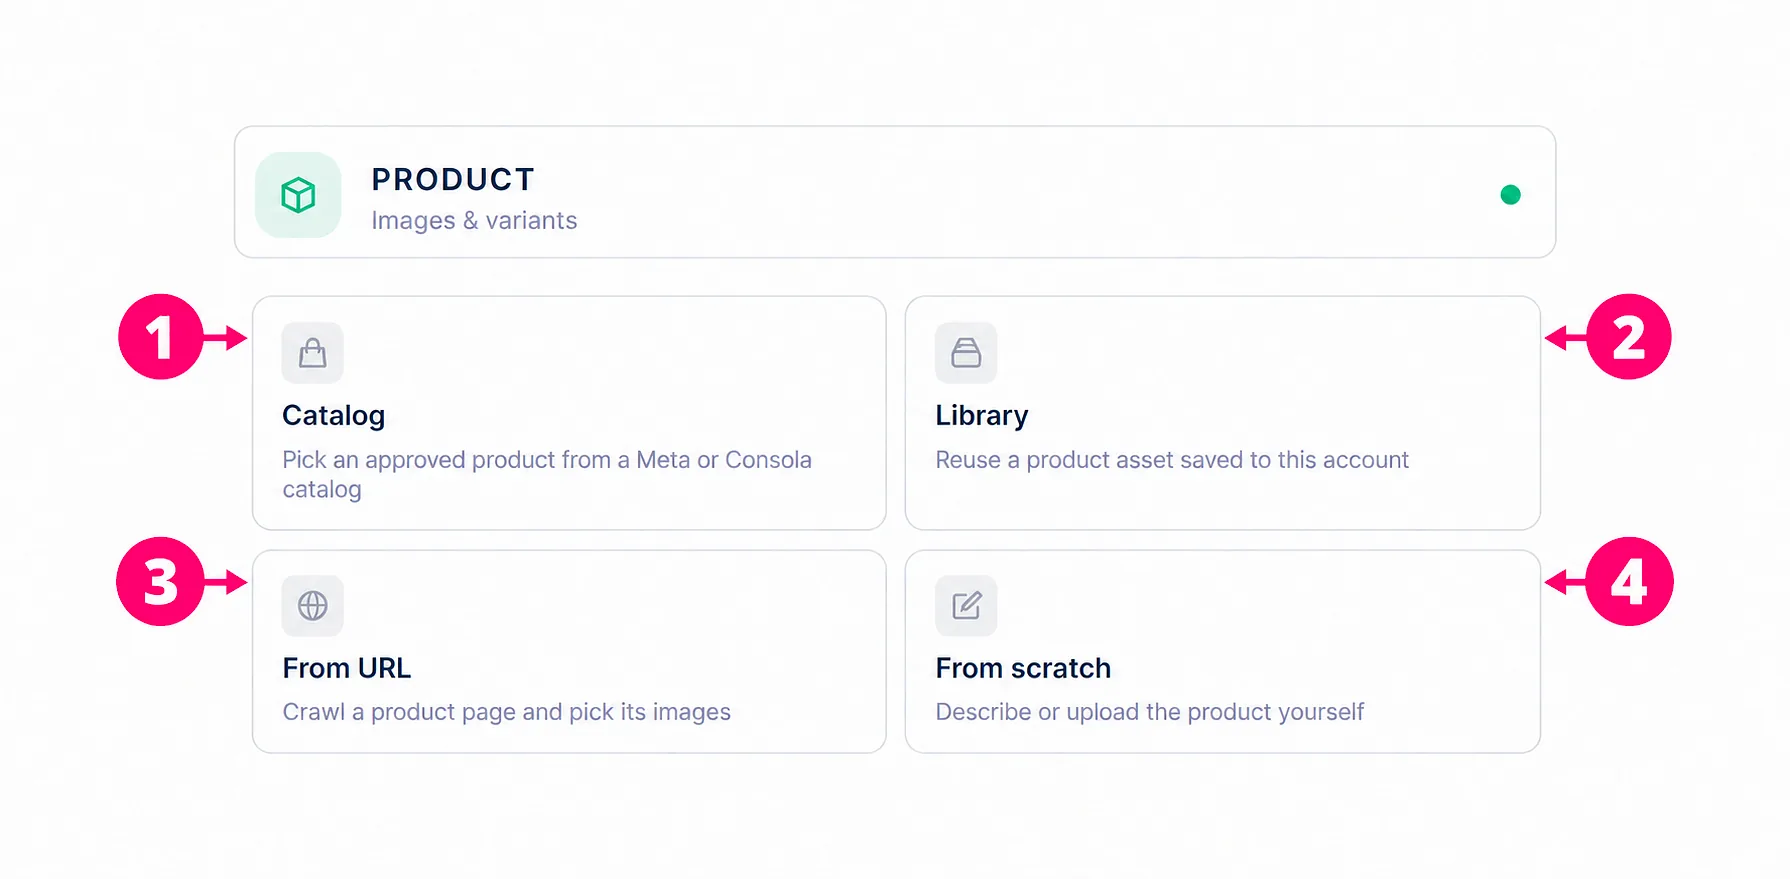
- Catalog: Select a product from a connected catalog. Follow the catalog walkthrough below to choose the item and its images.
- Library: Reuse a Product already saved to this account, including its details and images.
- From URL: Import details and images from a direct product-page URL.
- From scratch: Upload photos and enter the product details yourself, with optional AI direction.
2. Add the product
Catalog
Part 1: Select a catalog
The catalog picker lets you find a connected catalog before browsing its products.
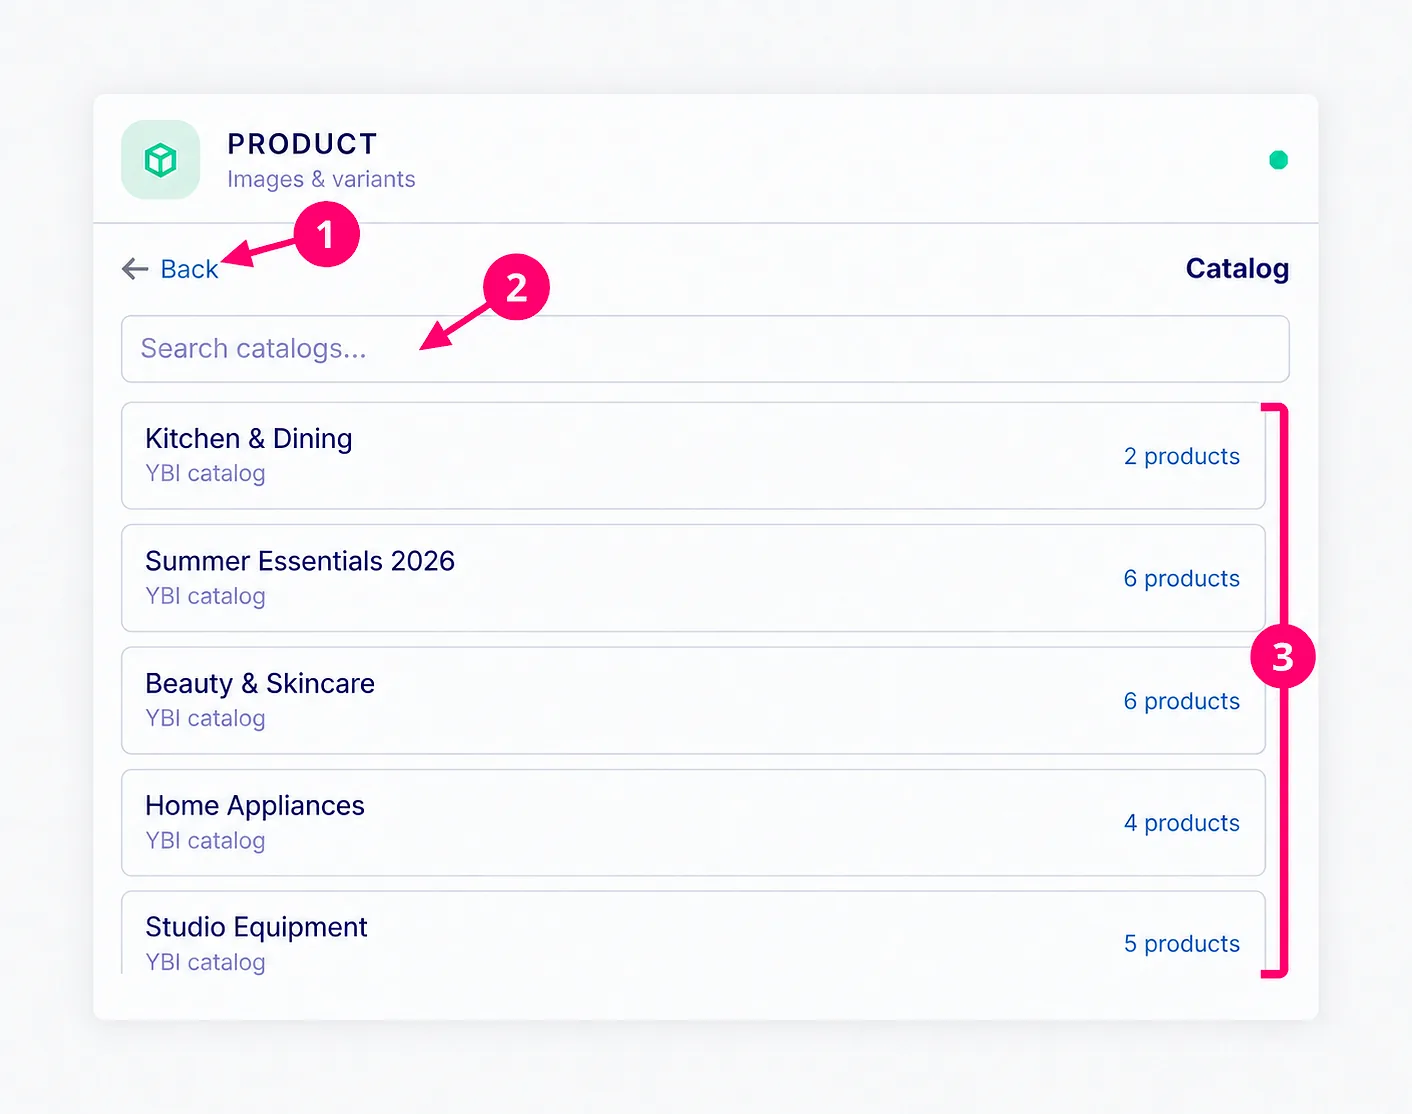
- Back: Return to the Product source cards.
- Search catalogs: Filter the list by catalog name.
- Catalog list: Select the catalog that contains the product you want.
Part 2: Select a product
The product picker shows items from the selected catalog. Use the catalog selector and search field to find the item you want.
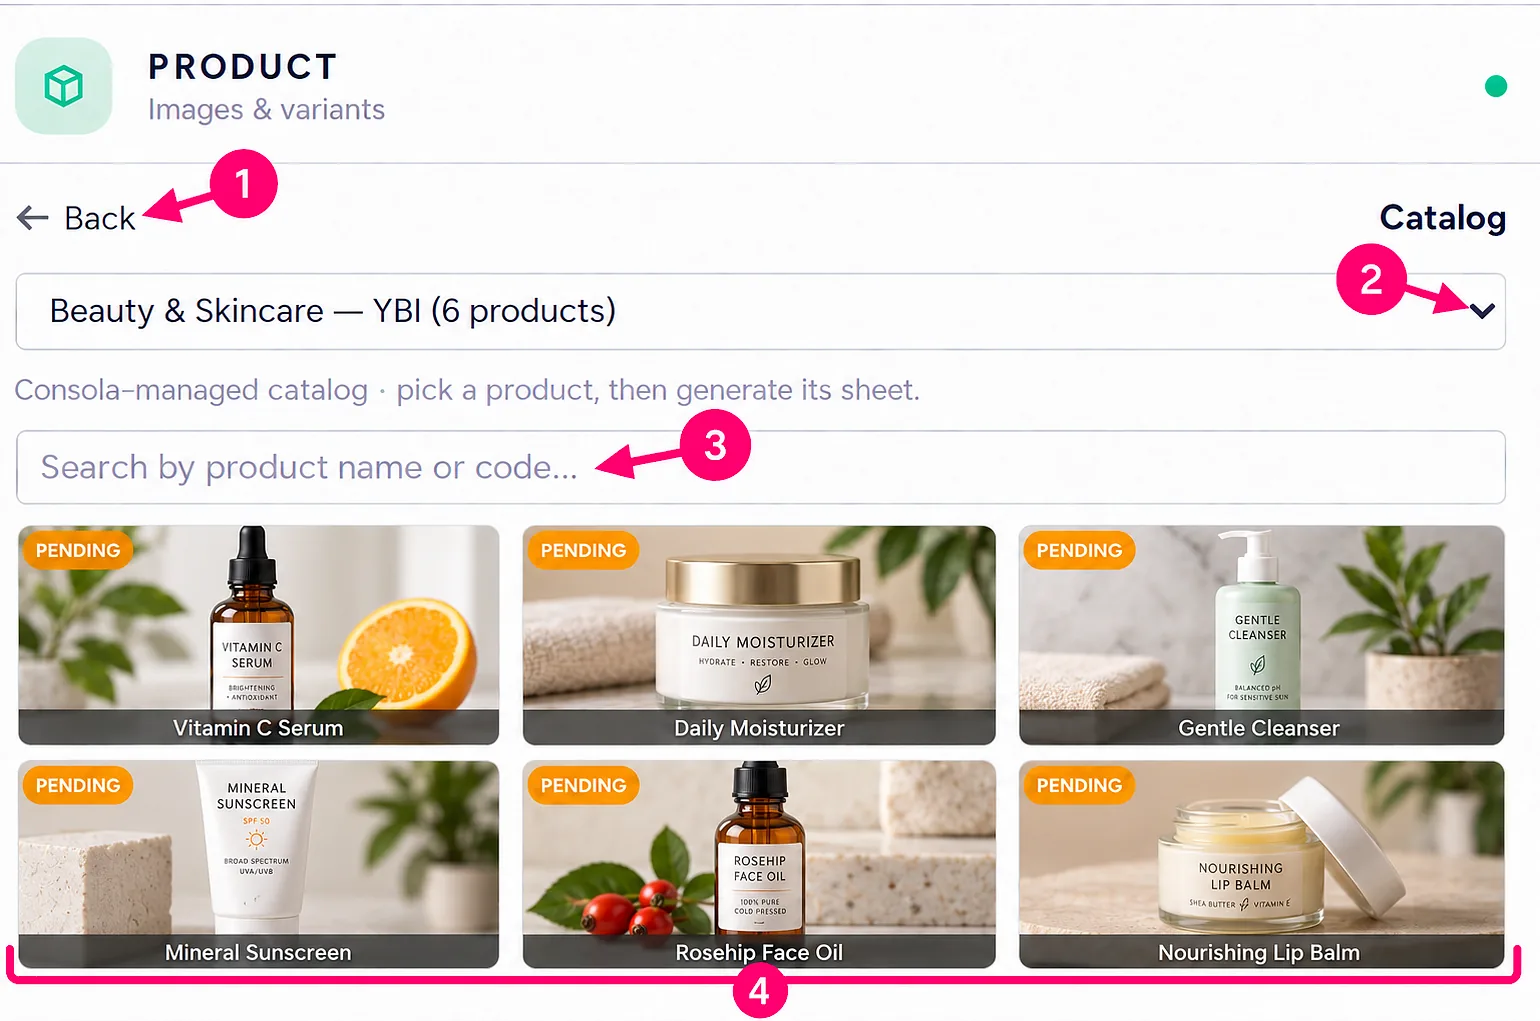
- Back: Return to the catalog list.
- Catalog selector: Switch to another catalog while staying in the product picker.
- Search products: Filter by product name or code.
- Product list: Select the product you want to add.
Part 3: Select the product images
Review the selected product’s details, then choose which catalog images to save. A product can have several images, so select each view you want to keep.
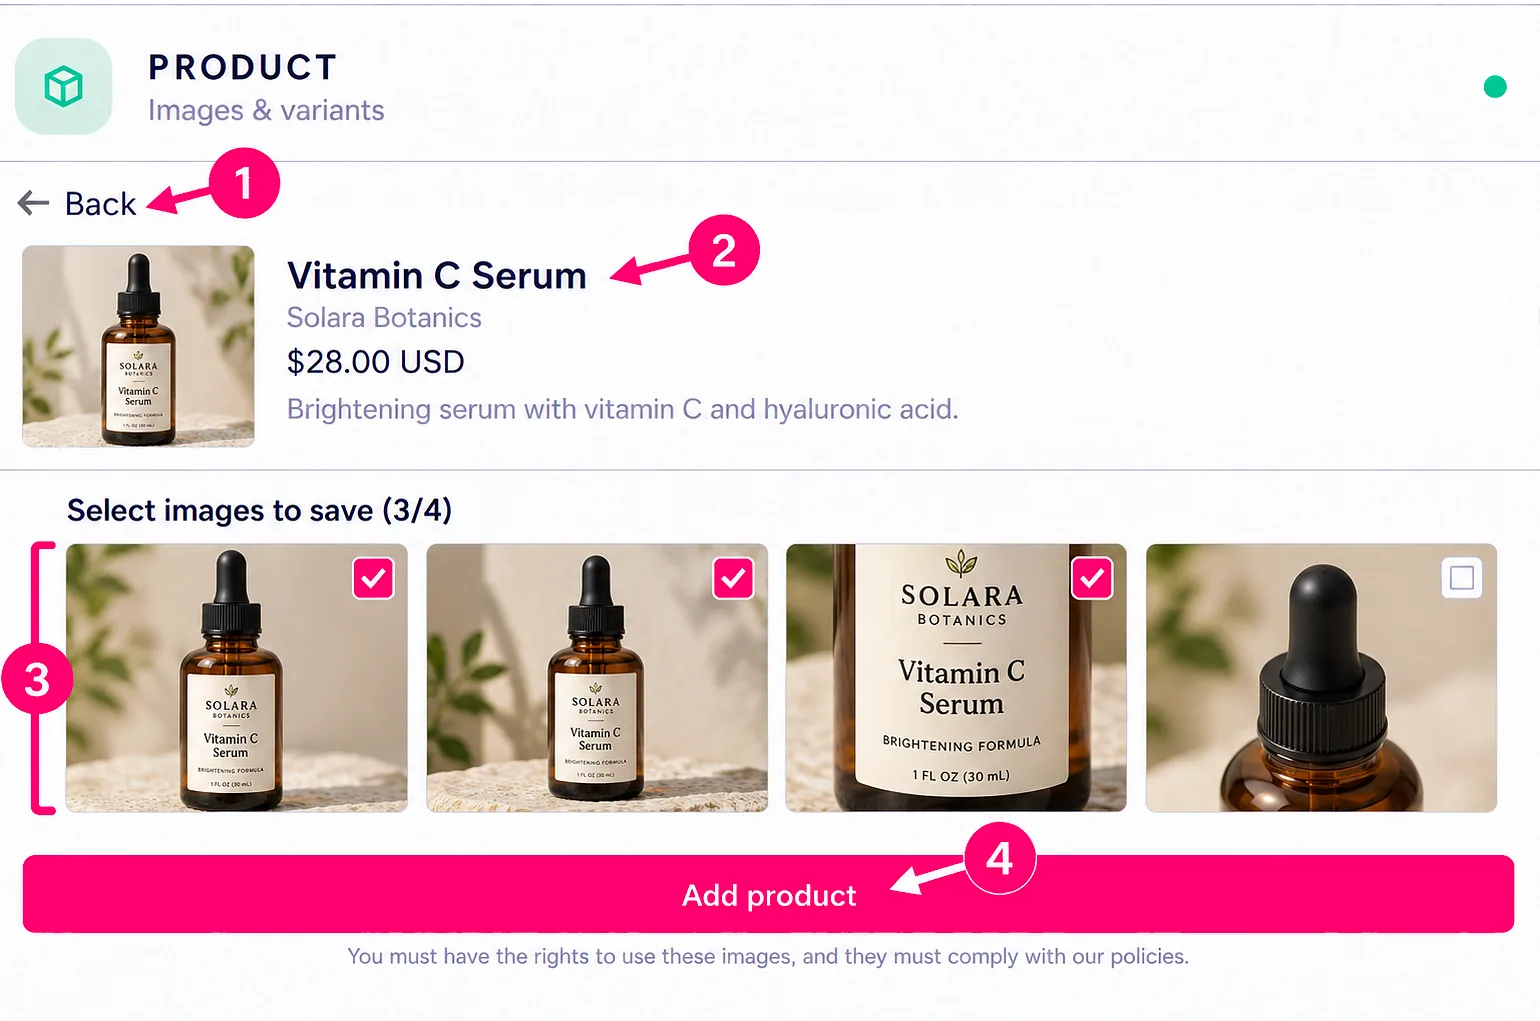
- Back: Return to the product list.
- Product details: Check that the name, brand, price, and description match the product.
- Image selection: Select one or more images to save.
- Add product: Save the product and selected images to this account’s library. By adding them, you confirm you have the rights to use the catalog images.
After choosing Add product, continue to the Product editor to review its details, references, and generation settings.
Library
Reuse a saved Product without regenerating it. Loading brings its saved details and images into the editor; generation is a separate action.
Part 1: Open the library
Choose Library from the Product source cards.
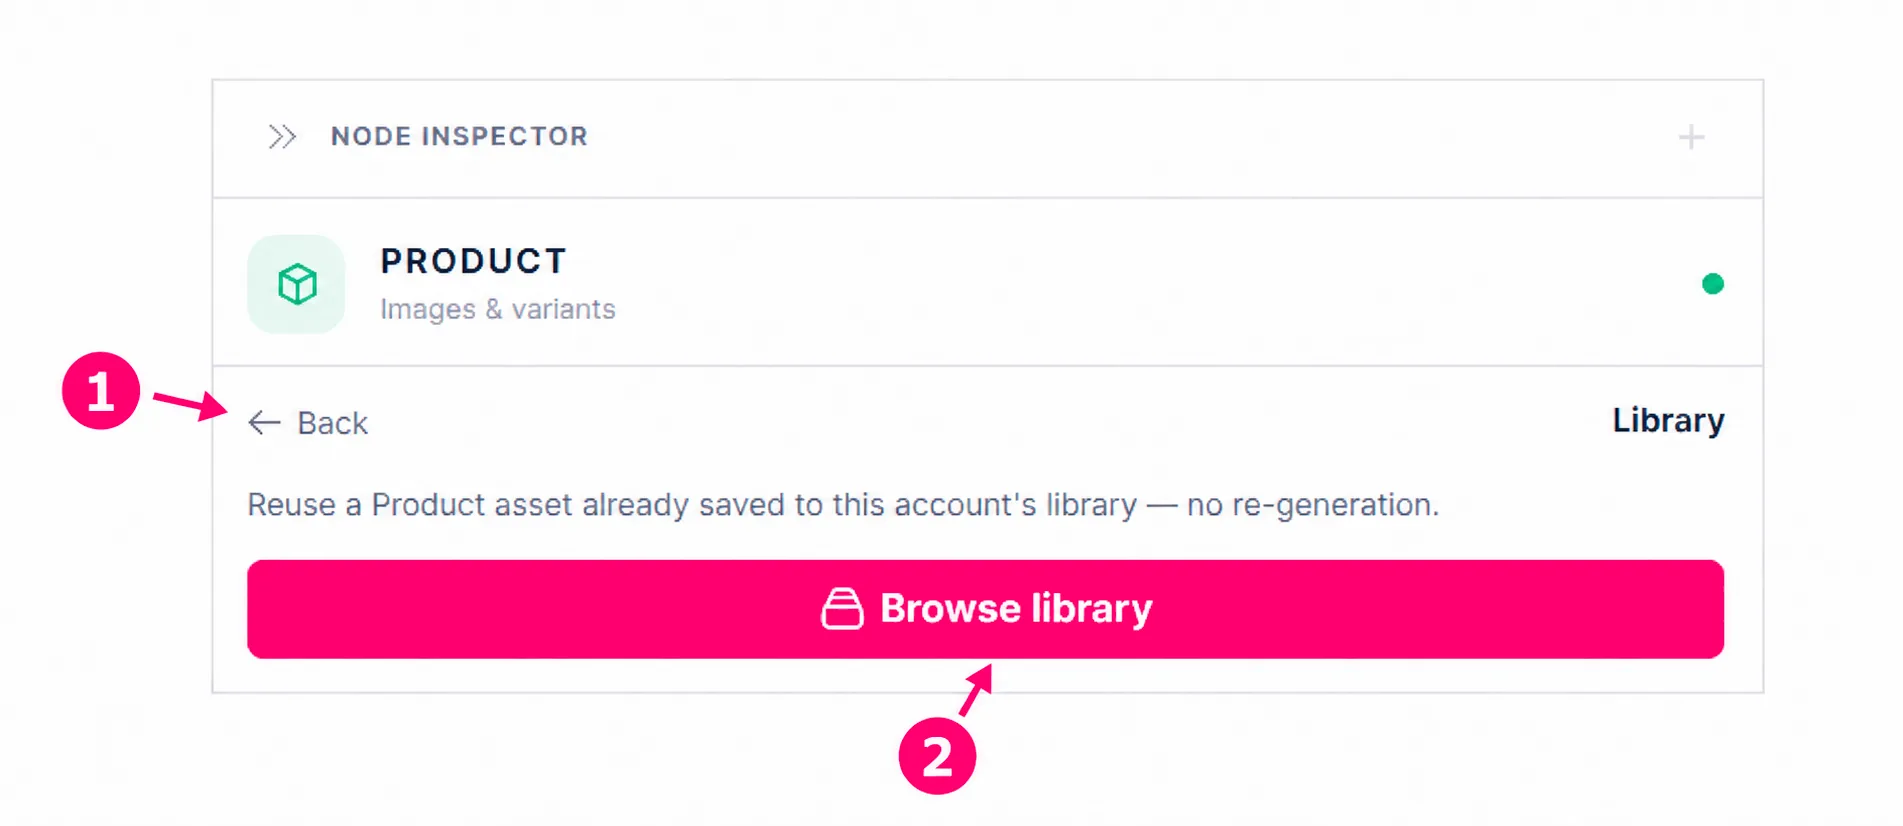
- Back: Return to the Product source cards.
- Browse library: Open the saved Product picker for this account.
Part 2: Choose a saved Product
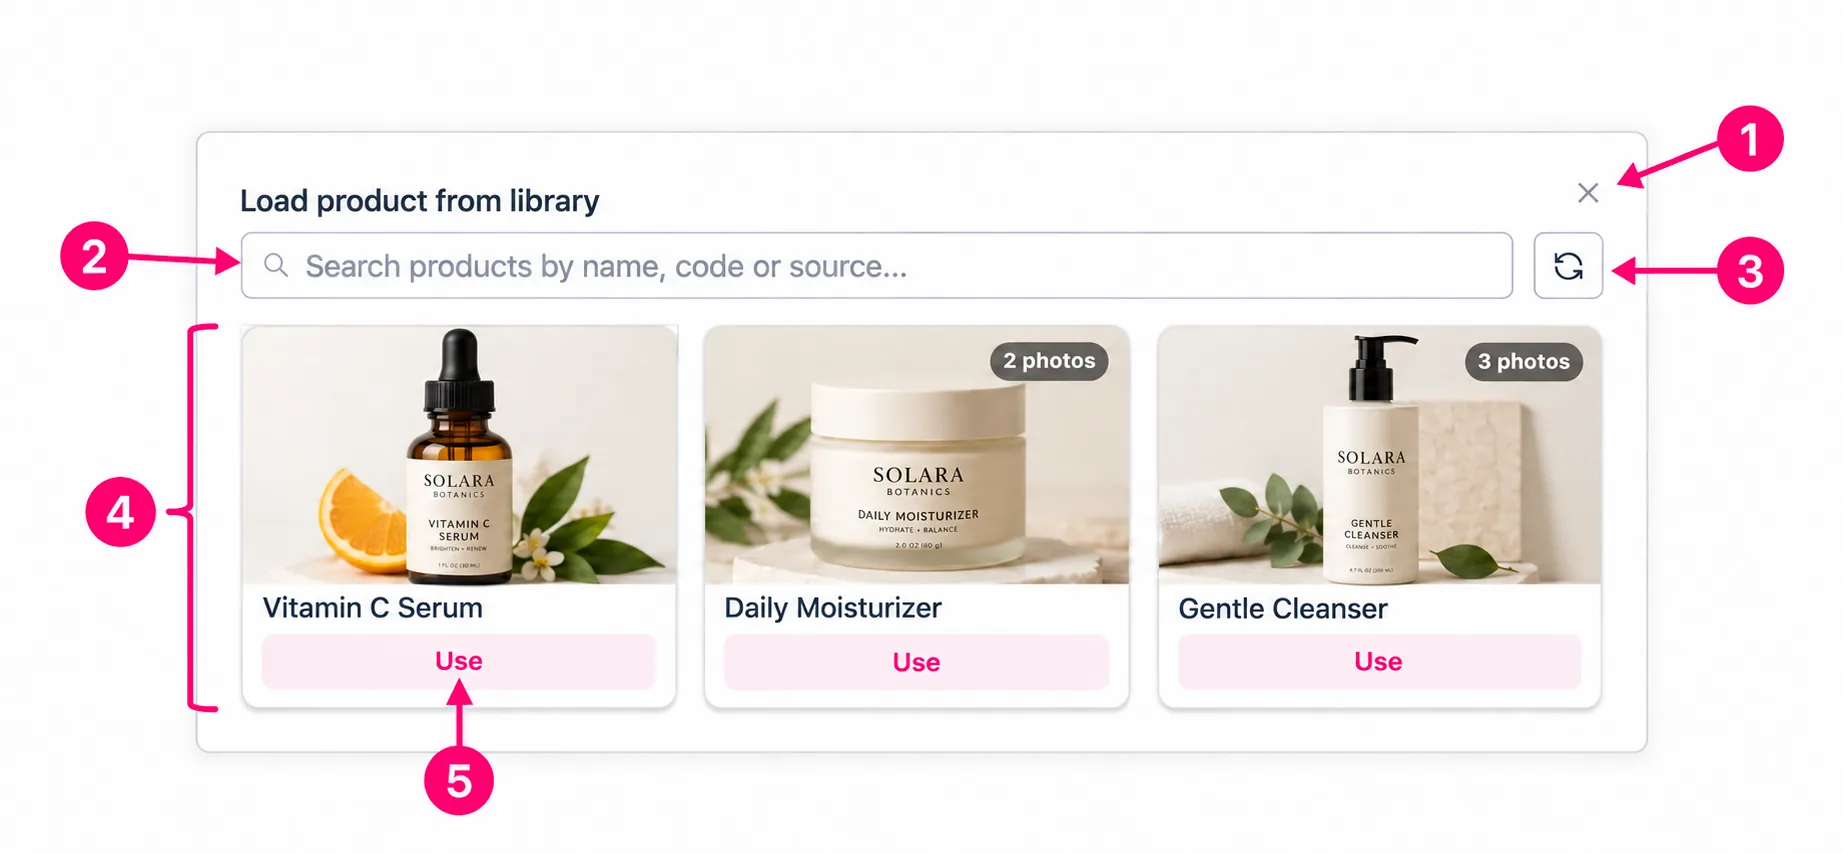
- Close: Dismiss the library picker.
- Search: Find saved Products by name, code, or source.
- Refresh: Reload the available library Products.
- Product list: Browse saved Products. Each card shows a preview and name; photo counts indicate Products with multiple images.
- Use: Load the selected Product’s saved details and images into the editor. This does not regenerate the Product.
After choosing Use, continue to the Product editor. Review or change its inputs there, and generate a new sheet only when needed.
From URL
Import a product’s details and candidate photos from its website page. Use a direct product-page URL rather than a homepage. The example URL below is a placeholder for a beauty-product page.
Part 1: Enter the product-page URL
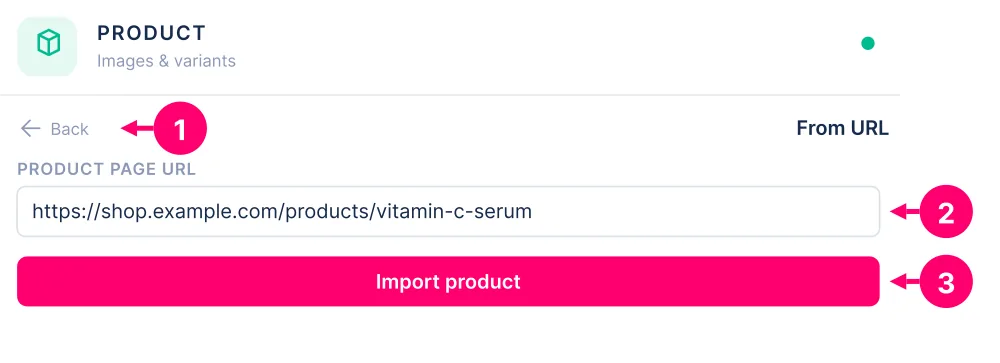
- Back: Return to the Product source cards.
- Product page URL: Paste the product’s direct page address, starting with https:// or http://.
- Import product: Start extracting product information and image candidates from the page.
Wait while the page is imported and analysed. If the import fails, review the error, check the URL, and try again.
Part 2: Review the product and choose images
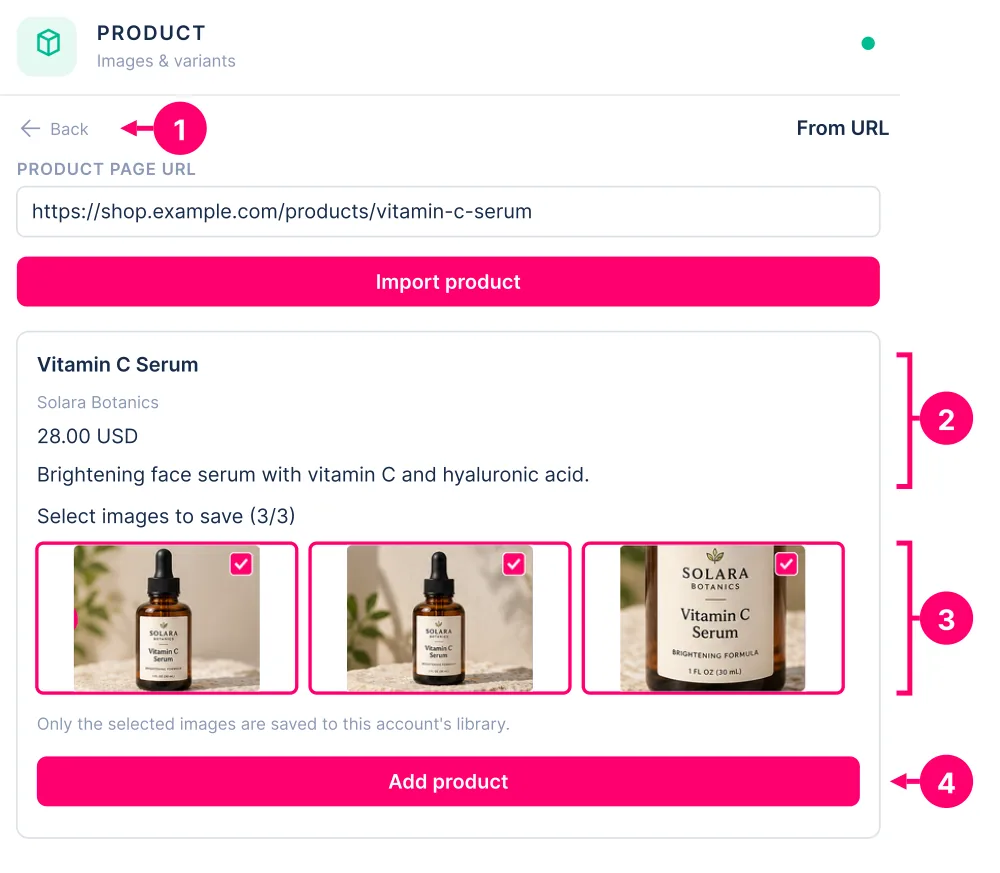
- Back: Return to the Product source cards.
- Detected details: Check the extracted name, brand, price, currency, and description. You can refine these in the Product editor after adding the item.
- Select images to save: Click a candidate to select or deselect it. Up to the first eight candidates are preselected; the counter shows how many are selected out of those found. Keep useful product views and remove unrelated images. Only selected images are saved to the account’s library. You can also add the Product with no images selected and attach photos later.
- Add product: Save the selected images and create the Product using the imported details. Importing the page does not generate a product sheet.
After choosing Add product, continue to the Product editor to review the imported information and generation settings.
From scratch
Build the Product manually instead of importing it. Add a name, upload any available photos, and enter the details you know. The serum below is an example; the fields work the same way for other products.
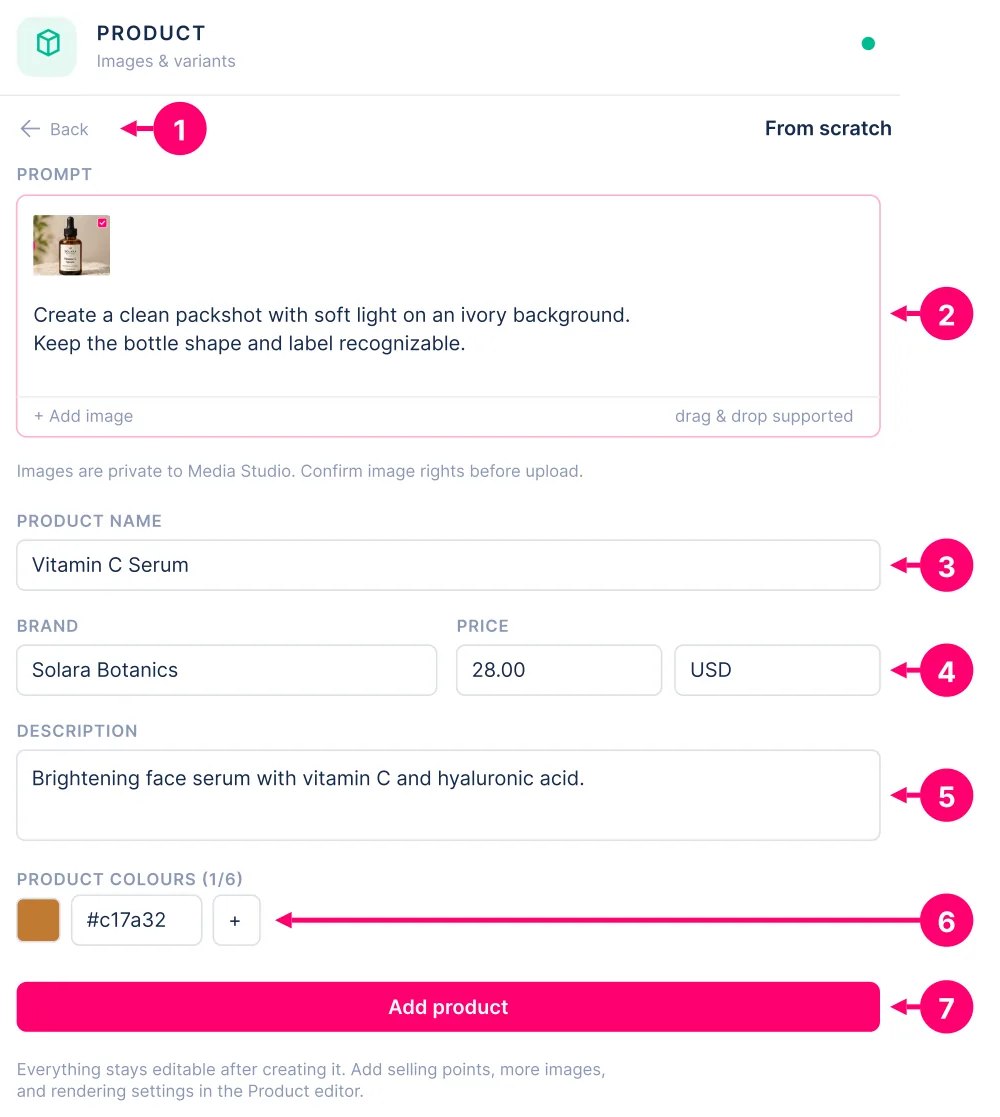
- Back: Return to the Product source cards.
- Prompt and photos: Enter optional AI direction, such as the view or background you want. Choose Add image or drag photos into the area to upload references. Confirm that you have the rights to use uploaded images.
- Product name: Enter a name. This is required to enable Add product.
- Brand, price, and currency: Enter the information you know. These fields are optional; currency uses a three-letter code such as USD.
- Description: Describe the product’s features and physical details. This is separate from the prompt’s generation instructions.
- Product colours: Add up to six physical product or packaging colours. Use + to add another swatch.
- Add product: Create the Product from your entries and uploaded references. This does not generate a sheet. A name is sufficient to create it; photos and other details can be added later.
Continue to the Product editor to refine the details, add selling points or more images, and choose rendering settings. Everything remains editable after creation.
3. Product editor
Open the product editor to review imported information, add references, and control generation. Products added from a catalog, the library, or a URL can start with populated fields; review and refine them as needed. Callout numbers restart at 1 in each image.
Part 1: Product name, photos, and prompt
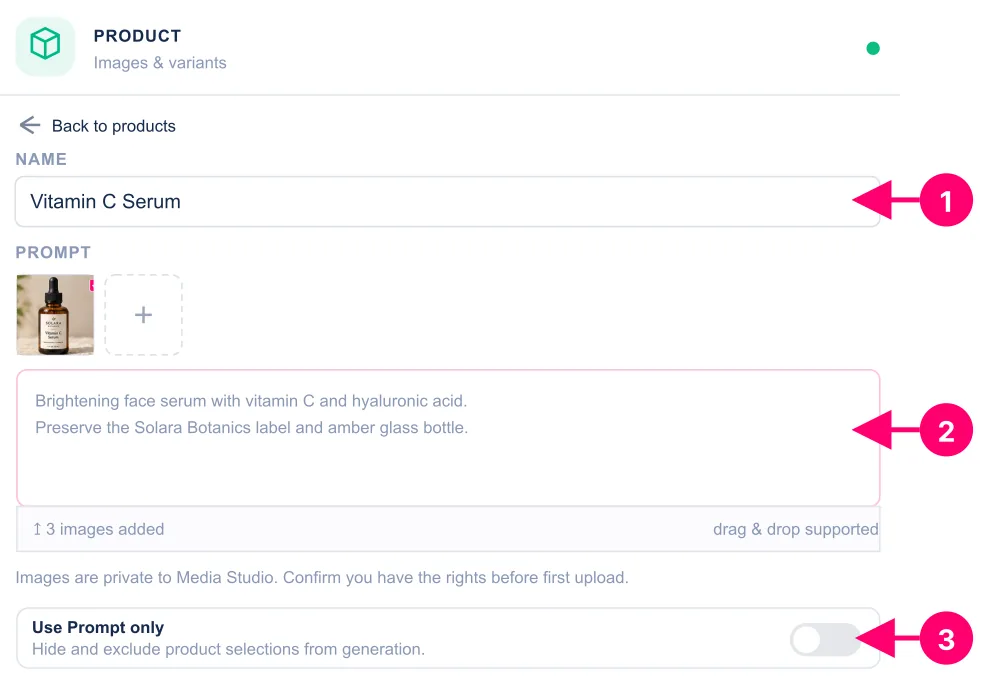
- Name: Give the Product a recognizable name so you can identify it on the board and in the library. Review an imported name or enter your own.
- Prompt and photos: Describe what generation should produce, including the view, composition, setting, and details to preserve. Use the + control or drag and drop to add reference photos. The prompt supplies direction; the photos provide visual references for appearance and packaging.
- Use Prompt only: Enable this to hide and exclude product selections from generation. Leave it off to use those selections with your prompt. Switching modes preserves the item’s prompt, settings, references, connections, and rendered versions.
Part 2: Details, colours, and product images
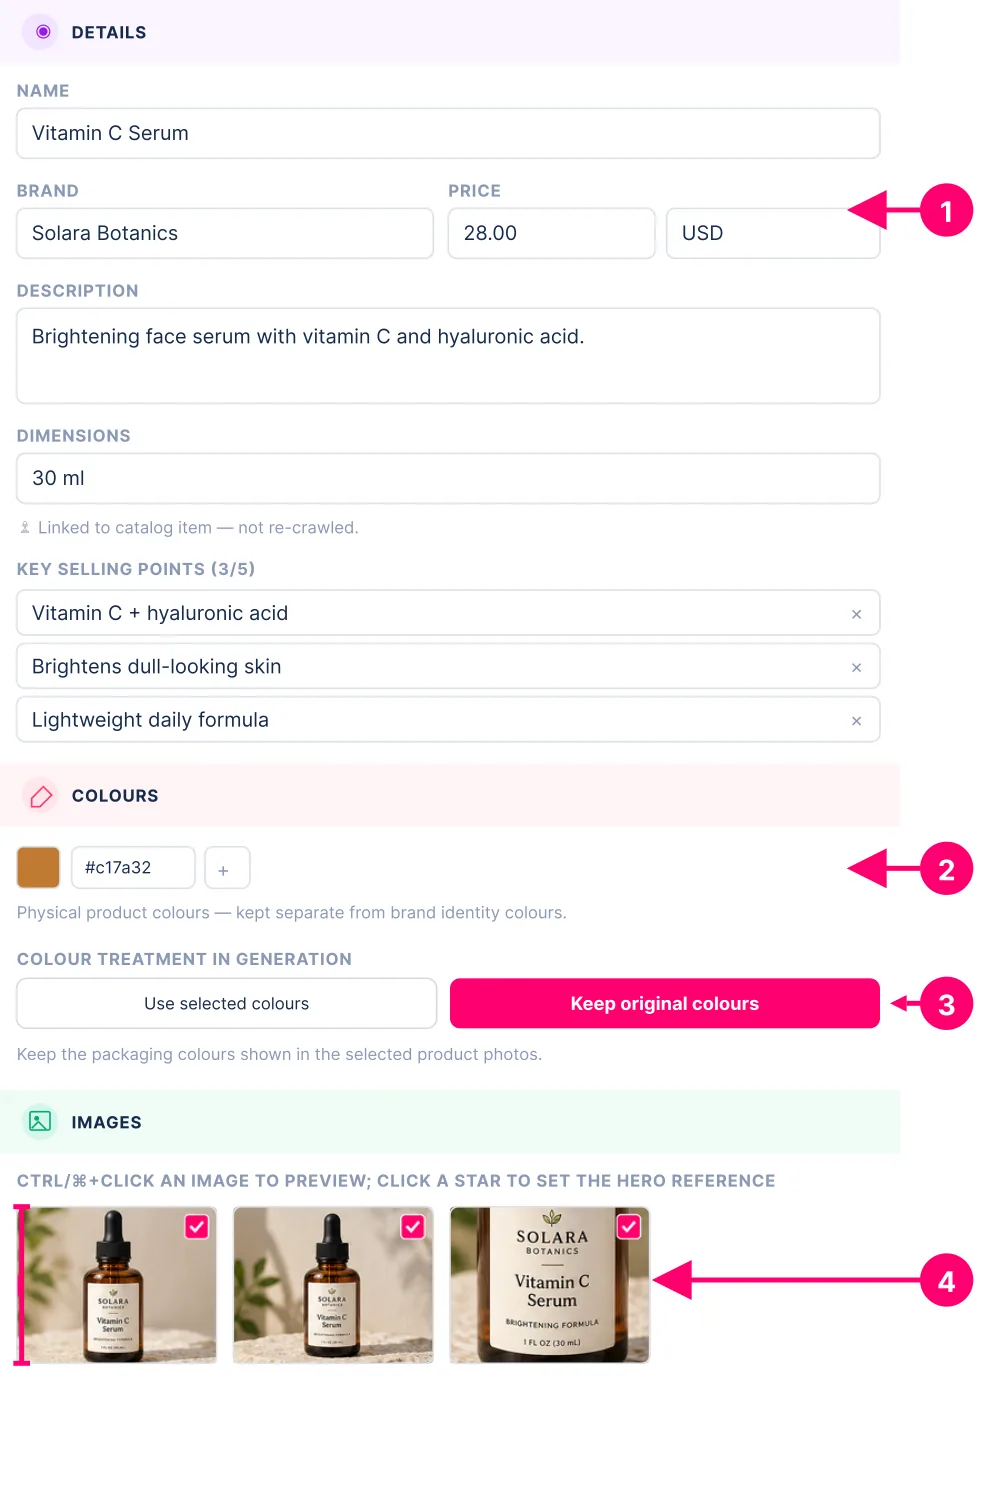
- Details: Supply the structured information that describes the product. Name and Brand identify it; Price and Currency record its price; Description explains its features; Dimensions describe its physical size. Add up to five Key selling points using the + button, and remove points you no longer need. A catalog-linked item is marked as linked and is not re-crawled.
- Product colours: Add physical product or packaging colours using the swatch and colour value. Use + to add another colour. These colours are separate from the brand identity palette in a Brand Kit.
- Colour treatment: This controls the colour instructions used when generating or refreshing the product sheet. Use selected colours asks the AI to use the swatches in the Colours section on the physical product; add the colours you want first. With no swatches, this mode adds no product-colour instruction. Keep original colours asks the AI to preserve the physical colours in the supplied product reference photos and explicitly tells it not to recolour the product from palette swatches. Use this when the photographed product’s colours should stay unchanged. Neither option edits the uploaded photos or an existing sheet; generate or refresh the sheet to use the new setting. Brand Kit identity colours remain separate from physical product colours.
- Images: Review the attached reference photos. Multiple views can show different sides, packaging, or details. Click a star to set the hero reference. Ctrl-click (Windows) or Command-click (Mac) previews an image.
Part 3: Linked inputs and rendering
-
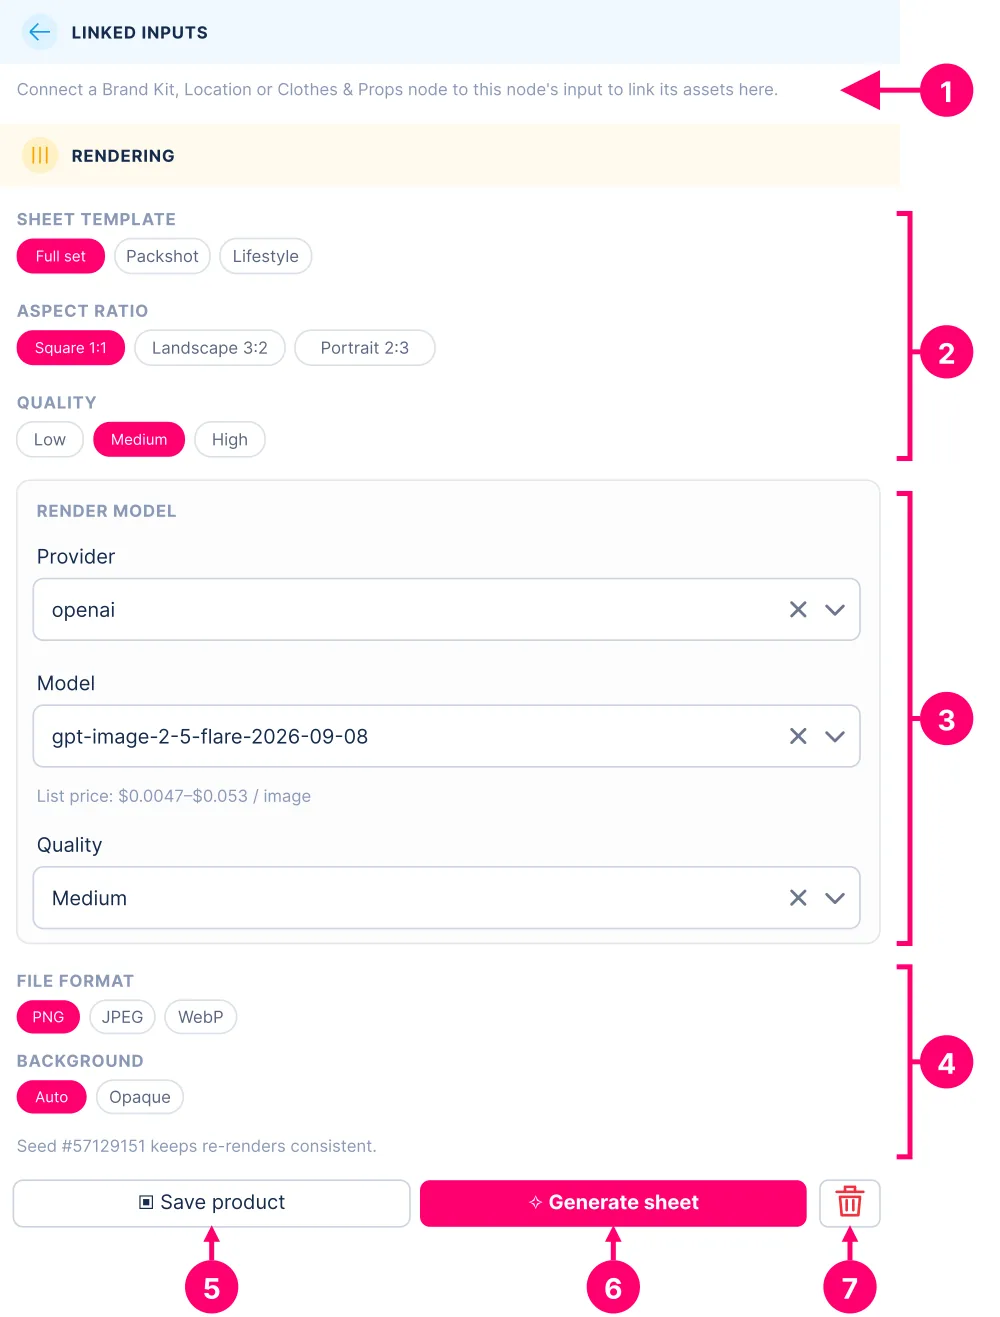
Linked inputs: Connect a Brand Kit, Location, or Clothes & Props node to this node’s input to make its assets available here. Use these connections to supply brand guidance, a setting, or supporting visual references.
-
Sheet and image settings: Sheet template controls the kinds of views generated: Full set includes packshots, detail views, lifestyle views, a specification panel, and colourways; Packshot focuses on front, back, and close-up detail views; Lifestyle provides an in-context hero with a clean packshot reference. Aspect ratio selects Square 1:1, Landscape 3:2, or Portrait 2:3. Quality selects Low, Medium, or High.
-
Render model: Select a Provider, then an available Model. Review its Quality setting and displayed list price per image. The provider and model shown in the screenshot are an example, not required selections. Choose a provider and model before generating a sheet.
-
Output settings: Select PNG, JPEG, or WebP as the file format. PNG preserves detail for further editing; JPEG and WebP use lossy compression. For Background, Auto lets the model choose from the prompt, while Opaque requests a solid background. The displayed seed helps keep repeated renders consistent.
-
Save product: Save reviewed details and images. Saving a Product requires at least one uploaded or imported image.
-
Generate sheet / Refresh sheet: Generate a visual reference sheet from the current inputs and rendering settings. After a sheet exists, the button becomes Refresh sheet to regenerate it.
-
Delete: Use the trash-can button to remove this Product from the board.
Before using the product elsewhere, check the package, label, size, colours, claims, and price against the item you actually sell.
4. Review the generated product sheet
After generation, review the sheet before using it as a reference for other nodes. The mock below illustrates a generated beauty-product sheet. Inspect packaging, logos, claims, colours, and physical details against your source photos.
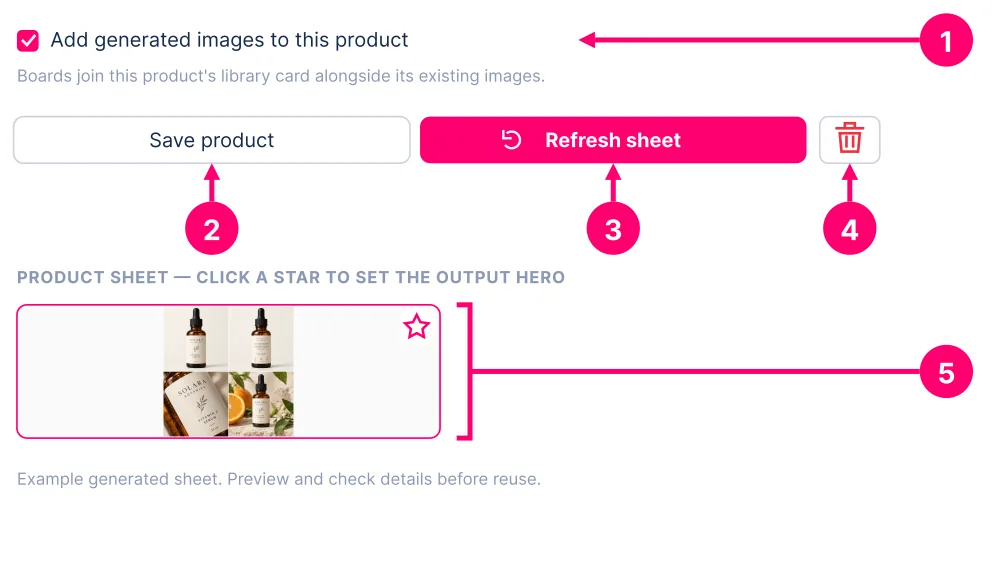
- Add generated images to this product: When enabled, generated boards join this Product’s library card alongside its existing images. When disabled, they are saved as a separate Product entry. This option appears after a sheet exists for Catalog, URL, or Upload sources; it needs a product name or source URL to group the images.
- Save product: Save the reviewed product details and images.
- Refresh sheet: Generate again using the current inputs and rendering settings. Review the new result after changing the prompt, references, or settings.
- Delete: Remove this Product from the board.
- Generated sheets and output hero: Ctrl-click (Windows) or Command-click (Mac) to preview a generated image. Click its star to choose the output hero. This selects a generated output, separately from the hero reference photo in the editor’s Images section.
Optional: Create a hero image
To use a specific area of a sheet as the Product’s hero image, open its preview with Ctrl-click (Windows) or Command-click (Mac), then choose Select hero image. If several images are available, choose the image you want in the preview’s thumbnail strip first.
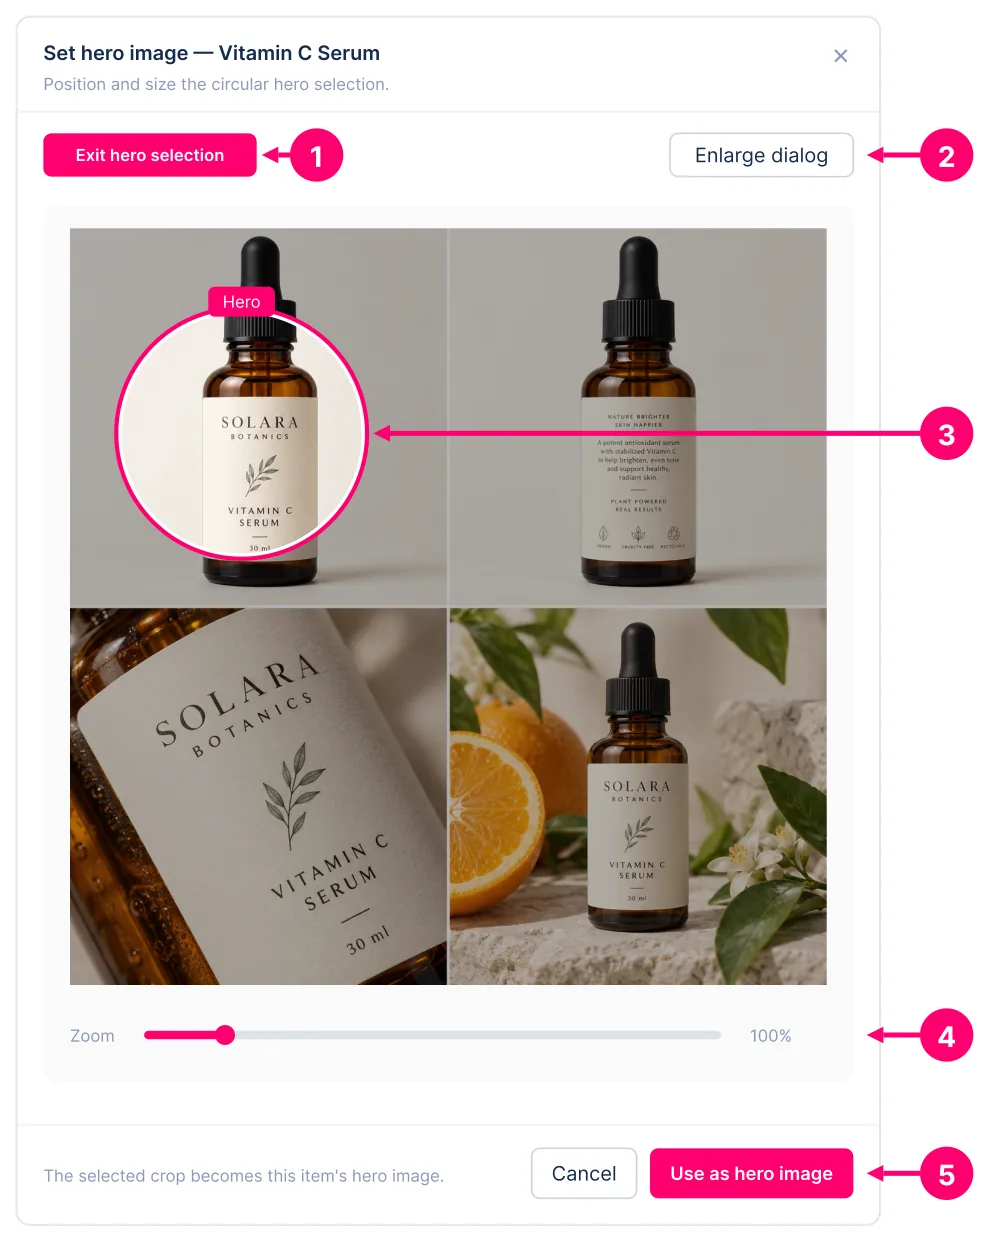
- Hero selection: Enter selection mode with Select hero image. While it is active, the button reads Exit hero selection; use it to return to normal preview mode.
- Enlarge dialog: Expand the preview for easier positioning. Choose Compact view to reduce it again.
- Circular selection: Drag the circle onto the part of the image you want to use. The highlighted area becomes the hero crop; the surrounding dimmed area is excluded.
- Zoom: Adjust the slider or use the mouse wheel over the selection to change the crop size. Arrow keys move the selection; plus and minus keys adjust zoom.
- Use as hero image: Apply the crop and close the dialog. This sets the selected image and its circular crop as this Product’s hero image without generating a new sheet. Cancel closes the dialog without applying the new selection.
Revise the inputs or refresh the sheet if the item is represented incorrectly. Connect the reviewed Product to a Static Ad or Storyboard when it should appear there, and confirm that the receiving node selects the intended product version.
Related reading
Learn the Media Studio canvas controls, start or reuse a board, load saved media, and choose the right node for your next creative step.
Getting StartedImport a Brand Kit from your website, review its extracted identity details and colors, then save the approved kit for other creative nodes.
Getting StartedCompose a static ad from selected references, review the draft, approve it, download it, or send its image to Asset Manager.